HOW TO MAKE A WOOCOMMERCE SHOP PAGE USING WOOCOMMERCE TEMPLATES FROM TEMPLATELY 3

How To Make A WooCommerce Shop Page Using WooCommerce Templates From Templately?

With WooCommerce templates from Templately, you can create stunning WooCommerce shop pages, product pages, and much more for your WordPress eCommerce website with ease. 

Note: To do this, you first need to set up your WooCommerce store. Afterward, you can create your shop page in Elementor using the ready WooCommerce template packs from Templately.

Check out the complete, step-by-step guideline below on how to create a WooCommerce shop page using WooCommerce templates from Templately.

How To Create A Shop Page With WooCommerce Templates?

After setting up your WooCommerce store, you need to install & activate the Essential Addons For Elementor plugin on your WordPress website. This is because some of the WooCommerce shop page templates in Templately are made with the Woo Product Grid, Woo Product Collection, and other WooCommerce elements from Essential Addons – the most popular addon for Elementor with over 1 million happy users

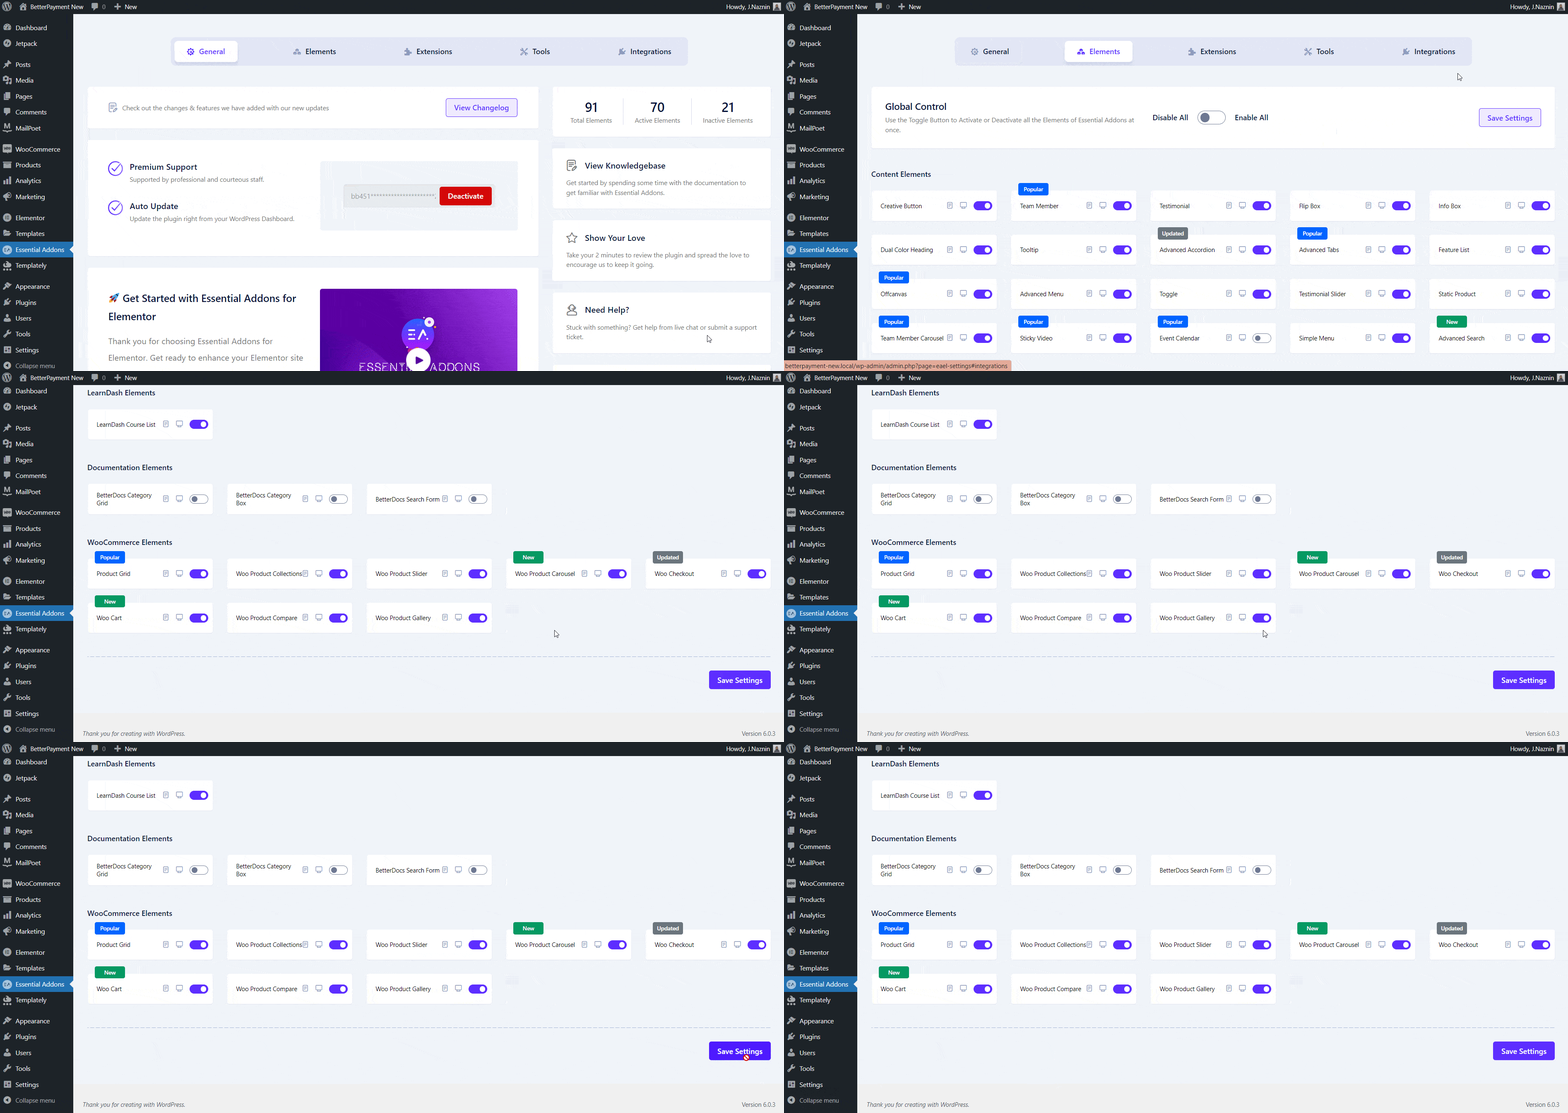
To activate these WooCommerce elements from Essential Addons, first, install the Essential Addons WordPress plugin on your website and then, navigate to the Essential Addons → Elements page. Then, scroll down to the WooCommerce Elements section and toggle to enable the required widgets. Finally, click on ‘Save Changes’.
WooCommerce Shop Page

How To Create WooCommerce Shop Pages With Templately?

You can insert any ready WooCommerce templates from Templately and customize them using following the simple and easy steps below:

Step 1: Insert A WooCommerce Template From Templately

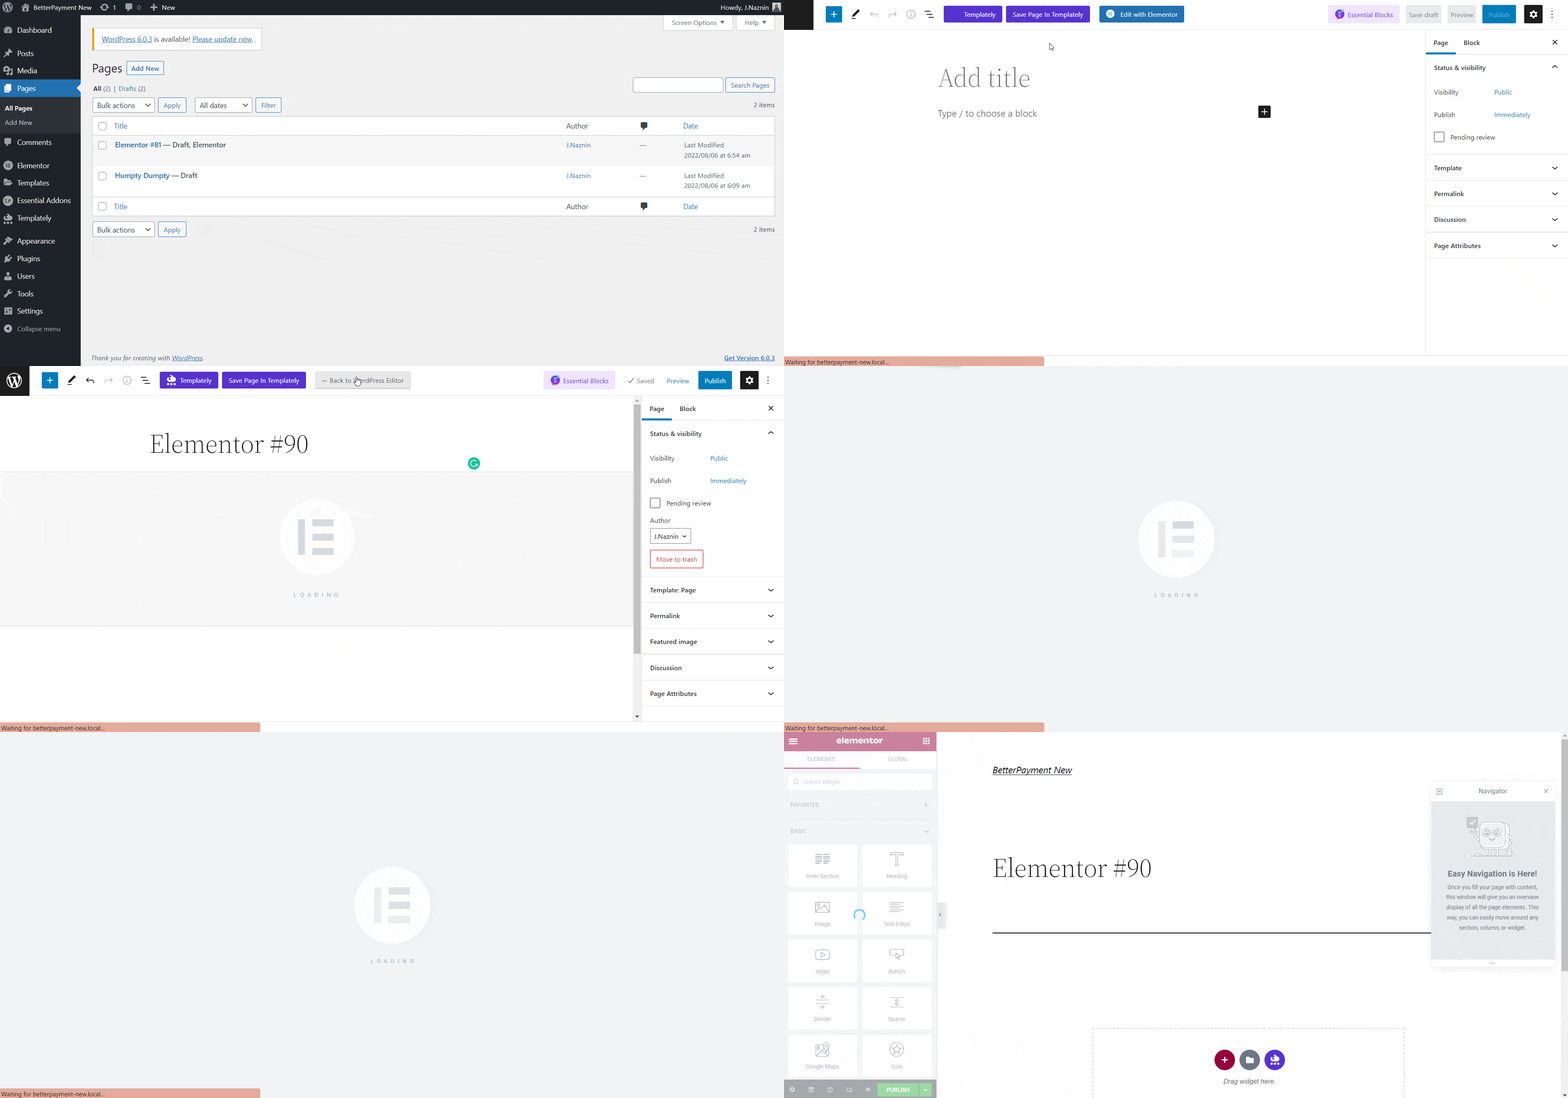
First, from your WordPress dashboard, navigate to ‘Page’ → ‘Add New’ → ‘Edit With Elementor’. After opening the page in Elementor you can insert any of the WooCommerce templates of your choice.
WooCommerce Shop Page

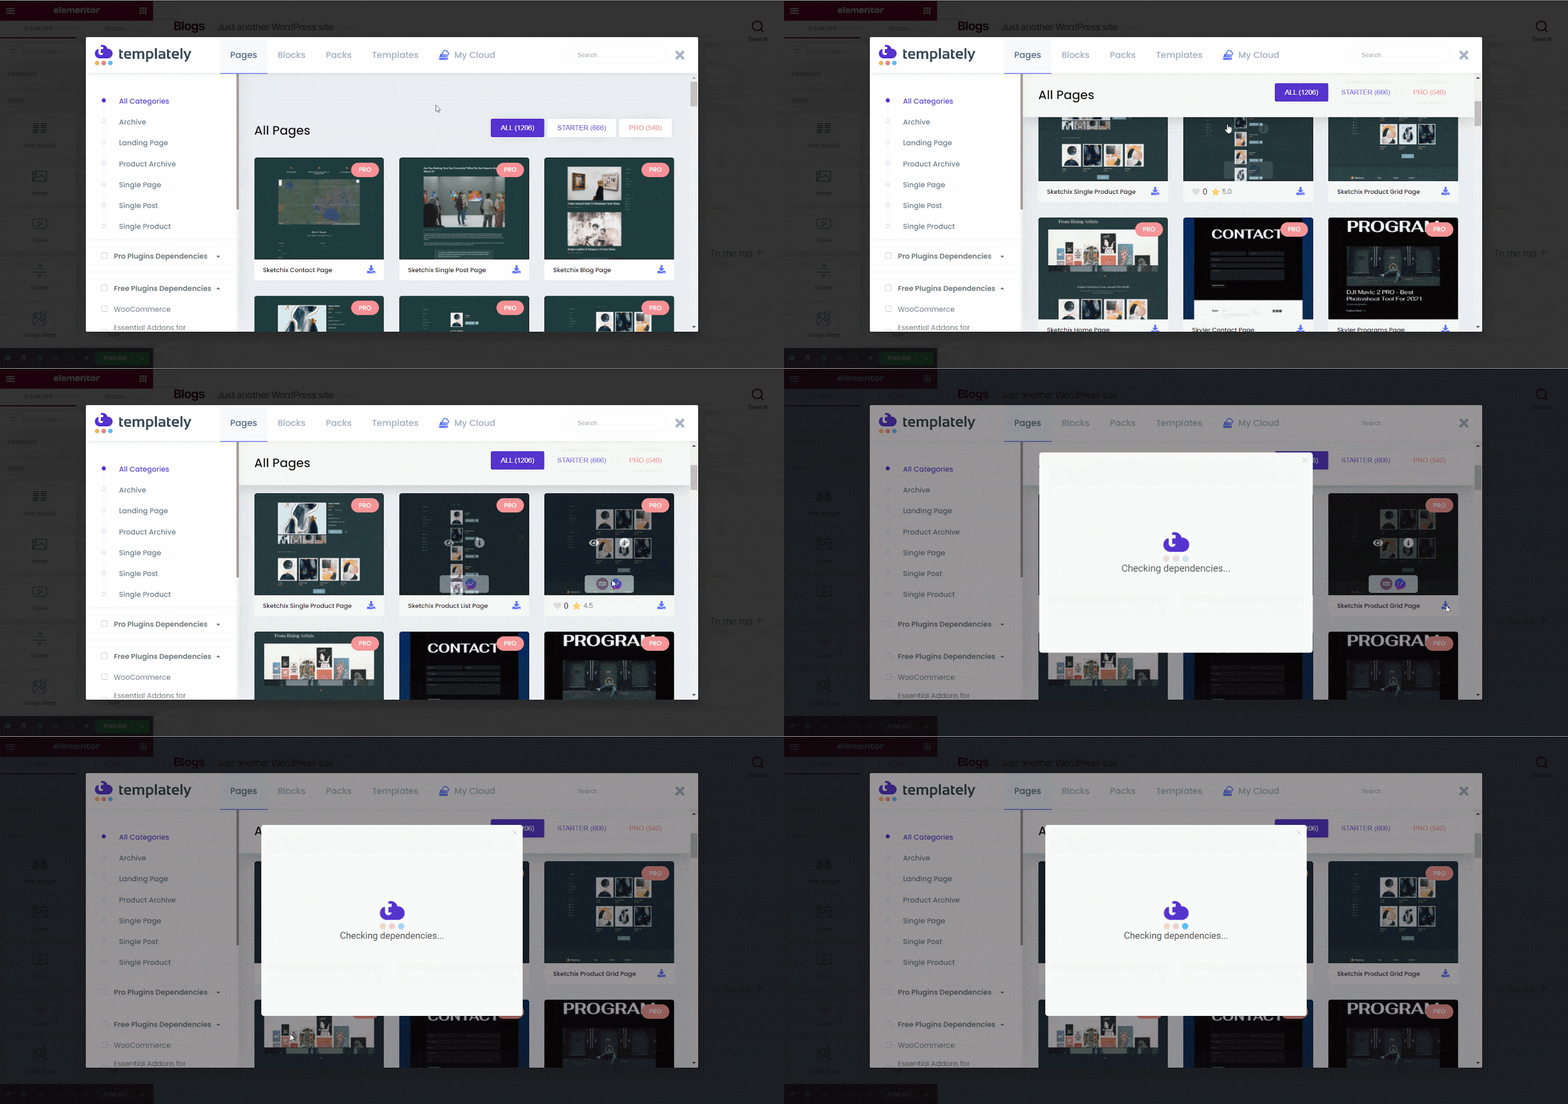
Click on the ‘Templately Blue’ icon and search for any WooCommerce templates from the Templately template library. Check the dependencies to see which plugins are required for using the template. 

For this tutorial, we will be using the Sketchix Product Grid Page‘. Simply click on the ‘Insert’ button to add the template to your website. 
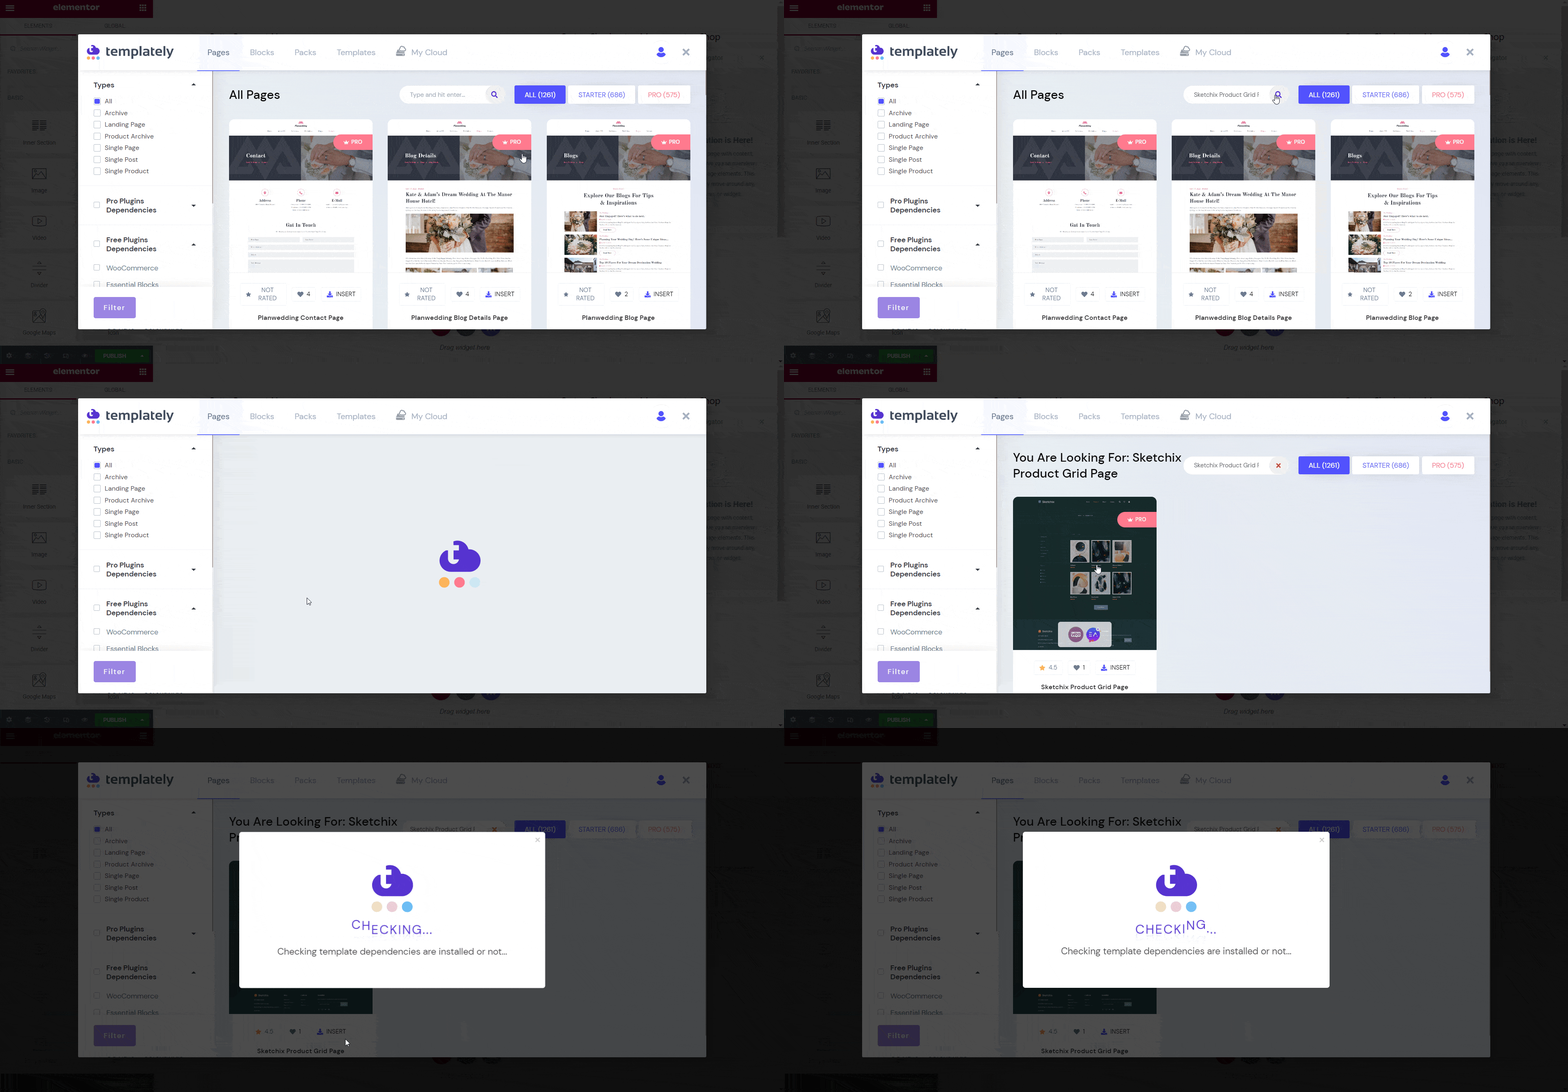
WooCommerce Shop page

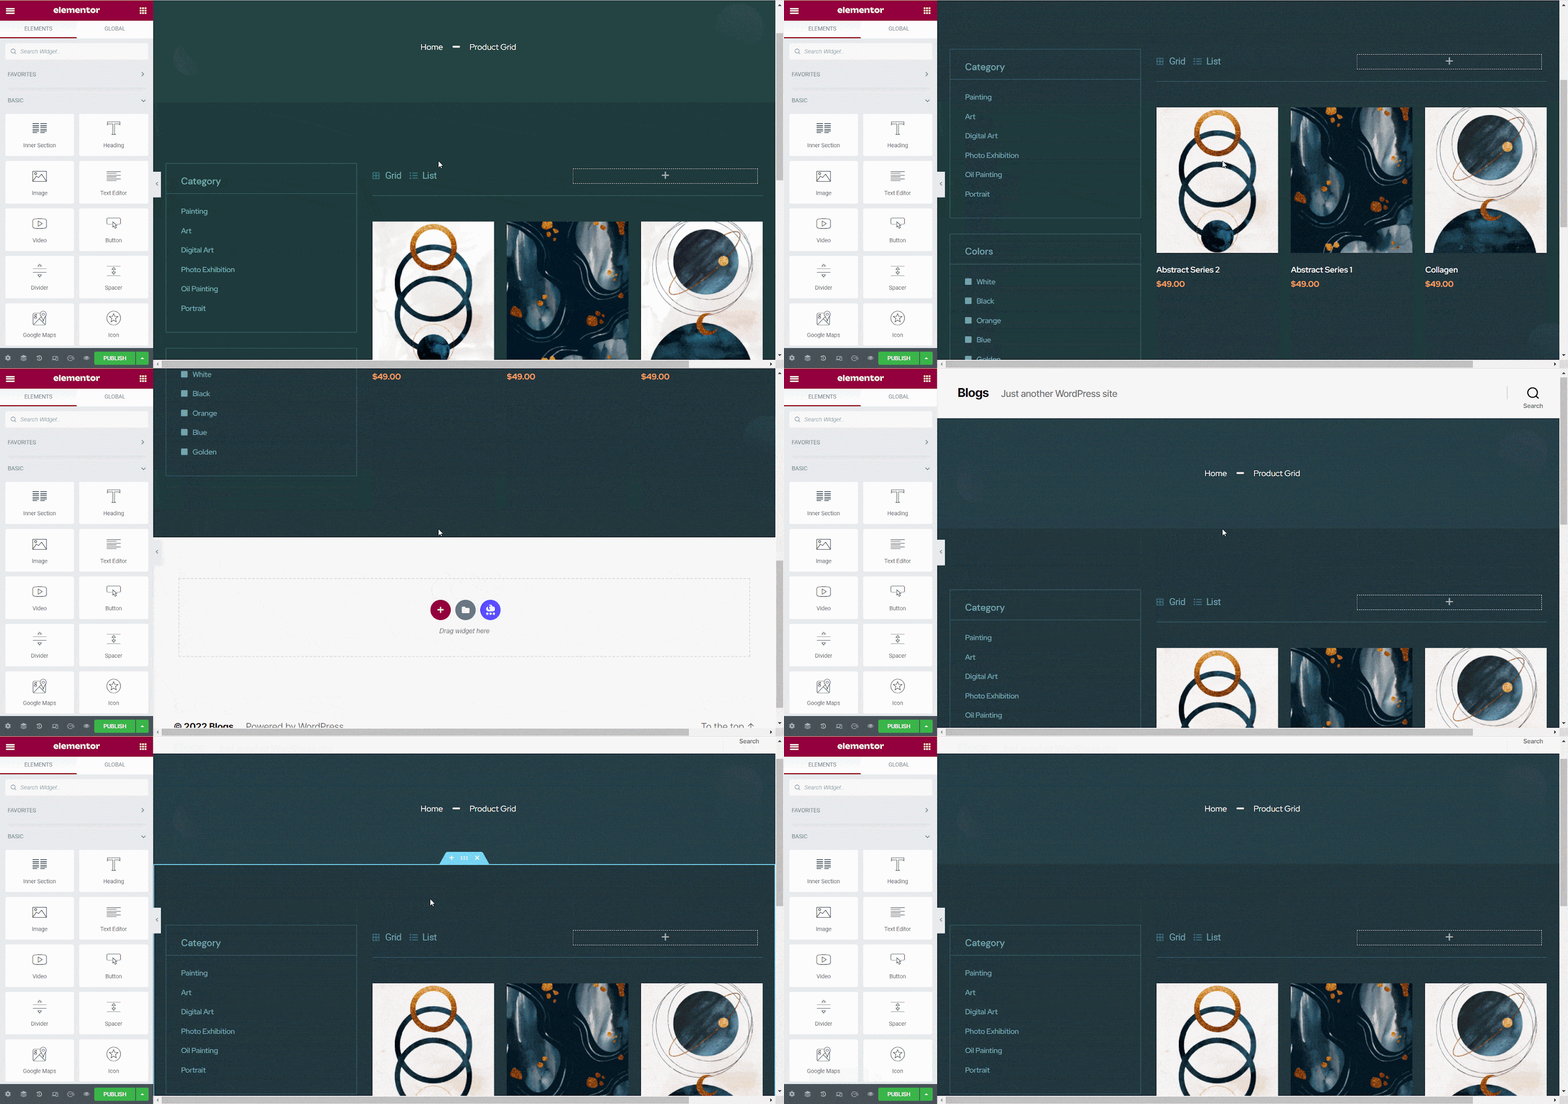
When the template is done loading, this is how your WooCommerce shop page will appear on your WordPress website by default.
HOW TO MAKE A WOOCOMMERCE SHOP PAGE USING WOOCOMMERCE TEMPLATES FROM TEMPLATELY 4

Step 2: Customize & Publish WooCommerce Shop Page In Elementor

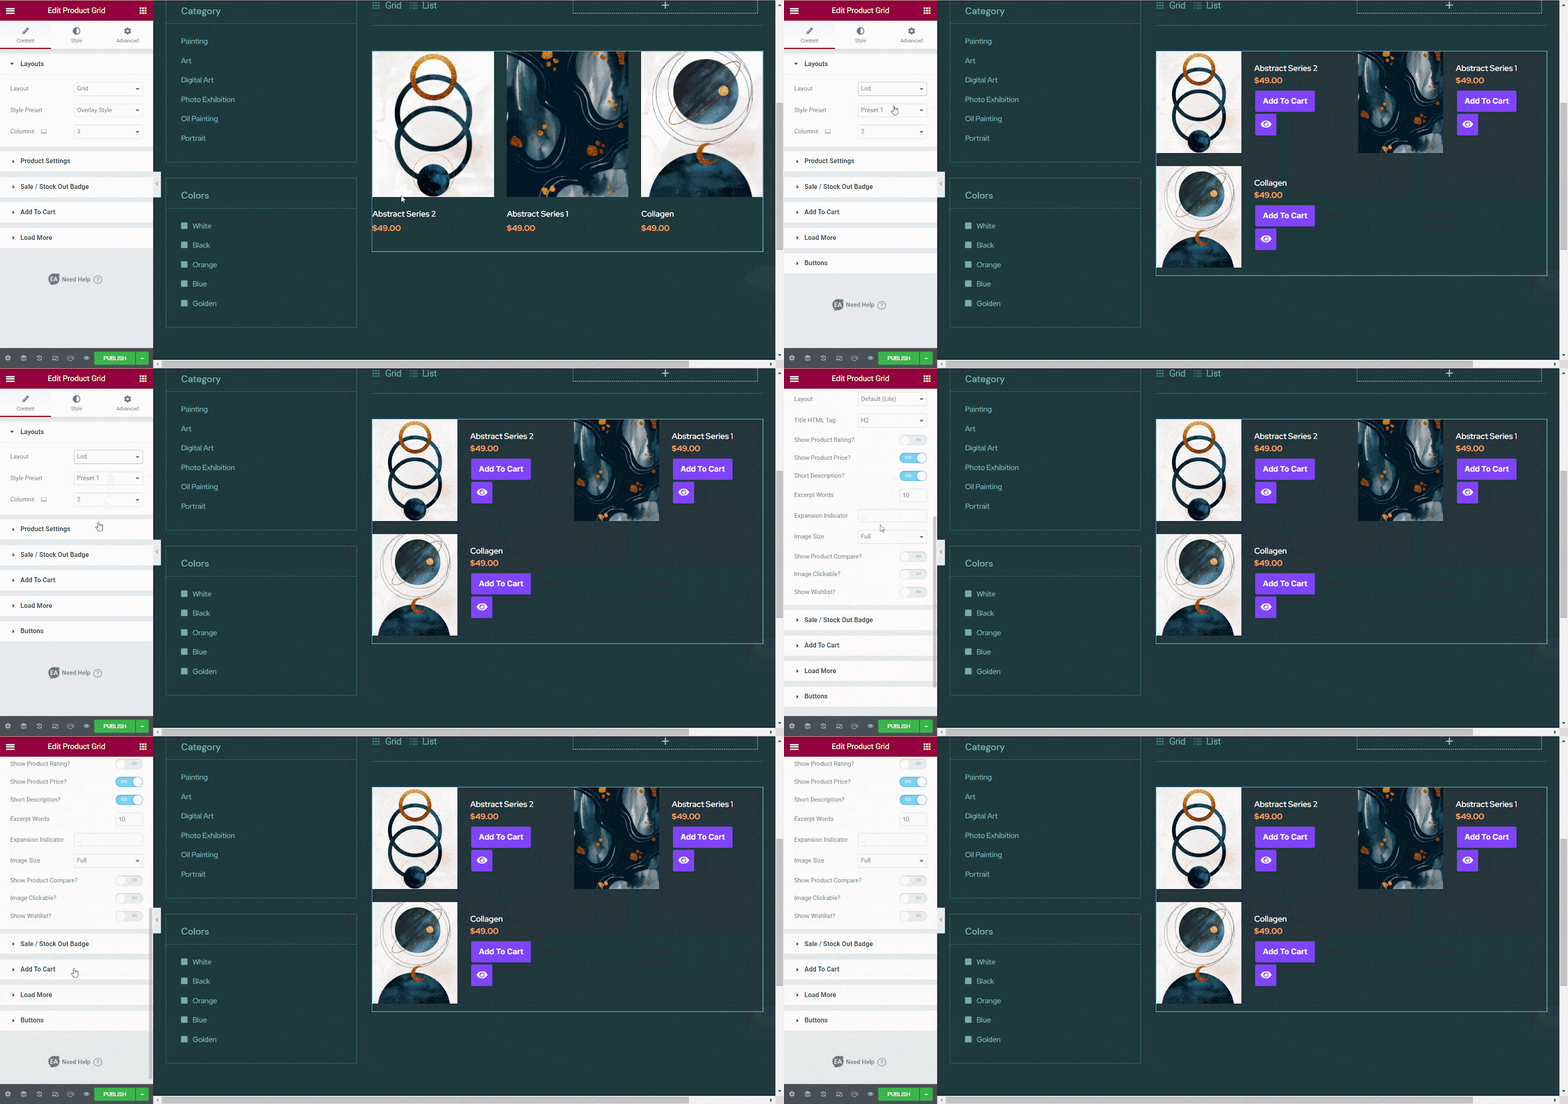
You can now customize your WooCommerce shop page any way you want in Elementor editor. From the ‘Content’ tab you can choose different layouts for your WooCommerce shop page, while from the ‘Style’ tab, you can change the colors, typography, font styles, and much more. 

If the WooCommerce template you have chosen is built using Essential Addons for Elementor, then you may see that the Woo Product Grid or Woo Product Collections elements have been used for your WooCommerce shop page. Furthermore, you can customize the elements any way you want in the Elementor editor.
HOW TO MAKE A WOOCOMMERCE SHOP PAGE USING WOOCOMMERCE TEMPLATES FROM TEMPLATELY 5

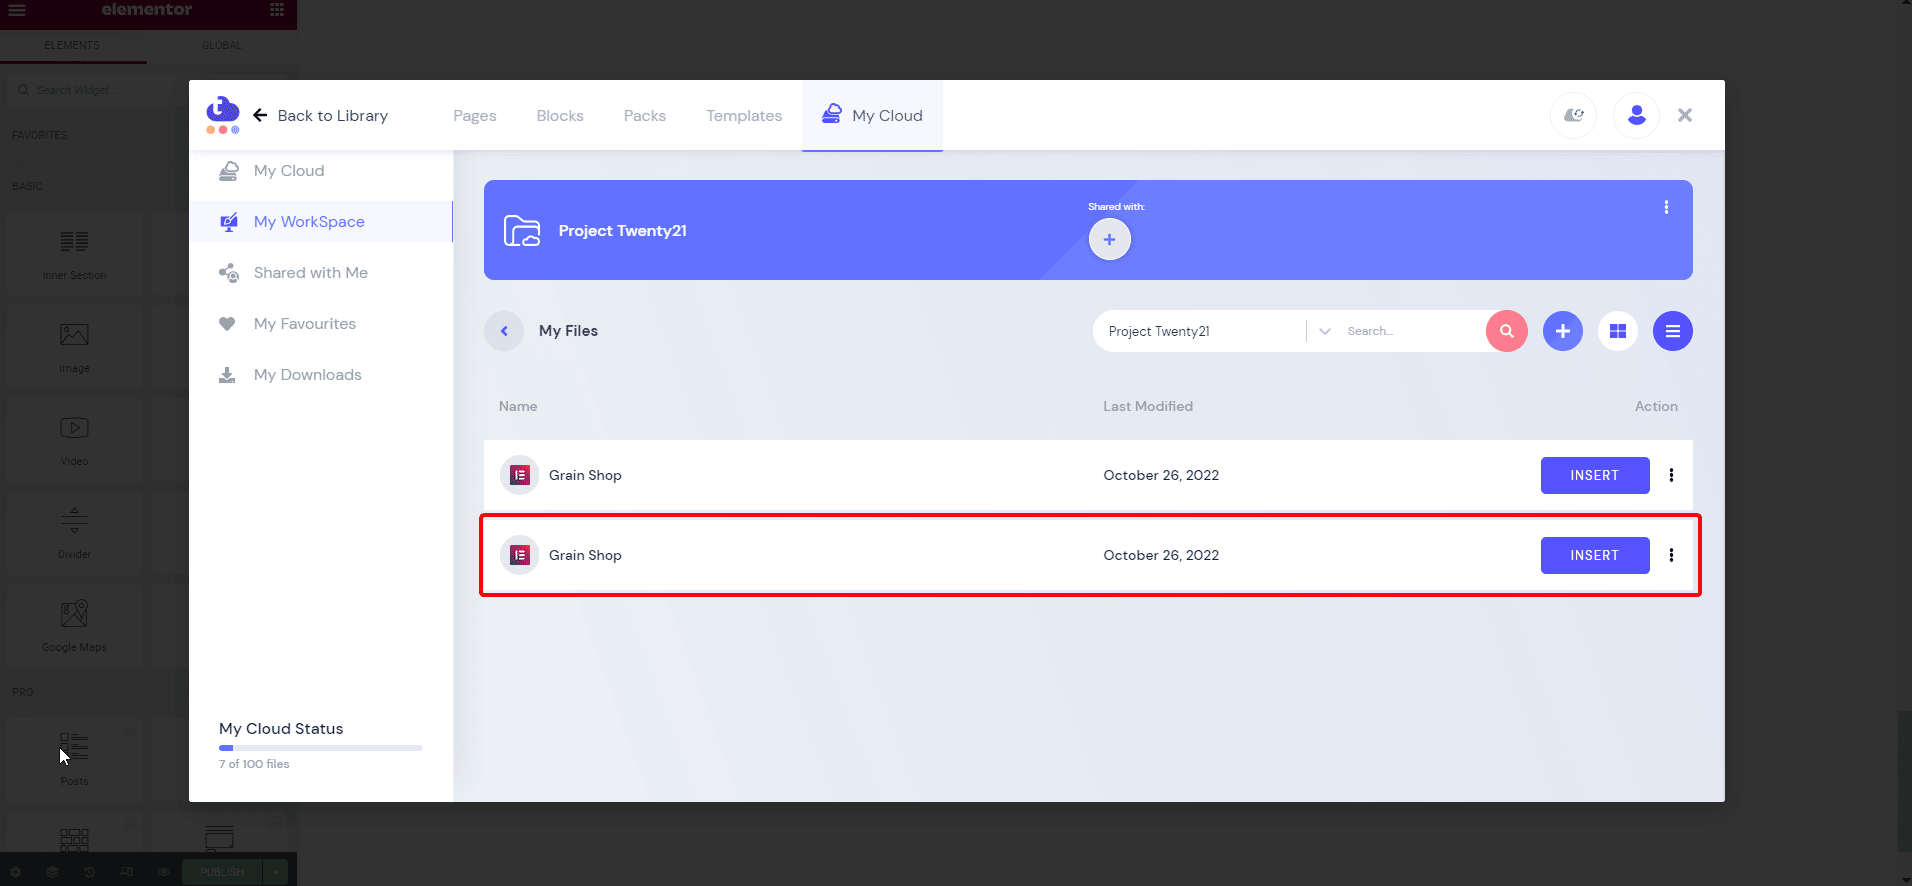
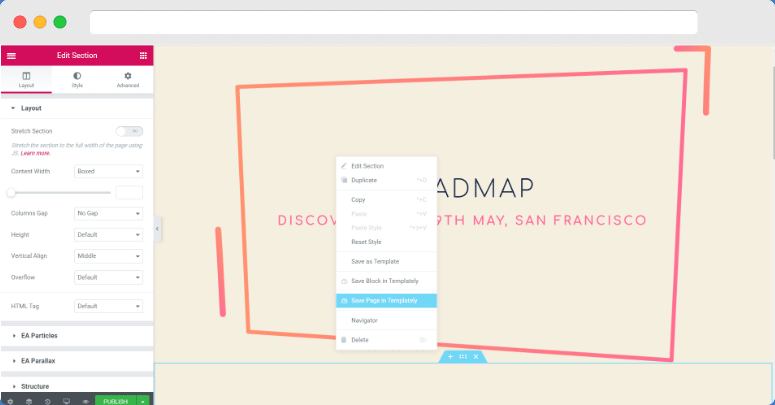
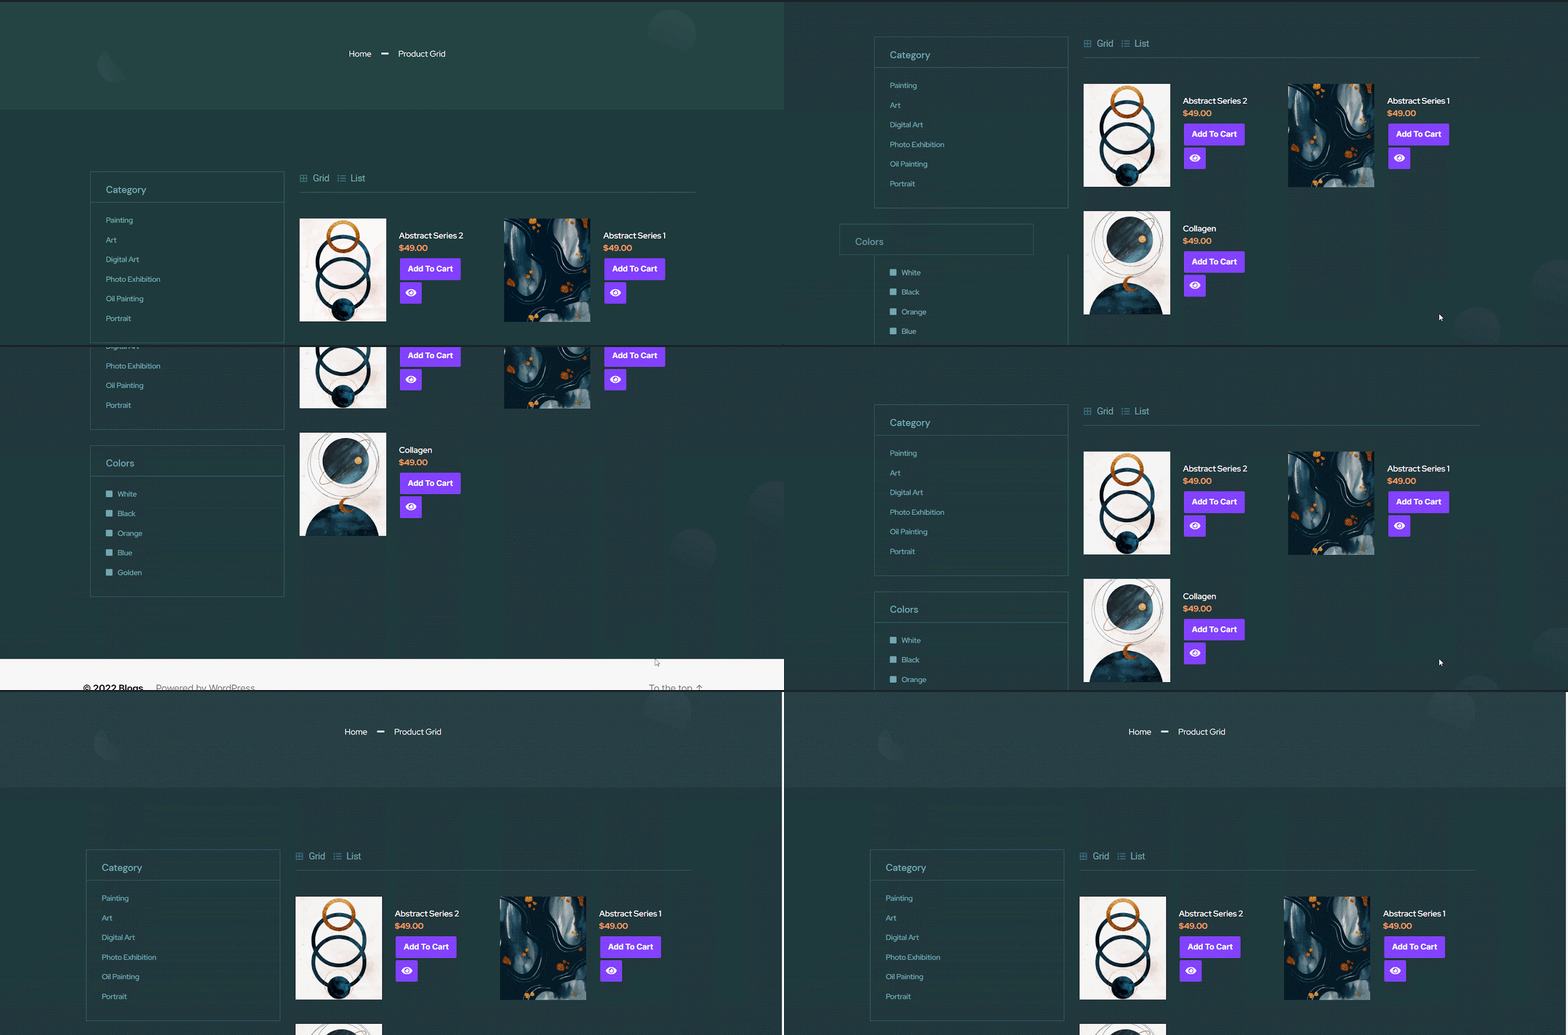
After you have customized your WooCommerce shop page and published the page. You can also save your WooCommerce template to MyCloud by right-clicking anywhere on your page and selecting the ‘Save Page To Templately’ option. 
HOW TO MAKE A WOOCOMMERCE SHOP PAGE USING WOOCOMMERCE TEMPLATES FROM TEMPLATELY 6

Step 3: Add Your Template To WooCommerce Shop Page

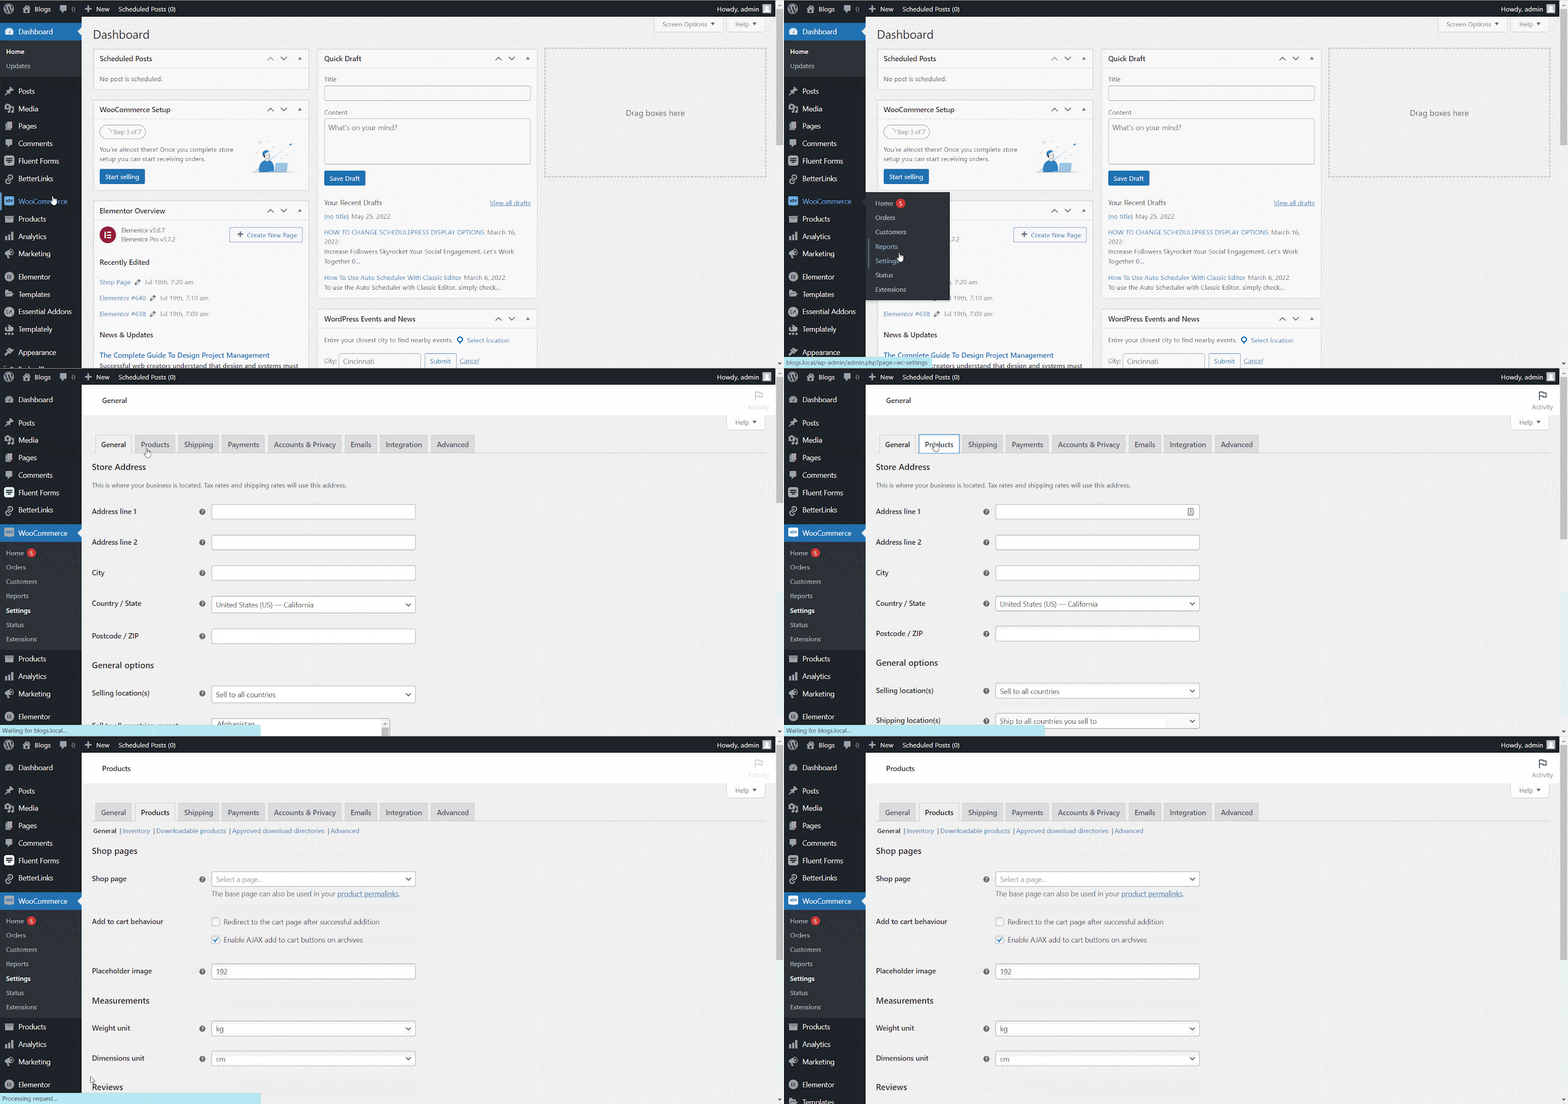
Now, you need to add your published template to the WooCommerce shop page. So, navigate to ‘WooCommerce’→ ‘Settings’→ ‘Products’ from your WordPress Dashboard. 
HOW TO MAKE A WOOCOMMERCE SHOP PAGE USING WOOCOMMERCE TEMPLATES FROM TEMPLATELY 7

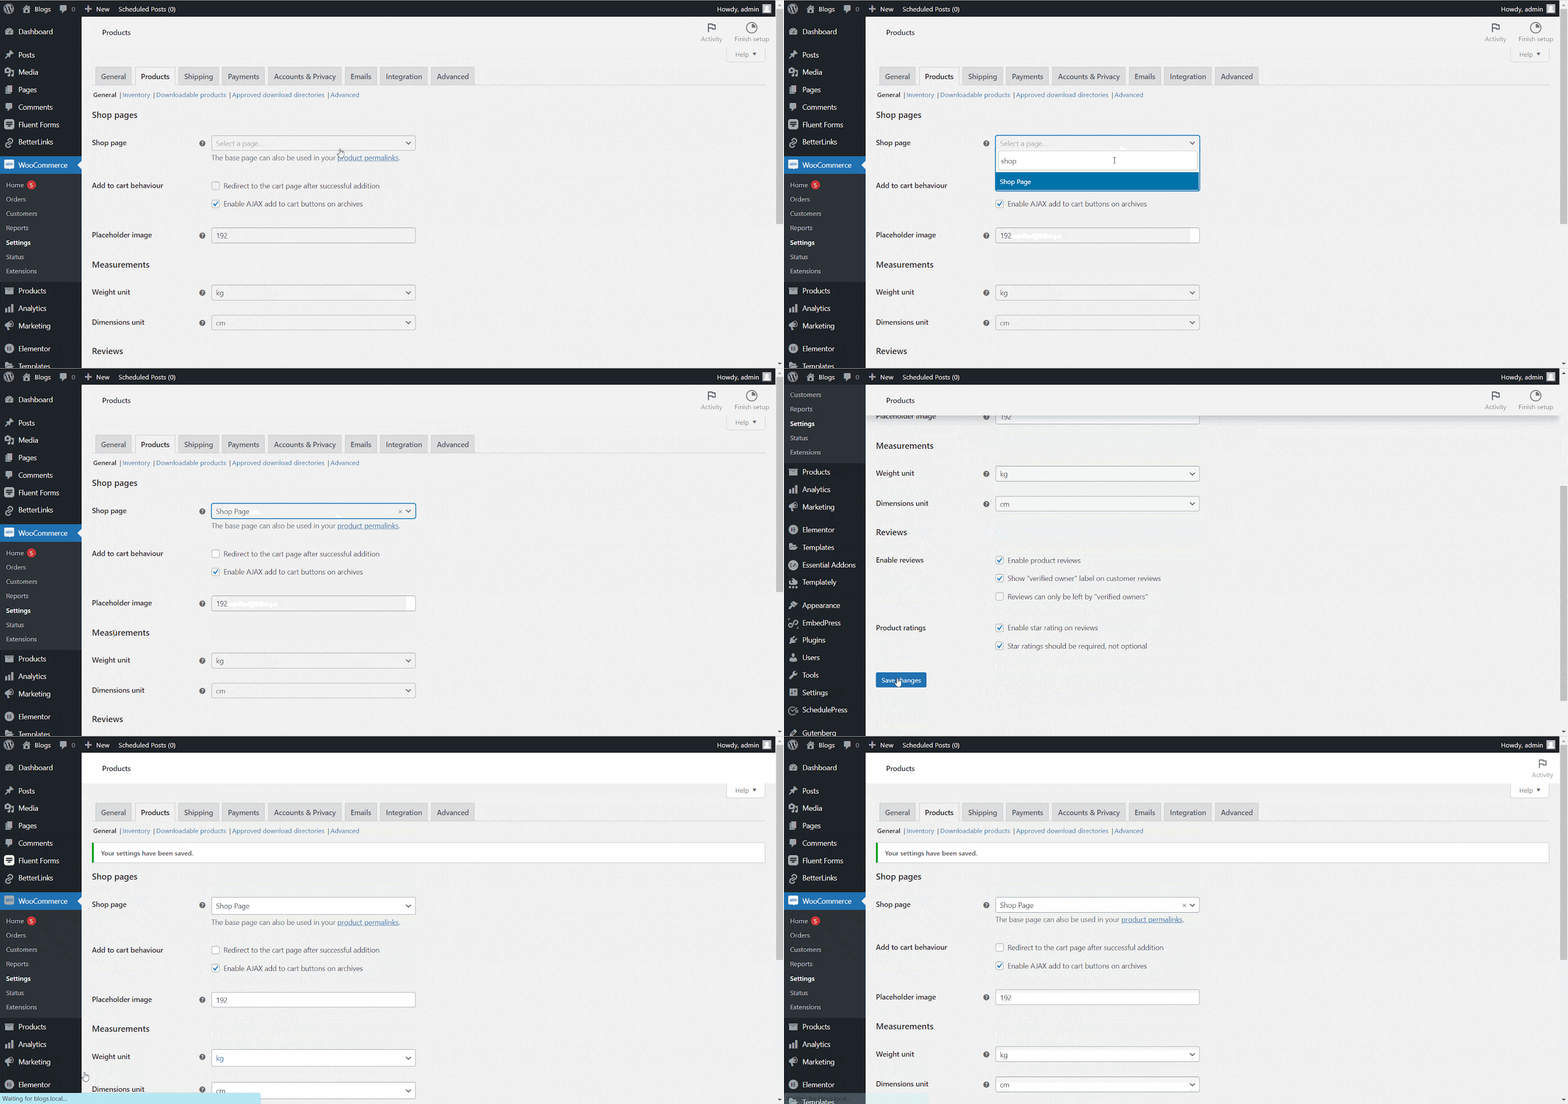
Now, select the page that you have published on the ‘Shop Page’ and then hit the ‘Save Change’ button. And that’s it, your WooCommerce shop page using Templately will be ready. 
HOW TO MAKE A WOOCOMMERCE SHOP PAGE USING WOOCOMMERCE TEMPLATES FROM TEMPLATELY 8

By following these simple steps, you can make a shop page with WooCommerce templates in Templately. 

Feel free to reach out to our dedicated support team in the event of any difficulties, and also if you wish to get updates about Templately, you can join our Facebook community.
Copy An Item

How To Copy An Item From One WorkSpace To Another WorkSpace In Templately?

Templately allows you to collaborate and share items saved to MyCloud with your teammates through a feature called  Templately WorkSpace. You can also share and copy an item from one WorkSpace to another in Templately. 

You can do this directly from your WordPress dashboard as well as from Templately website. Follow this step-by-step guideline to find out how to copy a WorkSpace item to a different WorkSpace.

Note: Before starting to copy shared items from one WorkSpace to another, make sure you have created a WorkSpace in Templately. Follow this documentation to learn how to configure Templately WorkSpace.

How To Copy An Item From One WorkSpace To Another?

You can copy an item from one WorkSpace to another either follow this step-by-step guideline to find out how to copy a shared item from one WorkSpace To Another directly from Templately website:

Step 1: Navigate To Your Templately WorkSpace 

You can access your WorkSpace directly from the Templately website. First, visit the Templately website and click on the ‘Sign in’ button. After signing in, you will be redirected to your cloud storage. Click on the ‘My WorkSpace’ tab to view all of your created WorkSpaces at a glance.

How To Copy An Item From One WorkSpace To Another WorkSpace In Templately?

Step 2: Copy An Item From One WorkSpace To Another 

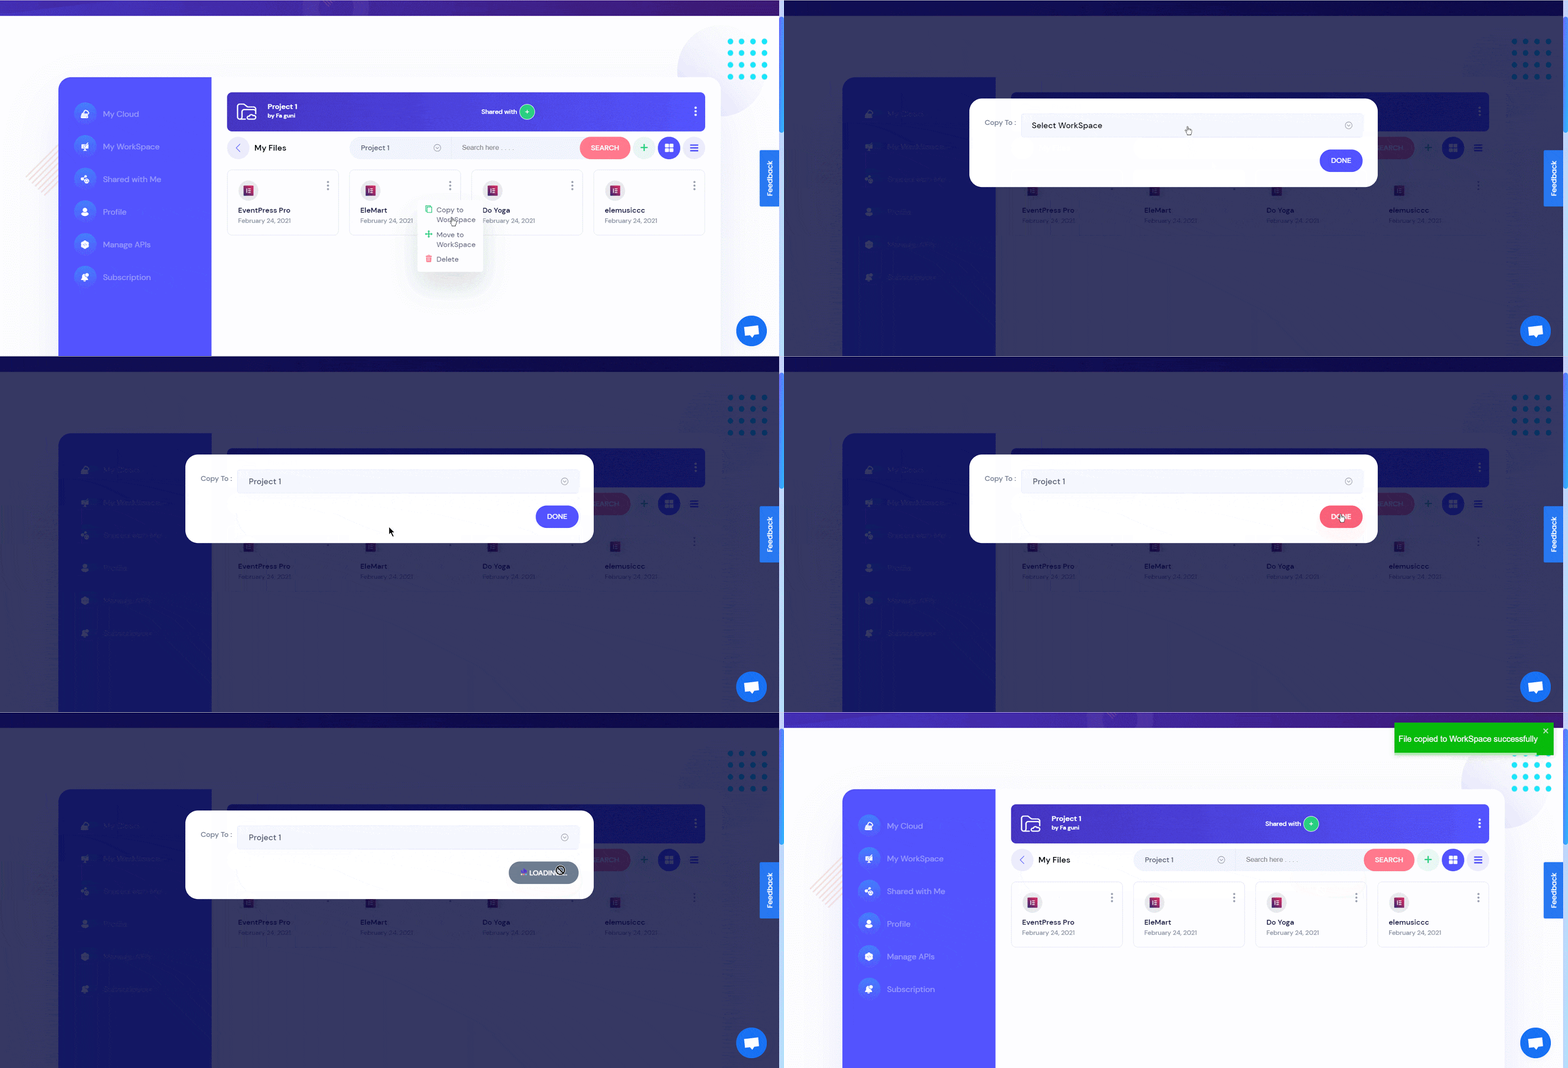
Go to the Workspace from where you want to copy a shared item. Hover over the item you want to copy, click on the ‘Three dots’ icon, and select ‘Copy To Workspace’ from the drop-down menu list of options. 

A popup will appear with an input field. From there, select the destination WorkSpace for the copied item and hit the ‘Done’ button. Your selected item will be copied to another Templately Workspace successfully.

Copy An Item


How To Copy A WorkSpace Item Using Templately WordPress Plugin?

If you have Templately WordPress plugin installed, you can copy a shared WorkSpace item directly from your WordPress website dashboard by following the steps given below.

Step 1: Go To MyCloud From Your WordPress Dashboard

Go to your WordPress dashboard, and navigate to Templately–> MyCloud tab. From here, click on ‘My WorkSpace’ as shown below to see all of your created WorkSpaces at once.

Copy An Item

Step 2: Copy An Item From One WorkSpace To Another

From any one WorkSpace, select an item you want to copy to another Templately WorkSpace. Now click on the ‘Three dots’ icon beside the item you want to copy, and click on the ‘Copy To WorkSpace’ button.

A popup will appear from where you can select the Templately WorkSpace where you want to copy the item. Hit the ‘Copy’ button. Your selected item will be copied to another WorkSpace successfully.

Copy An Item

By following these easy and simple steps, you can copy a shared item from one Templately WorkSpace to another, directly from your WordPress dashboard or from Templately website. 

If you face any difficulties, feel free to contact our support team for further assistance.

DOWNLOAD A MYCLOUD ITEM

How To Download A MyCloud Item From Templately?

Templately lets you save your template designs on its own dedicated cloud storage named as MyCloud. You can save the entire page template or a specific block of your page to MyCloud. After saving the templates, you can directly download a MyCloud item either by logging in to your account on the Templately website or by using the Templately WordPress plugin.

How To Download A MyCloud Item Directly From Templately Website?

Before you can download templates from Templately, you need to save the template to MyCloud first. Afterward, follow this step-by-step guide to download a MyCloud item directly from the Templately website.

Step 1: Navigate To Your MyCloud Cloud Storage

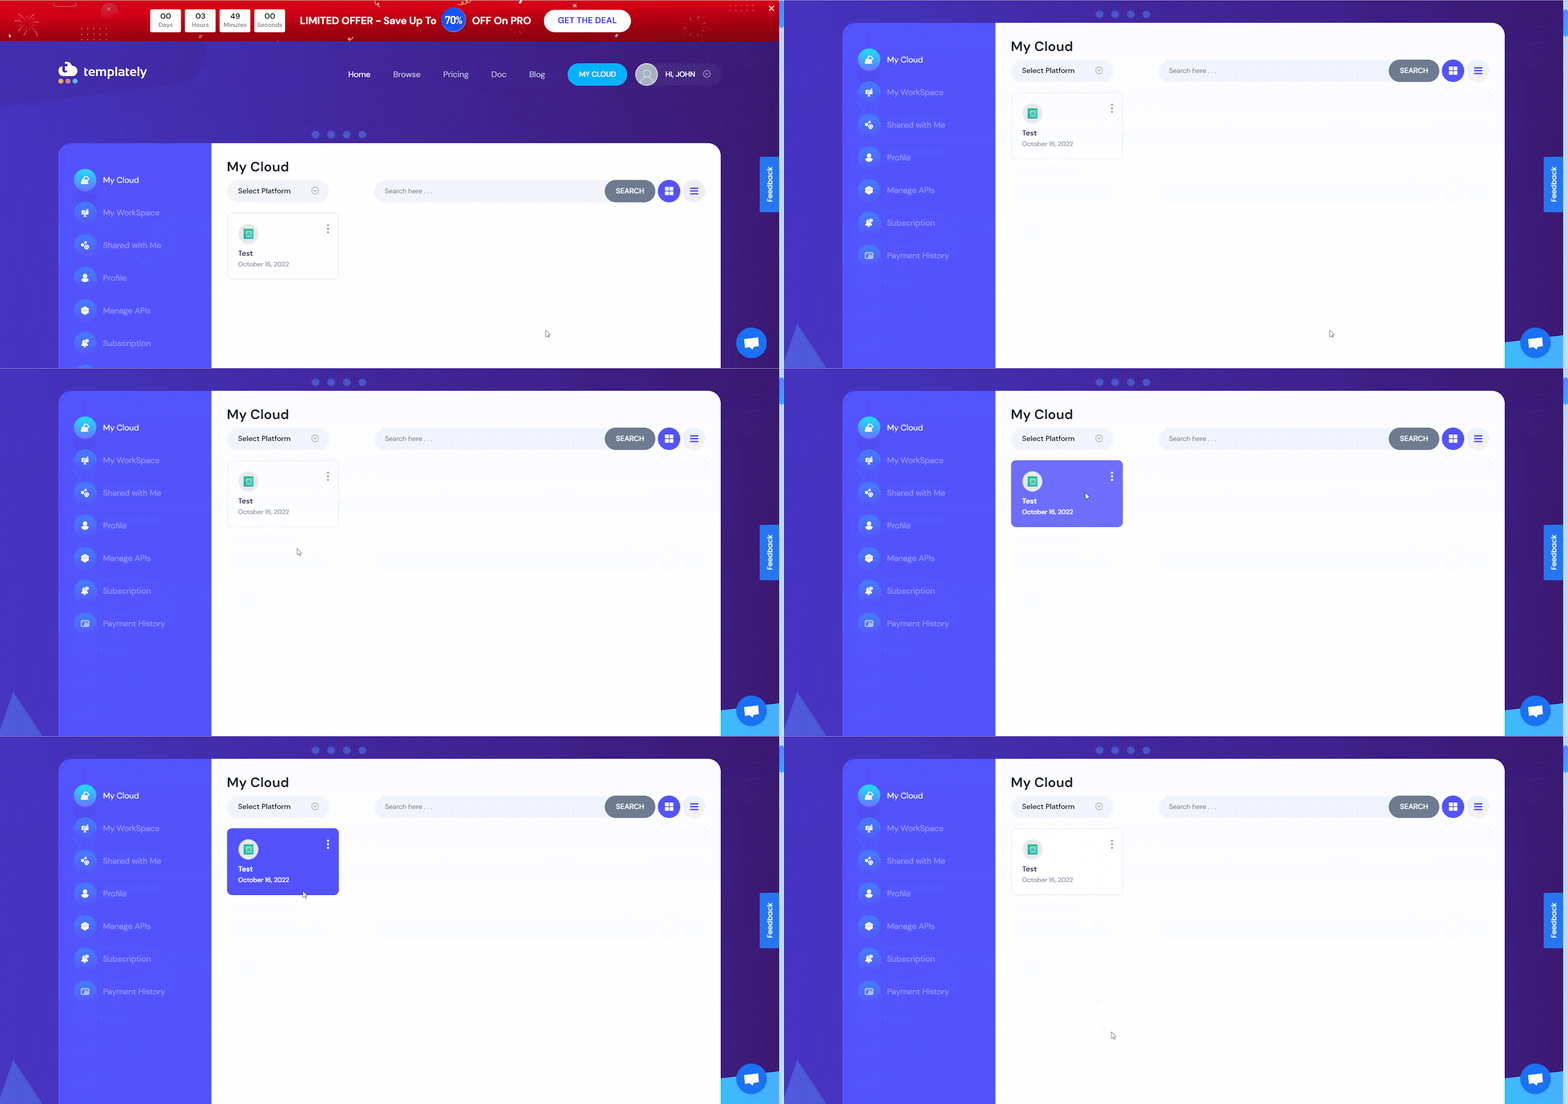
Go to the Templately website and sign in to your Templately account. After signing in, you will be redirected to the MyCloud tab directly. There, you can see all your saved items at a glance.

Download A MyCloud Item

Step 2: Download A MyCloud Item From Templately

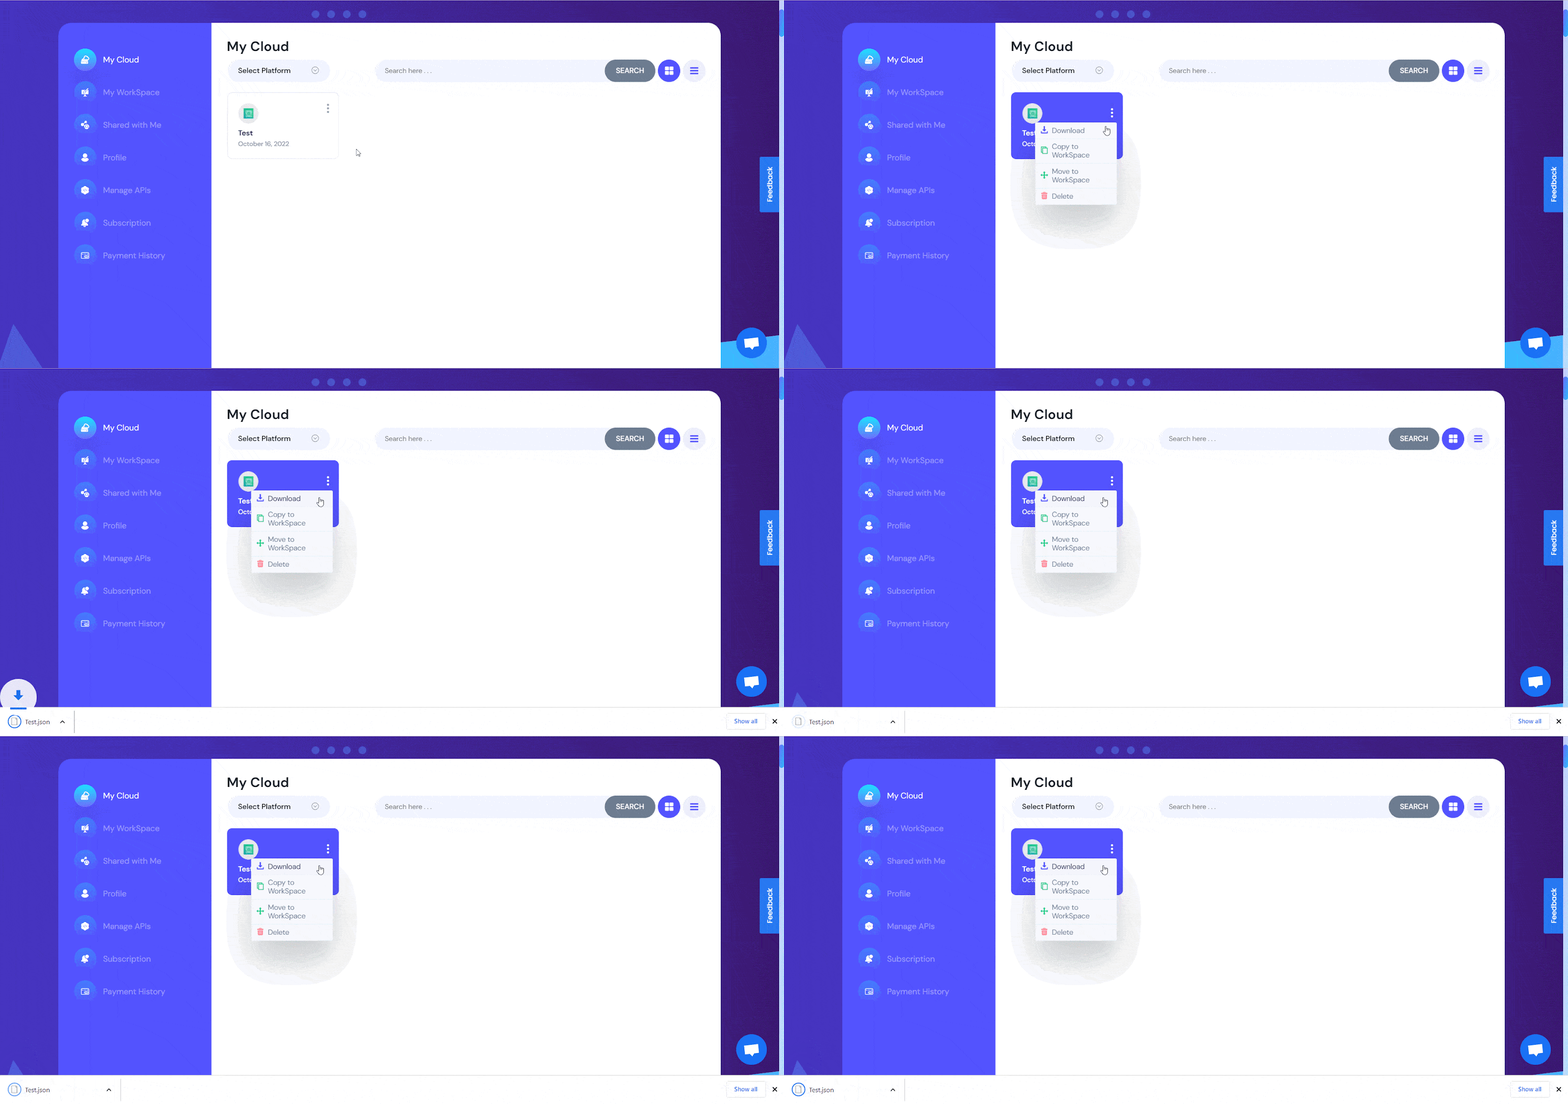
To save a Mycloud item from your cloud storage, hover your cursor over the item you want to download. Now click on the three dots to open a drop-down menu. From the drop-down menu list of options, click on ‘Download’. This will download the template as a JSON file to your local storage or device.

DOWNLOAD A MYCLOUD ITEM

With these steps, you can download a MyCloud item from Templately and save it as a JSON file on your local storage.

How To Download A MyCloud Item Using Templately WordPress Plugin?

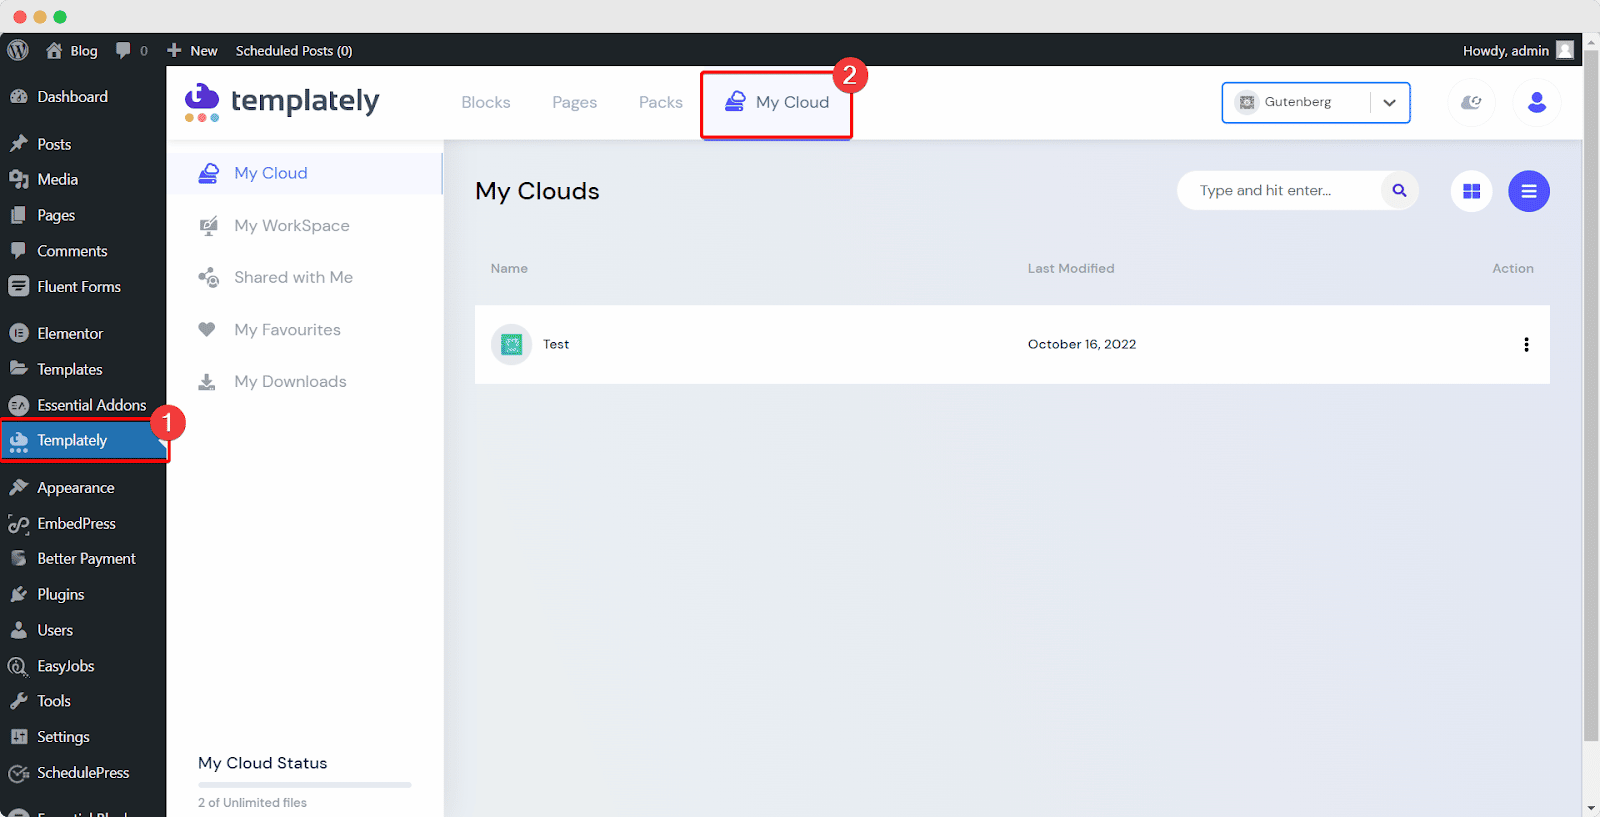
If you are using the WordPress plugin for Templately, you can also download a MyCloud item directly from your WordPress dashboard. After installing Templately plugin on your website, sign in to your account and click on the ‘MyCloud’ tab to open your cloud storage. This is how your cloud storage will look like.

DOWNLOAD A MYCLOUD ITEM

Step 2: Download A MyCloud Item From Dashboard

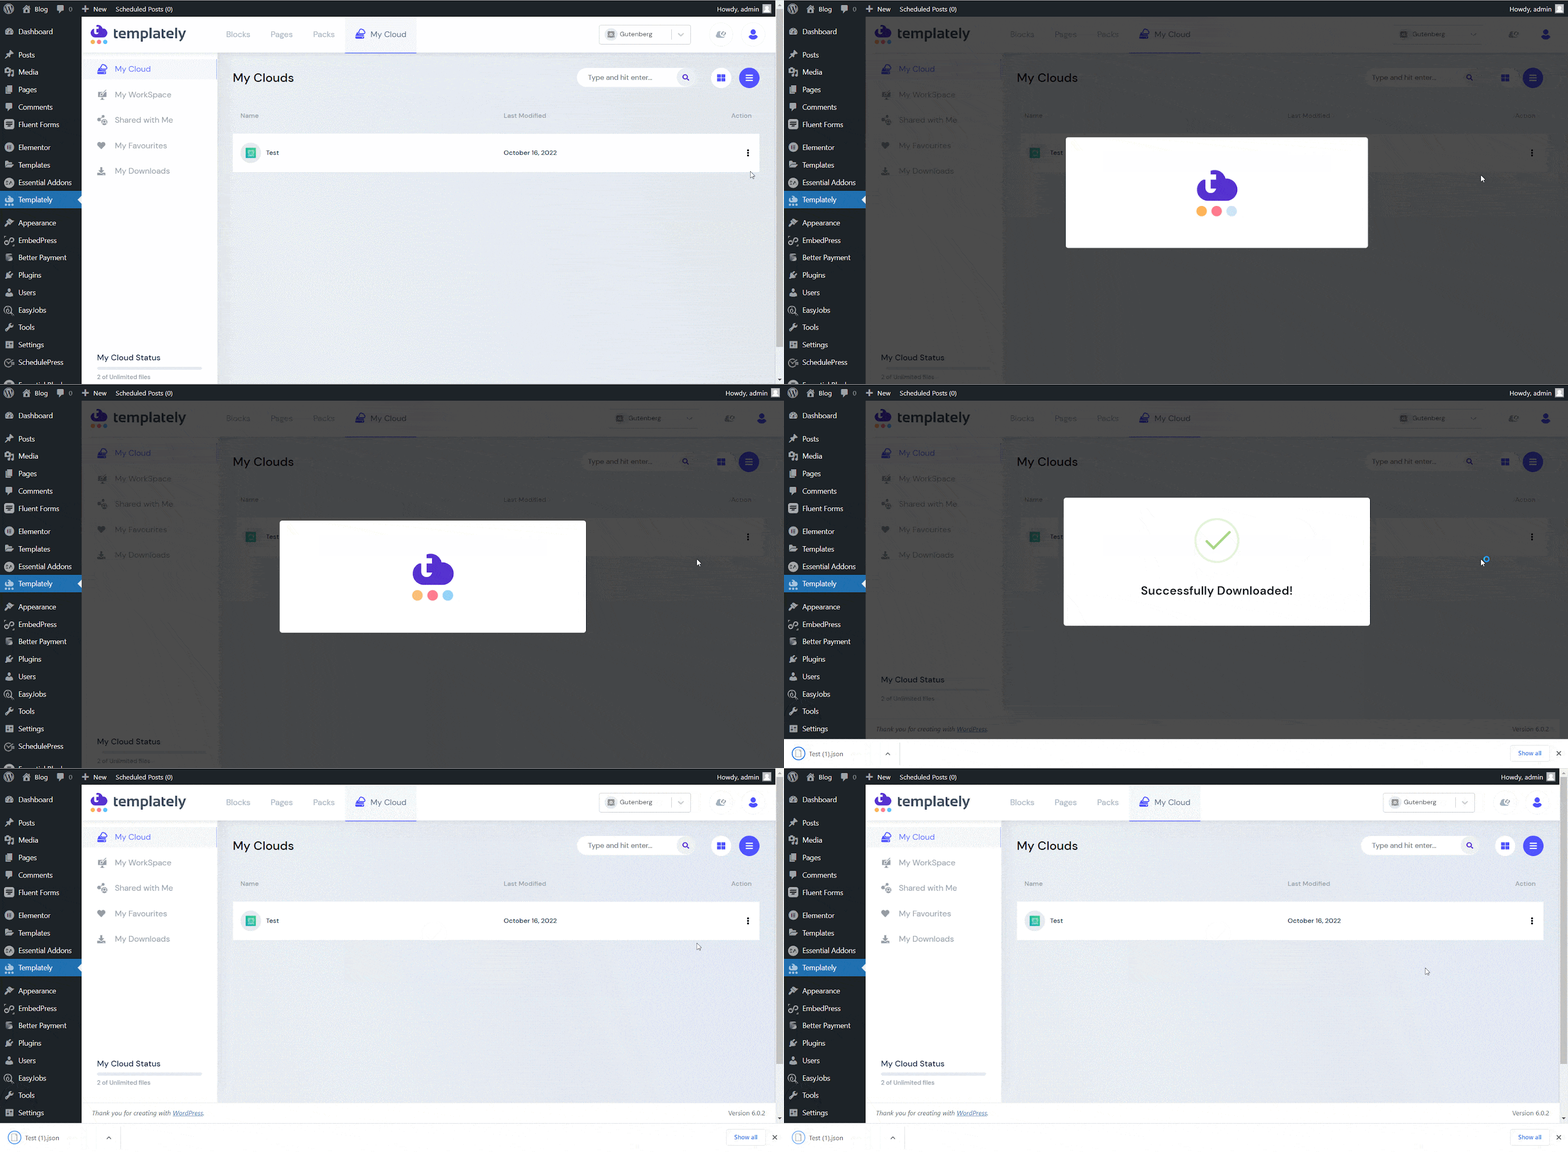
Now, hover your cursor over the item you want to download and click on the three dots icon as shown below. You will find the ‘Download’ option from the dropdown menu list. Simply click on ‘Download’ to download your template as a JSON file on your local storage.

 DOWNLOAD A MYCLOUD ITEM

By following these easy and simple steps, you can download a MyCloud item instantly from both your WordPress dashboard and Templately website. 

If you face any difficulties, feel free to contact our support team for further assistance.

How To Make A Single Product Page With Woocommerce Templates? 10

How To Make A Single Product Page With Woocommerce Templates?

With the help of the ready WooCommerce templates from Templately, you can easily create a stunning Single Product Page in Elementor for your WooCommerce products. Follow the detailed steps given below to create a Single Product Page with WooCommerce templates in Elementor from Templately.

Note: For this, you just have to set up your shop page by using WooCommerce first. 

How To Create A Single Product Page With WooCommerce Templates?

Creating your single product page with WooCommerce templates from Templately is easy, but requires a little bit of preparation beforehand. It will take less than 5 minutes to set everything up for your online store website. The steps below can be used to create a single product page for your WordPress WooCommerce website.

Note: To create a single product page with a WooCommerce template you have to use the  Elementor Theme Builder feature. As it’s a PRO feature of Elementor; therefore, before starting this tutorial, make sure you have installed Elementor Pro on your website. 

Step 1: Add Your WooCommerce Products To Set Up Your Store

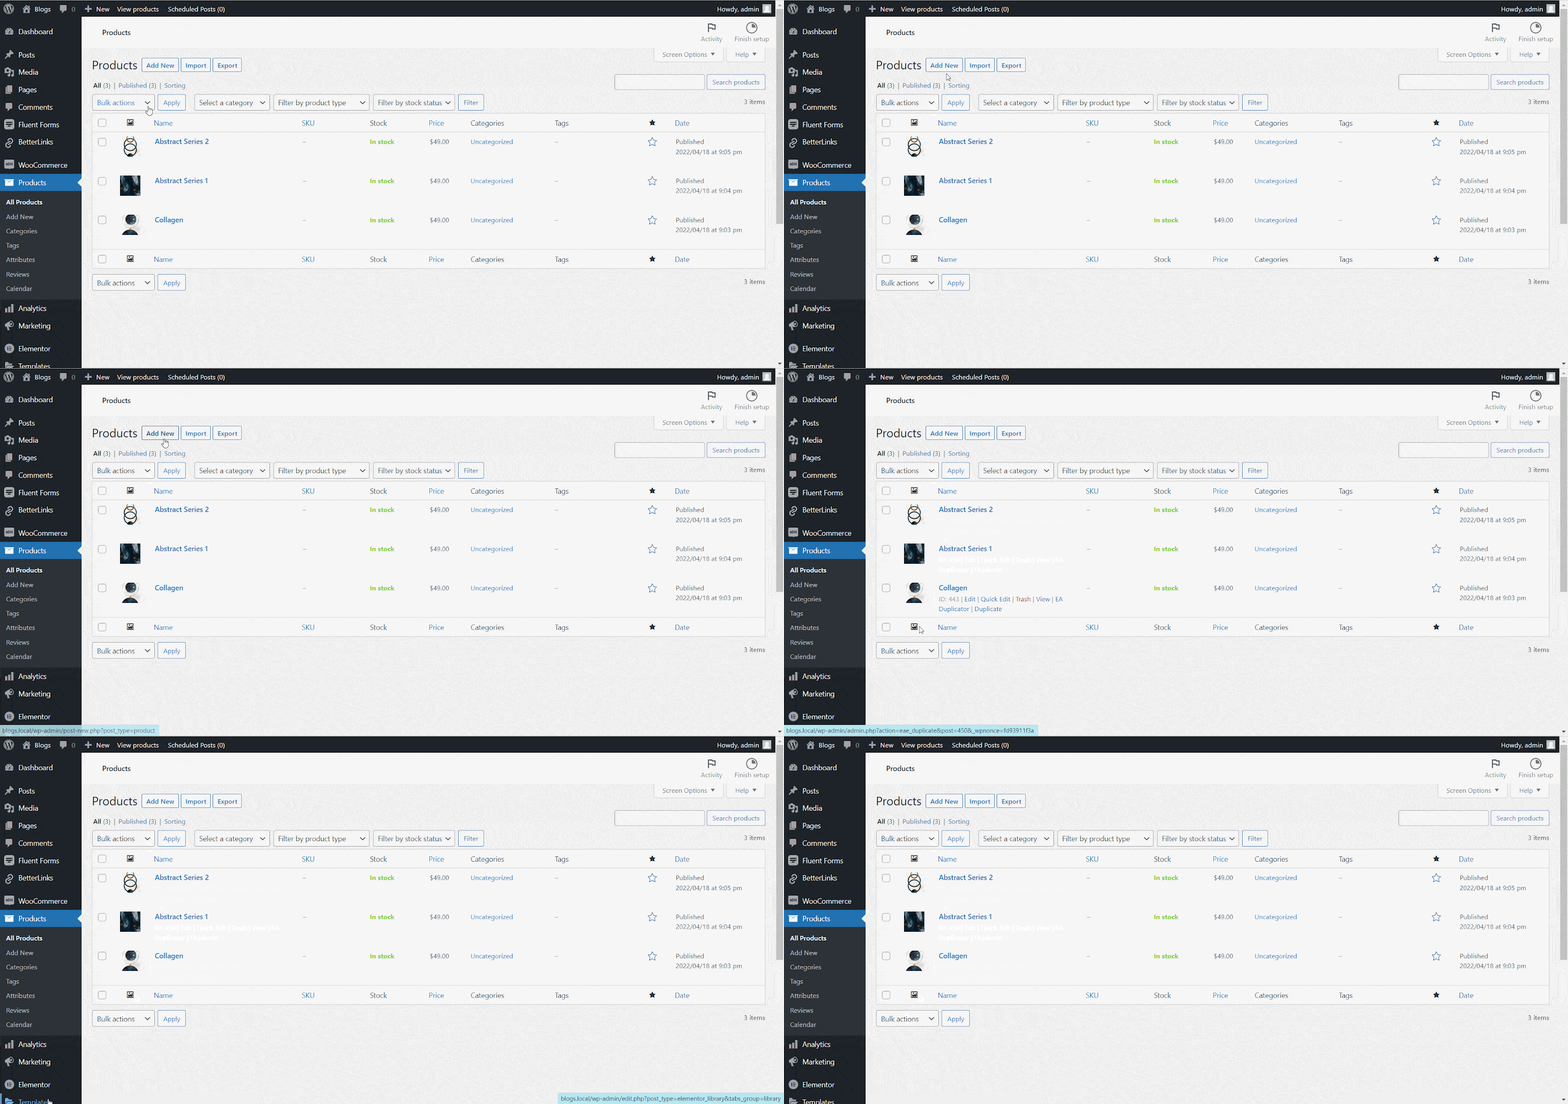
First, you must install & activate the WooCommerce plugin, and set up your online store on WordPress. You can add your preferred WooCommerce products by navigating to WooCommerce → Products → Add New as shown below. 

How To Make A Single Product Page With Woocommerce Templates? 1

From here you can add all the necessary details and publish your products. You can learn more by checking out this detailed documentation for adding and managing products on WooCommerce

Step 2: Activate The Required Essential WooCommerce Elements

Some WooCommerce template packs may also require you to install and activate the plugin Essential Addons For Elementor, as this Elementor widgets library comes with several essential and important WooCommerce elements to help you create your online store. 

For instance, you can effortlessly create a WooCommerce Checkout page with Templately if you have Essential Addons for Elementor installed. So it is recommended that you install Essential Addons for Elementor when using any WooCommerce templates from Templately.

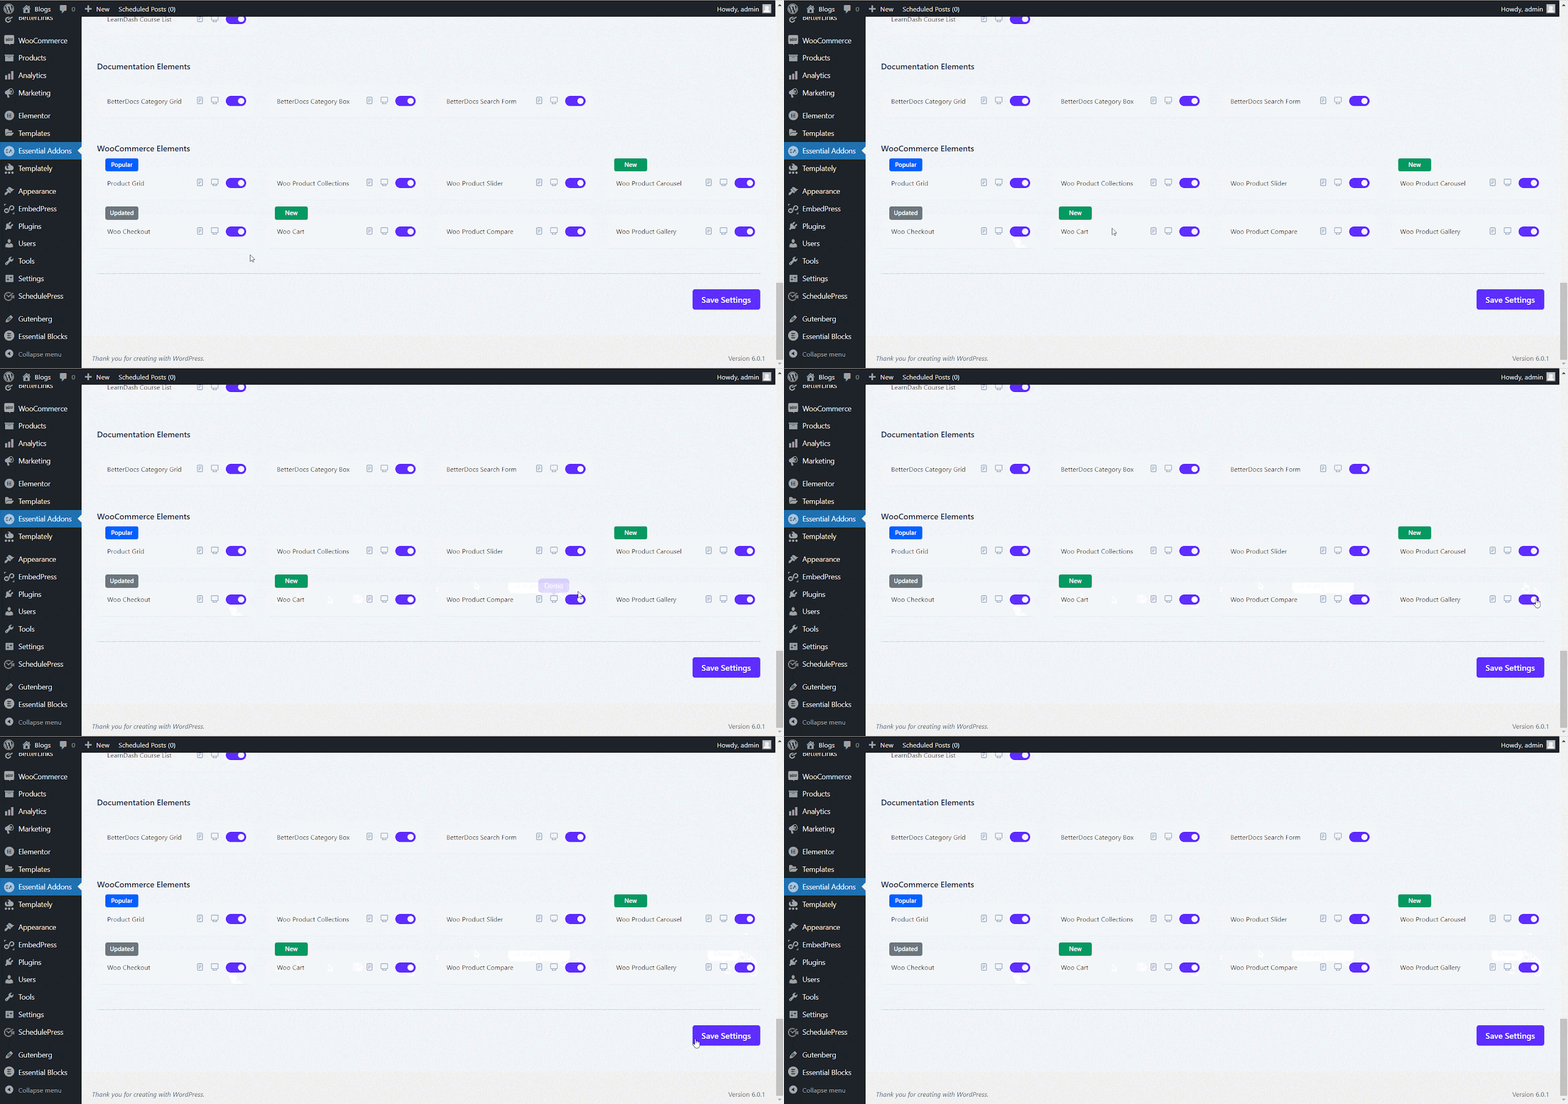
Afterward, to use the WooCommerce elements from Essential Addons, install the plugin and navigate to Essential Addons → Elements. Then, scroll down until you find the WooCommerce Elements section on the ‘Elements‘ page. Toggle the elements in this section to enable the necessary widgets and click on ‘Save Changes’.

How To Make A Single Product Page With Woocommerce Templates? 2

Step 3: Create A Single Product Page From Elementor Theme Builder

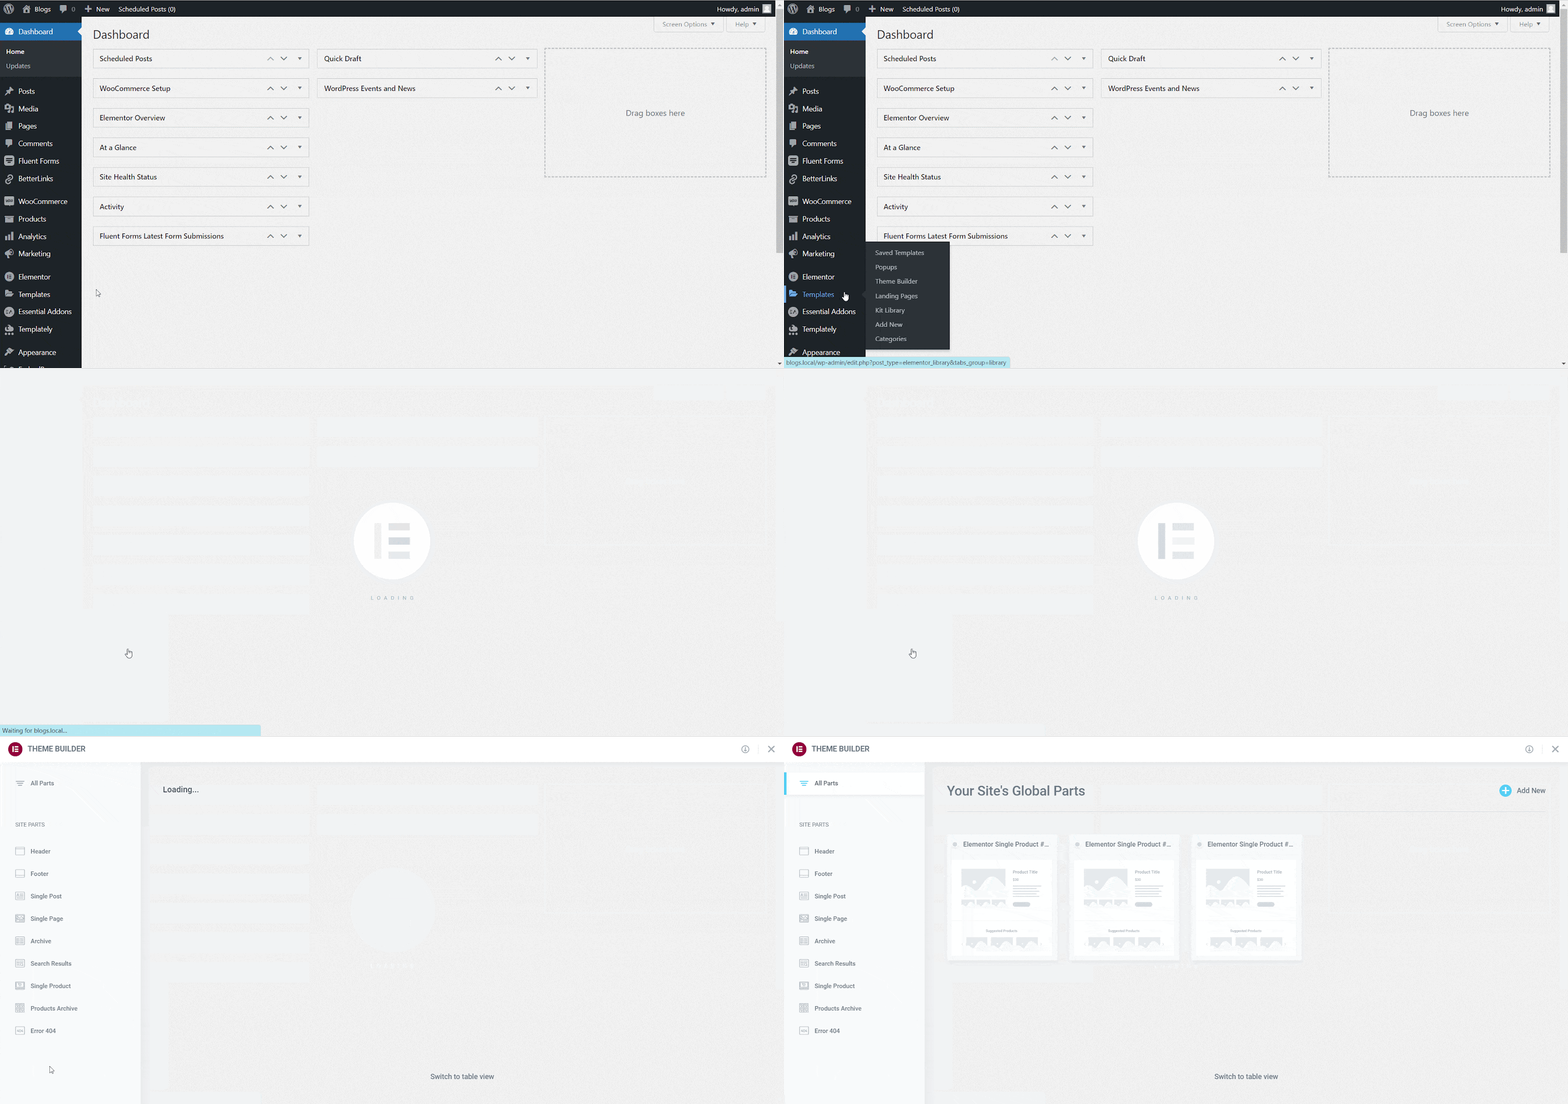
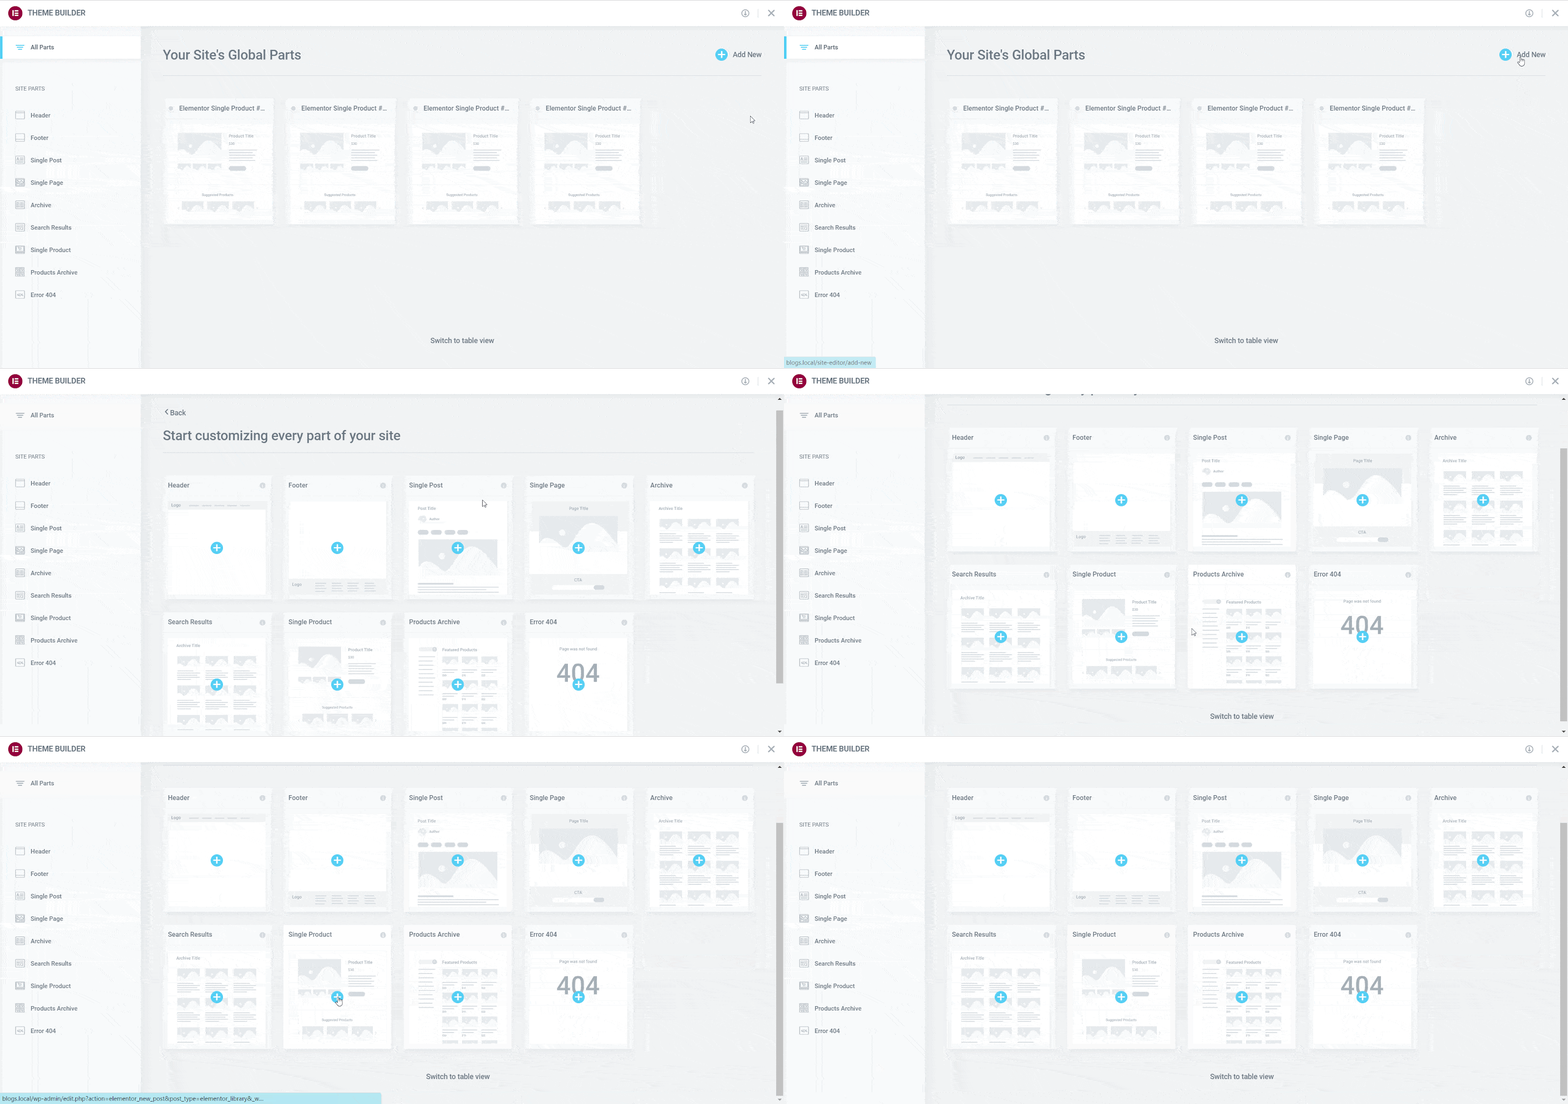
Afterward, open the Elementor’s ‘Theme Builder’ from your WordPress dashboard. Here, you will get the options for creating a single product page for WooCommerce on your site. 

How To Make A Single Product Page With Woocommerce Templates? 3

Then, click on the ‘Add New’ option and select the ‘Single Product’ option. You will be redirected to the Elementor page editing panel as you can see below. 

How To Make A Single Product Page With Woocommerce Templates? 4

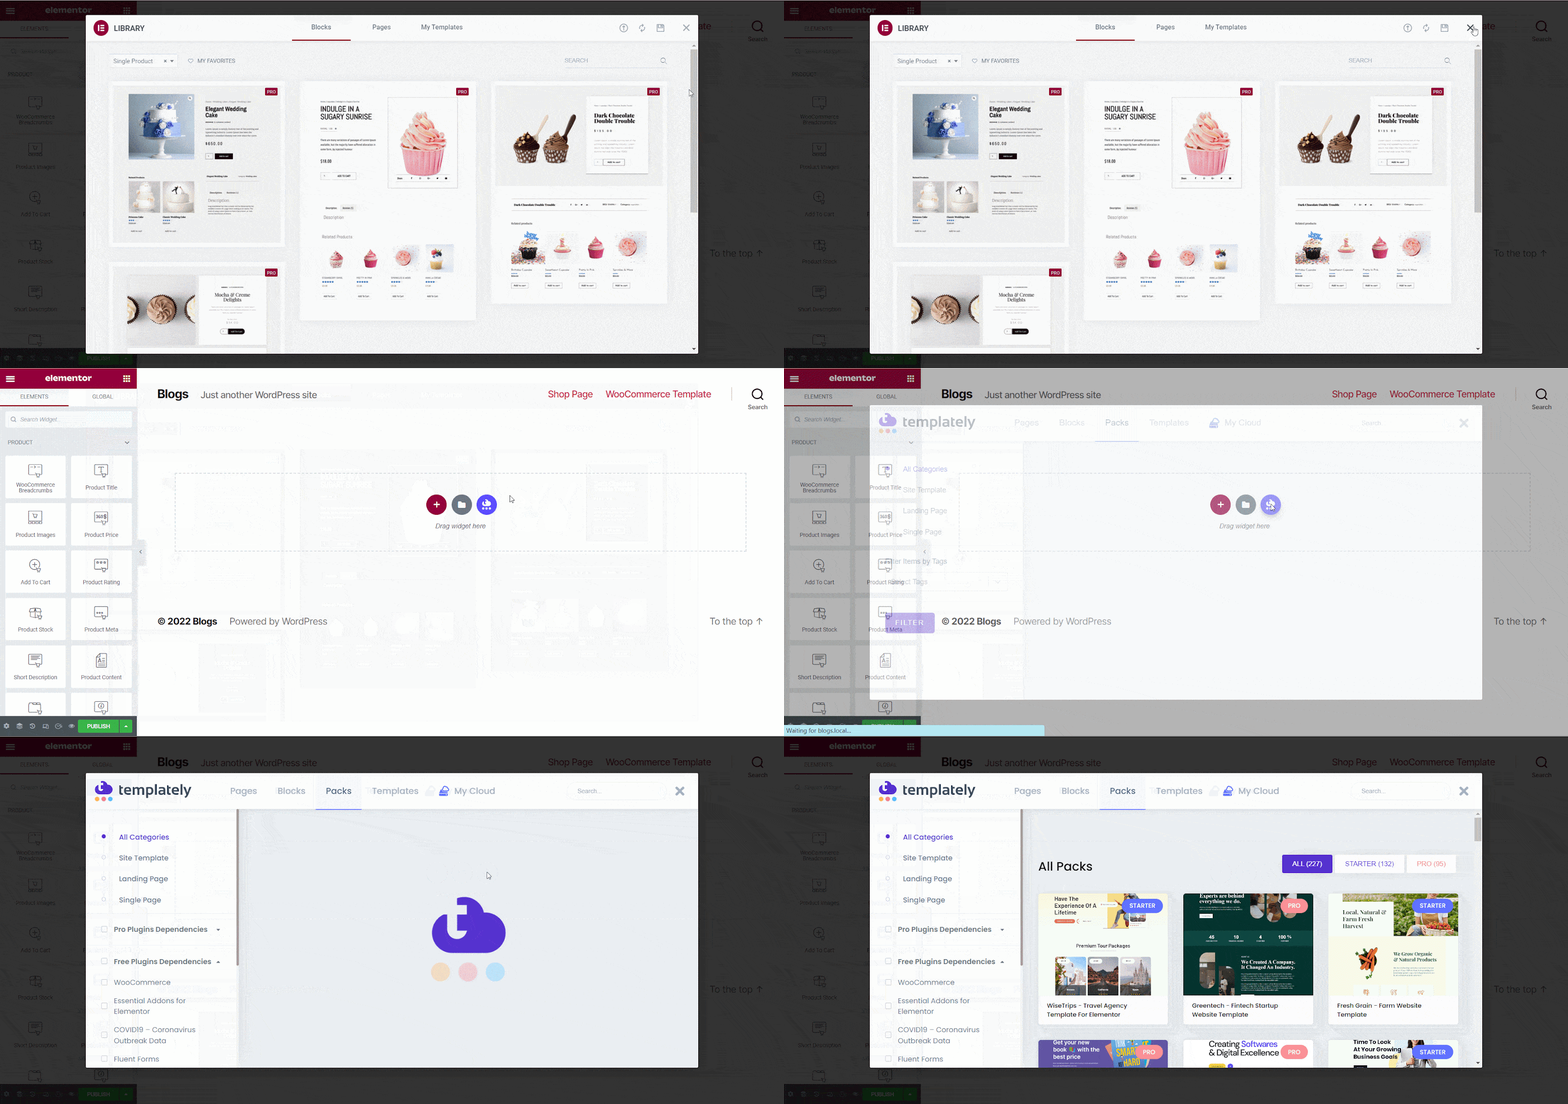
Then, close the library window and click on the blue ‘Templately’ icon. Afterward, choose any of the WooCommerce template packs for Elementor from the popup window of Templately.

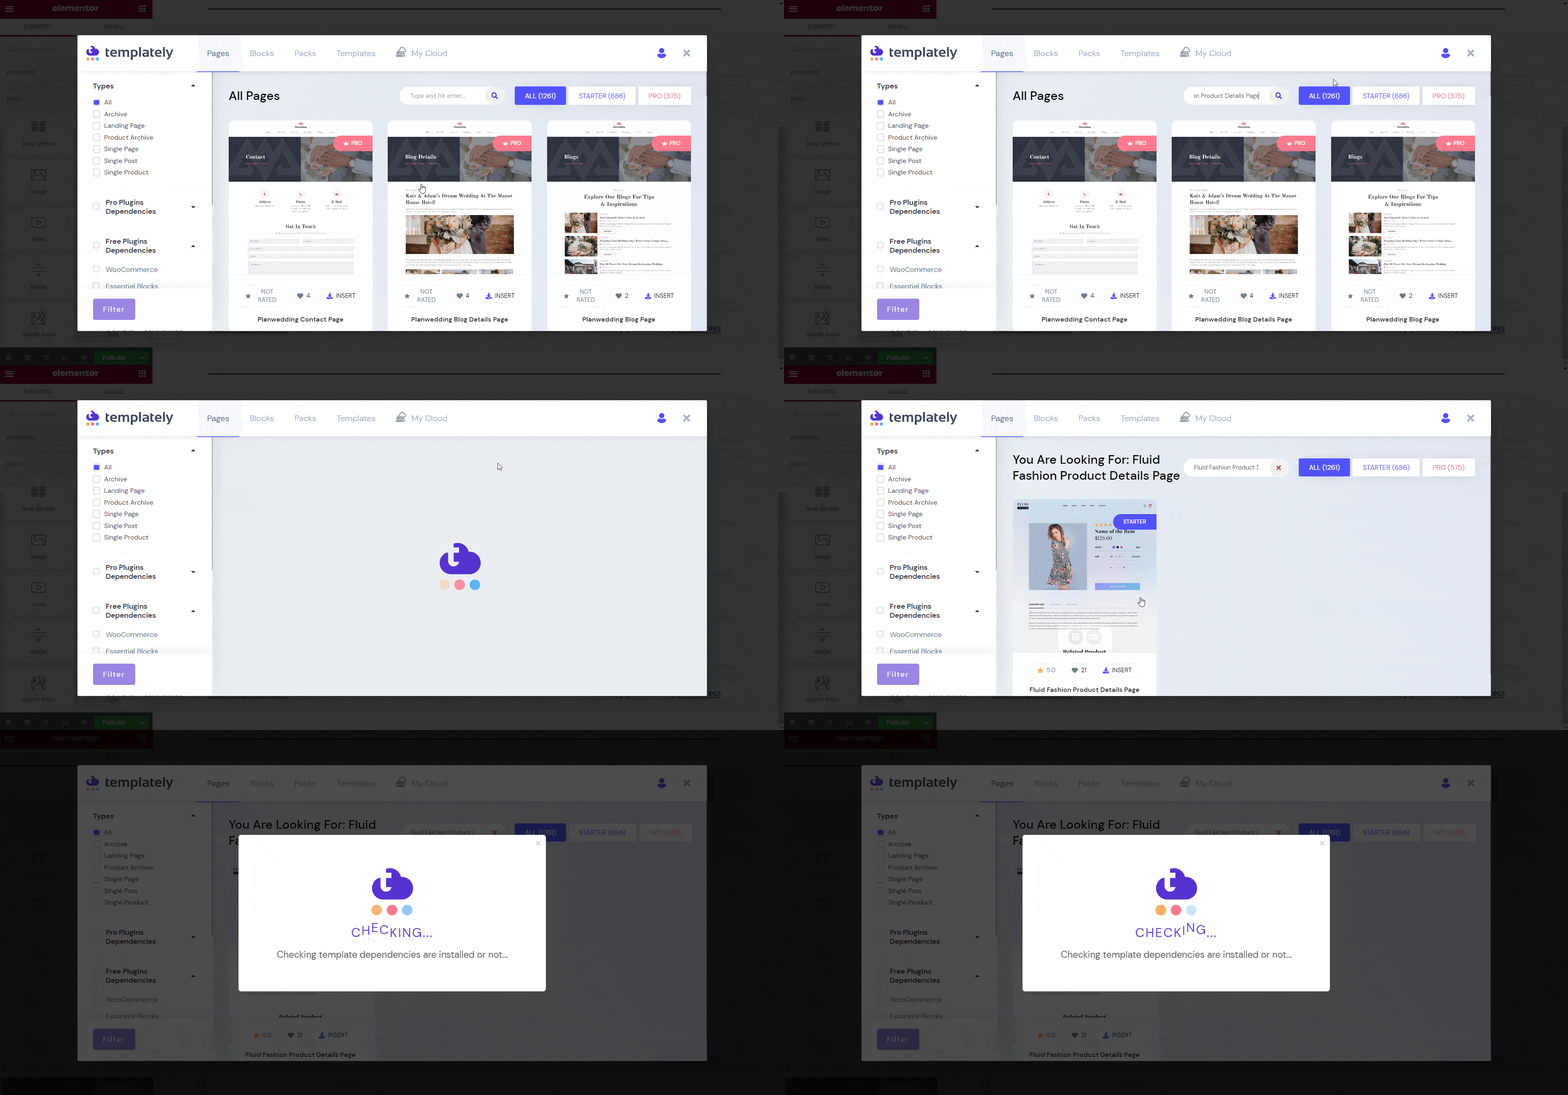
Check the ready page templates and choose your ‘Single Product Page’ or ‘Product Details Page’ from that WooCommerce template pack.

How To Make A Single Product Page With Woocommerce Templates? 5

For this tutorial, we will be using the ‘Fluid Fashion Product Details Page‘. Simply click on the ‘Insert’ button to load the page template on your website.

WooCommerce Single Product Page

Step 5: Customize Your Single Product Page For WooCommerce

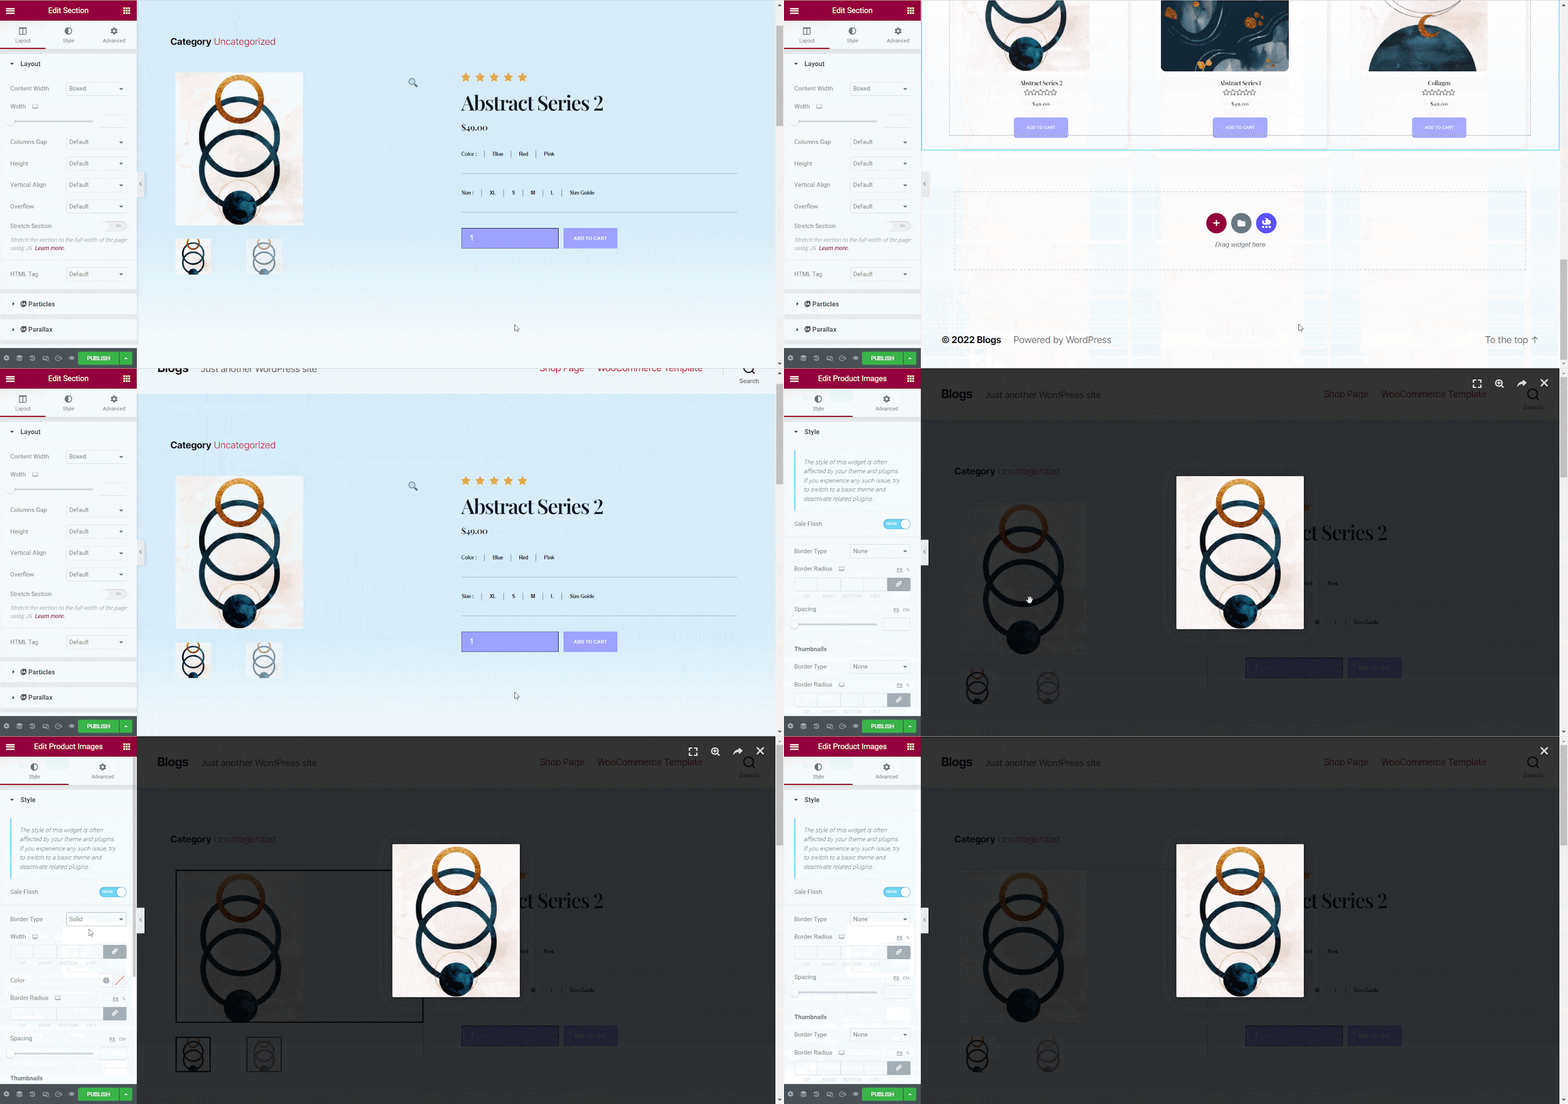
After inserting your single product page template, you can customize it any way you want according to your needs. You customize each section of the template design, change the colors and backgrounds, typography, and much more by playing around with the settings under the ‘Content’ and ‘Style’ tabs as shown below.

How To Make A Single Product Page With Woocommerce Templates? 7

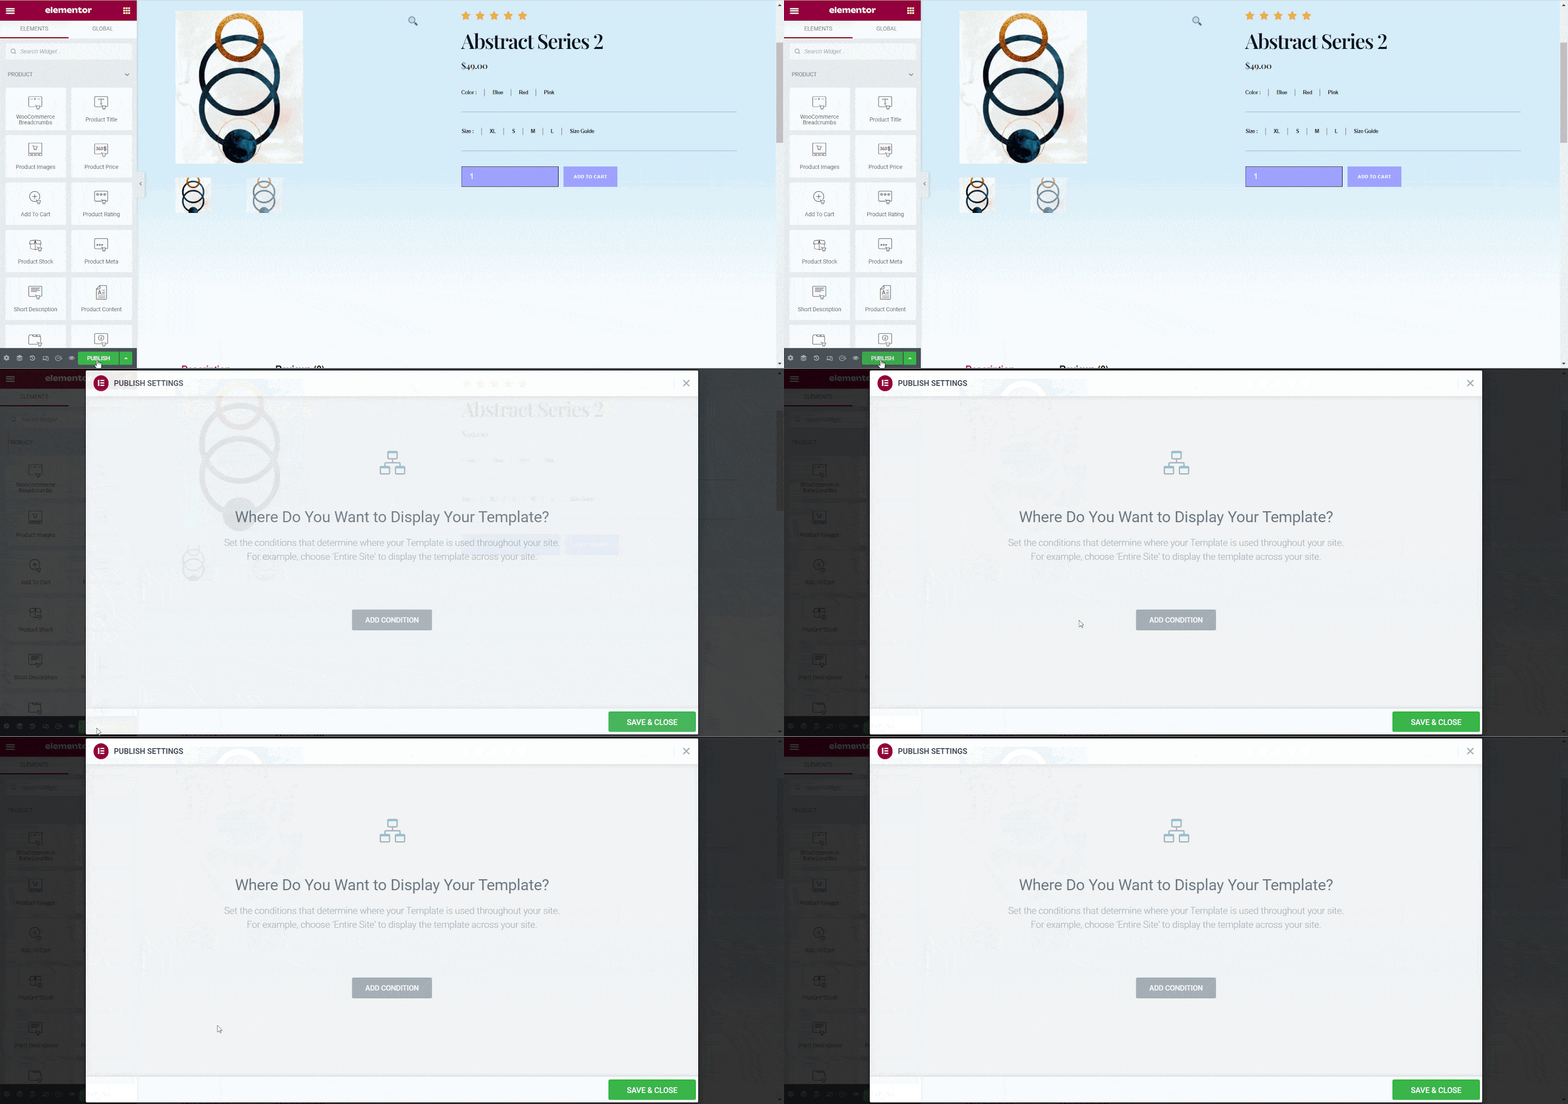
Step 6: Publish Your WooCommerce Single Product Page 

When you are done with the customization, you can then save the template design to MyCloud by right-clicking anywhere on your page and choosing the ‘Save Page To Templately’ option.

This way you can save your page designs as a backup or share them with your team members using Templately WorkSpace. Afterward, click on the ‘Publish’ button and set the condition for the products. 

How To Make A Single Product Page With Woocommerce Templates? 8

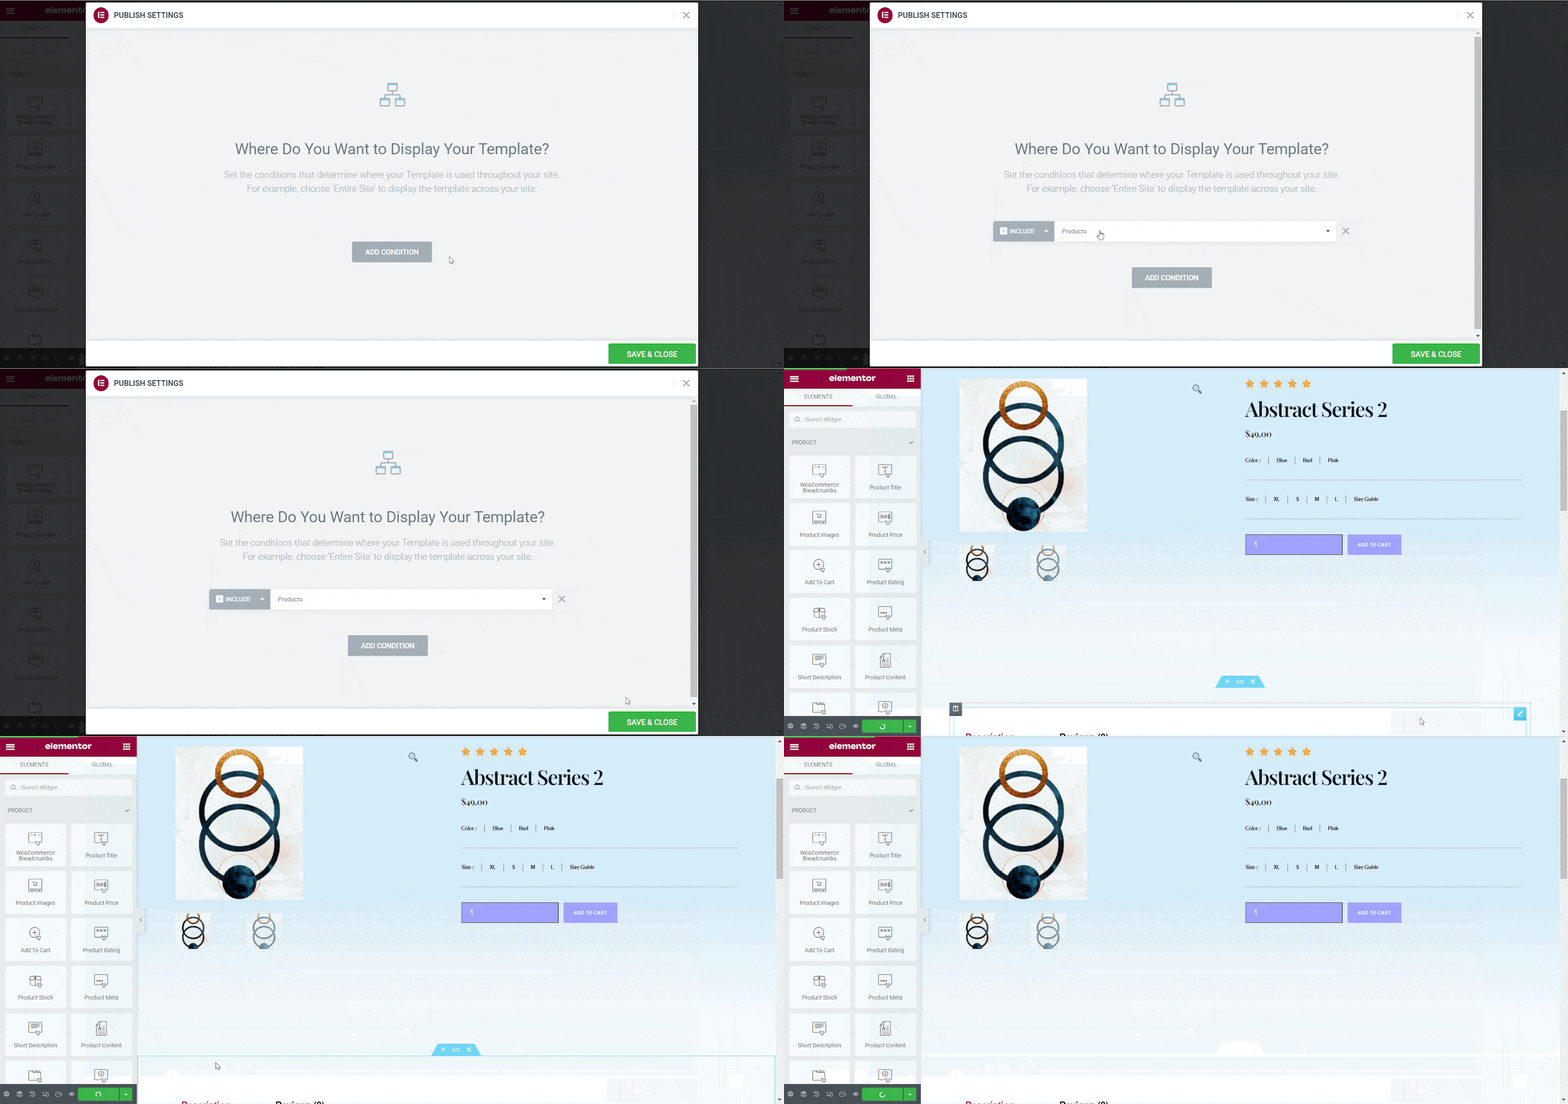
Now, click on the ‘ADD CONDITION’ button and set the conditions for where you want to display your template. After that select the condition and hit the ‘SAVE & CLOSE’ button.

How To Make A Single Product Page With Woocommerce Templates? 9

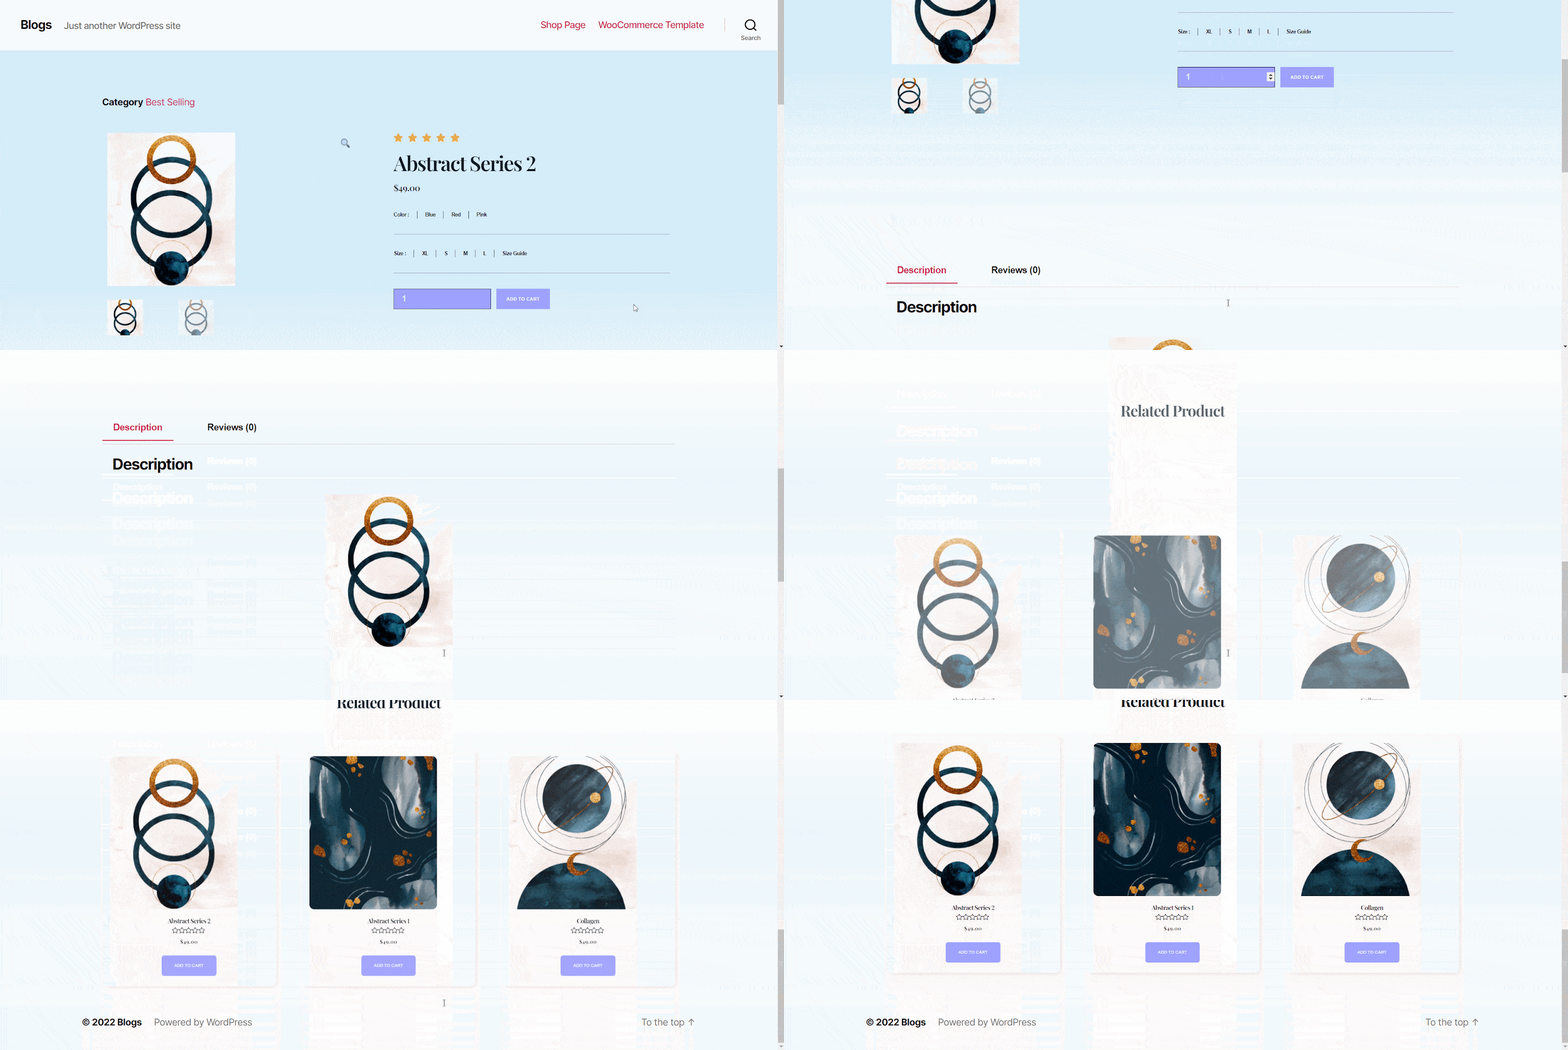
That’s it. Now, you can see your WooCommerce templates added to each of your single product pages. This is how your single product page for WooCommerce will look on your site. 

How To Make A Single Product Page With Woocommerce Templates? 10

By following these basic steps, you can use Templately to create your own WooCommerce Single Product Page in Elementor without coding.

Getting Stuck? Feel free to contact our support team for further assistance.

Downgrade Current Subscription Plan

How To Downgrade Current Subscription Plan For Templately & What Happens When I Do So?

With Templately, now you can easily downgrade your current subscription plan to a smaller plan within a few clicks. If you are using the Premium plan, then you can downgrade to the Starter plan easily. Follow the instructions given below to downgrade your subscription plan.

How To Downgrade Subscription Plan From Premium To Starter?

Here is a step-by-step guideline to downgrade the current subscription plan from Premium to Starter on Templately. 

Note: The same steps will apply when you want to downgrade from a premium subscription plan to another, smaller subscription plan.

Step 1: Navigate To The ‘Subscription’ Tab In Templately

Sign in to your Templately account. Click on your profile and select ‘Subscription’ from the list of options in the drop-down menu.

Downgrade Current Subscription Plan

Step 2: Click On The ‘Downgrade’ Button

You will be taken to the ‘Subscription’ page where you can see all the subscription plans available for Templately. You can also check which plan is currently active as shown below. To downgrade the subscription plan for your Templately account, simply click on the ‘Downgrade’ button.

Downgrade Current Subscription Plan

A popup will appear asking for your confirmation.  Click on the ‘Downgrade’ button, and your Templately plan will be successfully downgraded from Premium to Starter. 

Downgrade Current Subscription Plan

By following these simple steps, you can downgrade your current subscription plan in Templately.

What Will Happen If You Downgrade Your Current Plan?

If you downgrade your current subscription plan for Templately to any other premium plan or Starter package, you can still continue using Templately, but certain features may be limited. Here are some changes that will occur when you downgrade from the Premium plan to the Starter plan.

  • All of your previously created WorkSpaces will be available on all plans. However, if you downgrade to the Starter plan, you will not be able to create new WorkSpaces.
  • Each plan offers a specific number of active website access. Once you downgrade, you will have limited access to active websites. However, the Lifetime plan gives you access to unlimited websites.
  • All premium plans offer an unlimited item-saving feature  in MyCloud storage. But if you downgrade to the Starter Pack, you can save up to 100 items. However, if you have already saved more than 100 items while using a premium plan but want to downgrade to the Starter plan, your designs will still be accessible on MyCloud.
  • You will not be able to access upcoming, new Pro templates from Templately.

If you want to keep your exclusive Premium plan features, you can upgrade anytime from your Templately account. To learn more on how to easily upgrade your Templately subscription, check out this documentation.

Feel free to reach out to our dedicated support team in the event of any difficulties, and also if you wish to get constant updates about Templately, you can join our Facebook community.

Woo Checkout

How To Create A Woo Checkout Page And Cart Page In Elementor With Templately

Using ready Elementor templates from Templately, you can create a Woo Checkout Page and Cart Page instantly in Elementor. To do this, you need to first set any page on your website as your Checkout page and Cart page. Follow these steps below to create a WooCommerce Checkout Page and WooCommerce Cart Page in Elementor with Templately.

How To Set Up Your Woo Checkout Page And Cart Page

At first, you need to install and activate the WooCommerce plugin and Essential Addons For Elementor. This is because the Checkout page templates in Templately are made with the Woo Checkout element from Essential Addons. This is the most popular addons for Elementor with over 1 million happy users.

After installing these two plugins, you need to set up your store and your products for your WooCommerce by following the on-screen instructions. Then, navigate to Essential Addons→ Elements and scroll down until you find the Woo Checkout element. Toggle this element to enable it and click on ‘Save Changes’.

Woo Checkout

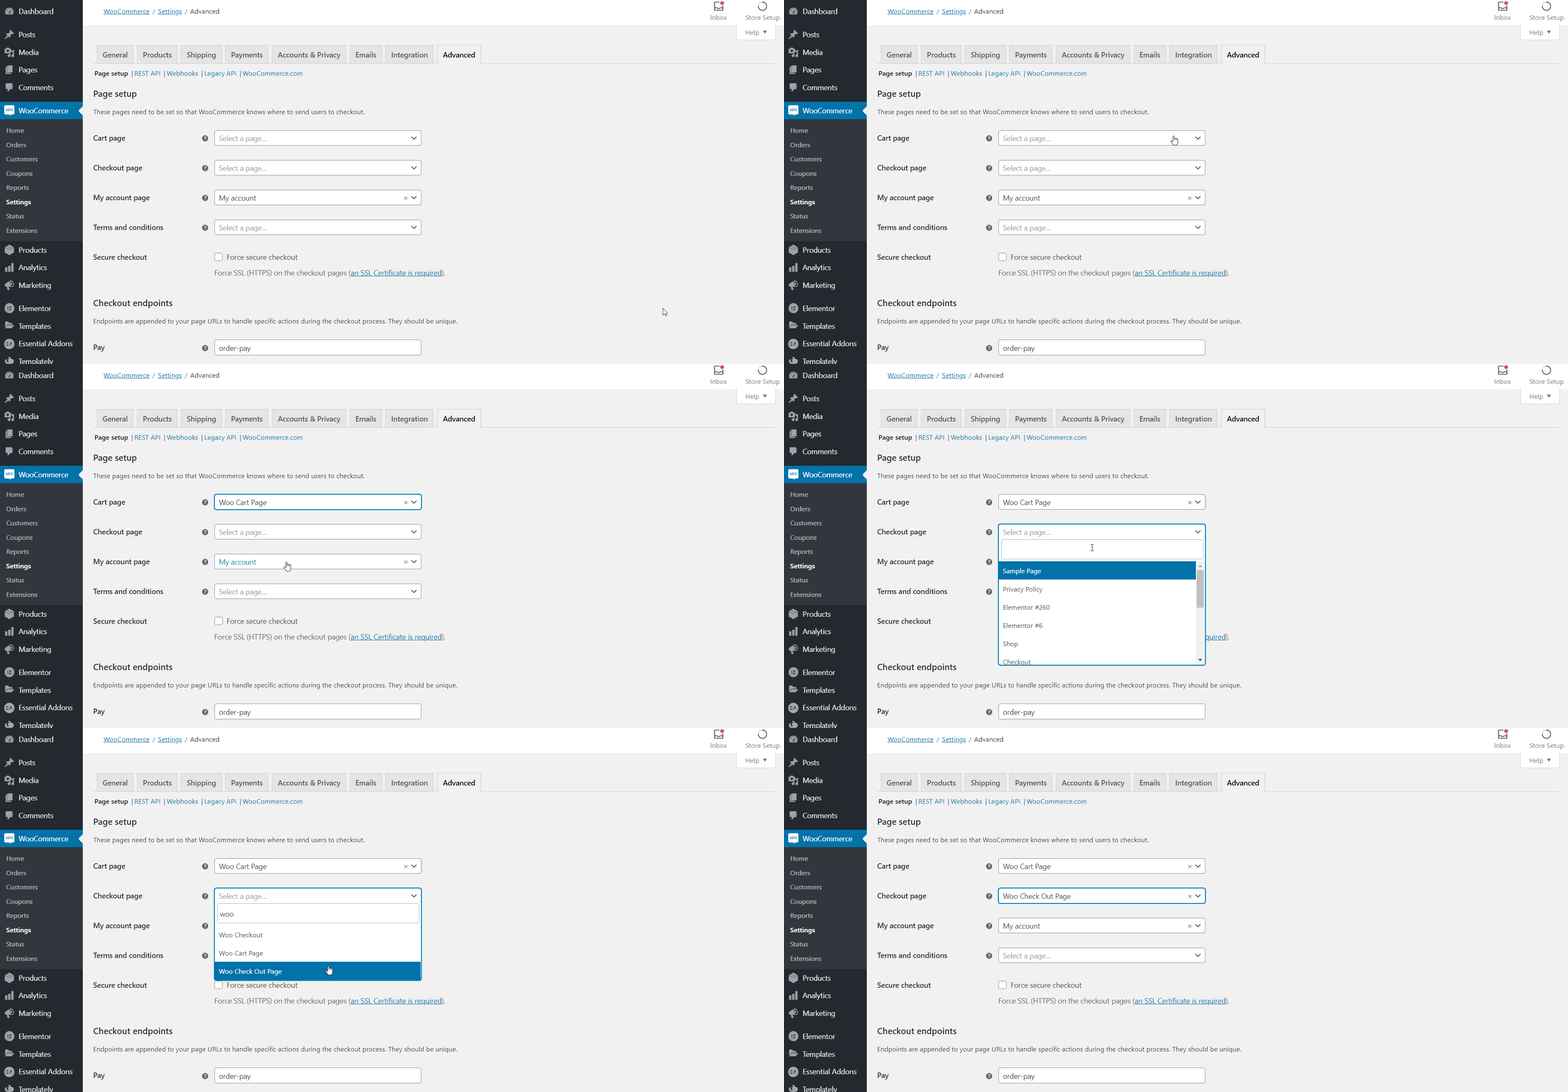
Next, create two new pages by heading over to Pages→ Add New from your WordPress dashboard. These will be your new Woo Checkout page and Cart page. Give these pages a name and then navigate to WooCommerce →Settings. 

Head over to the ‘Advanced’ tab. From here, you have to assign the page you created earlier as your Woo Checkout page. Click on the Checkout page option and choose a page from the drop-down menu as your Woo Checkout page. Do the same for your Woo Cart page. Make sure to save your changes.

Woo Checkout

Your Woo Checkout page and Cart page have now been set up. Now you can insert and use any ready page template from Templately.

How To Insert And Customize Woo Checkout Page And Cart Page

Navigate to your ‘Pages’ from your WordPress dashboard. Choose the Woo Checkout page that you have assigned in the previous step and click on ‘Edit with Elementor’. Once the Elementor Editor is done loading, you can insert ready Elementor templates from Templately and customize them by following the steps below.

Step 1: Insert Elementor Templates From Templately

Click on the blue ‘Templately’ icon and choose any Elementor template pack for WooCommerce. Check the ready page templates and choose your ‘Checkout Page’ from that template pack. For this tutorial, we will be using the ‘Upsole Checkout PageSimply click on the ‘Insert’ button to load the page template on your website.

Woo Checkout

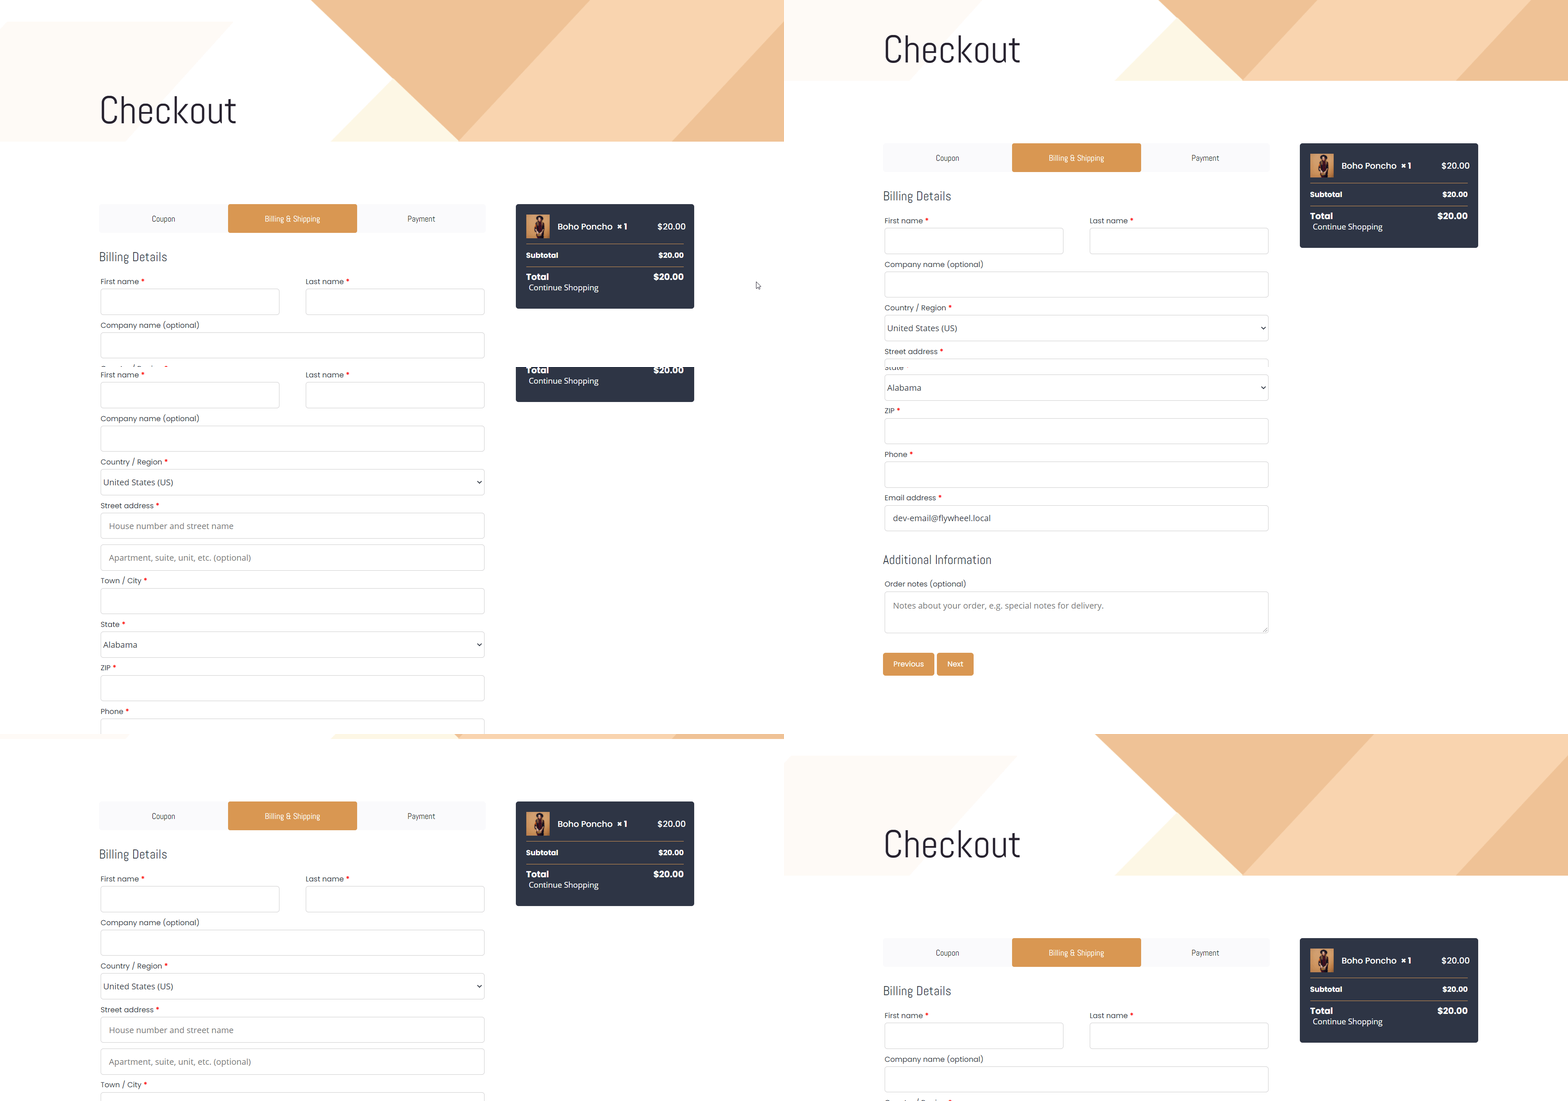
When your page template is done loading, this is how your Woo Checkout Page will appear on your website by default. Repeat these same steps for your Woo Cart page as well.

Woo Checkout

Step 2: Customize Your Woo Checkout Page

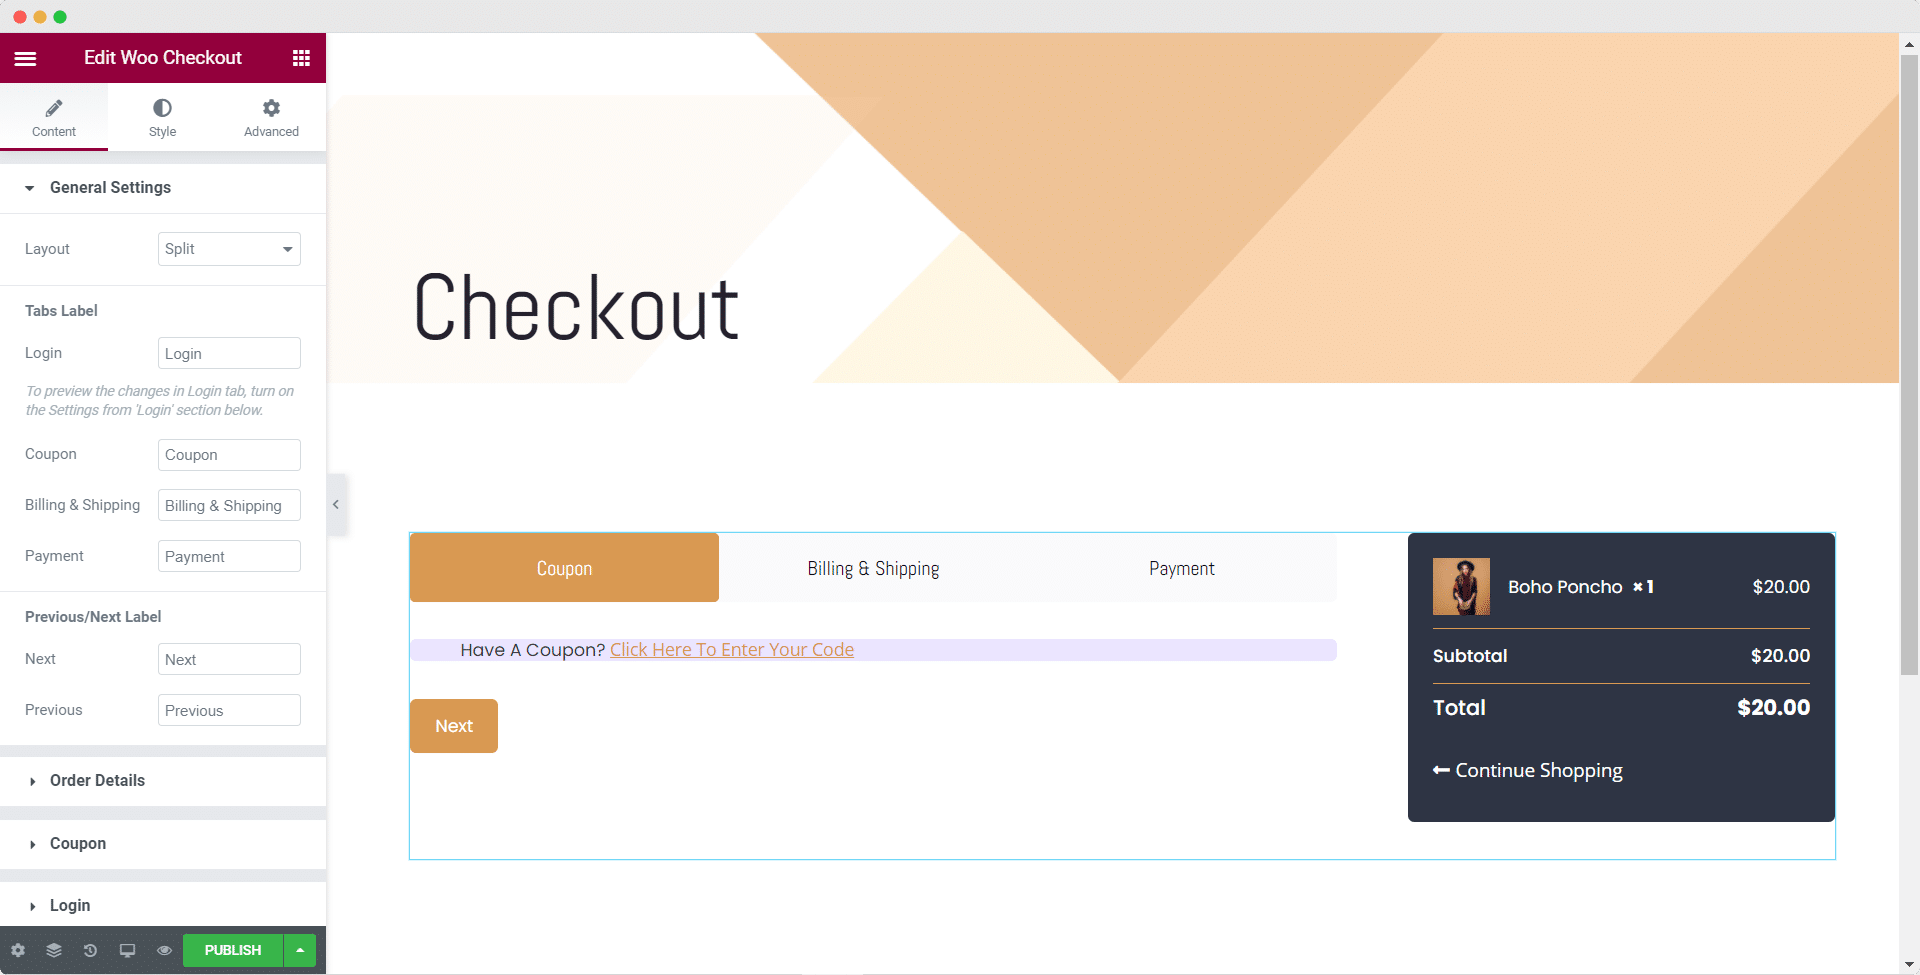
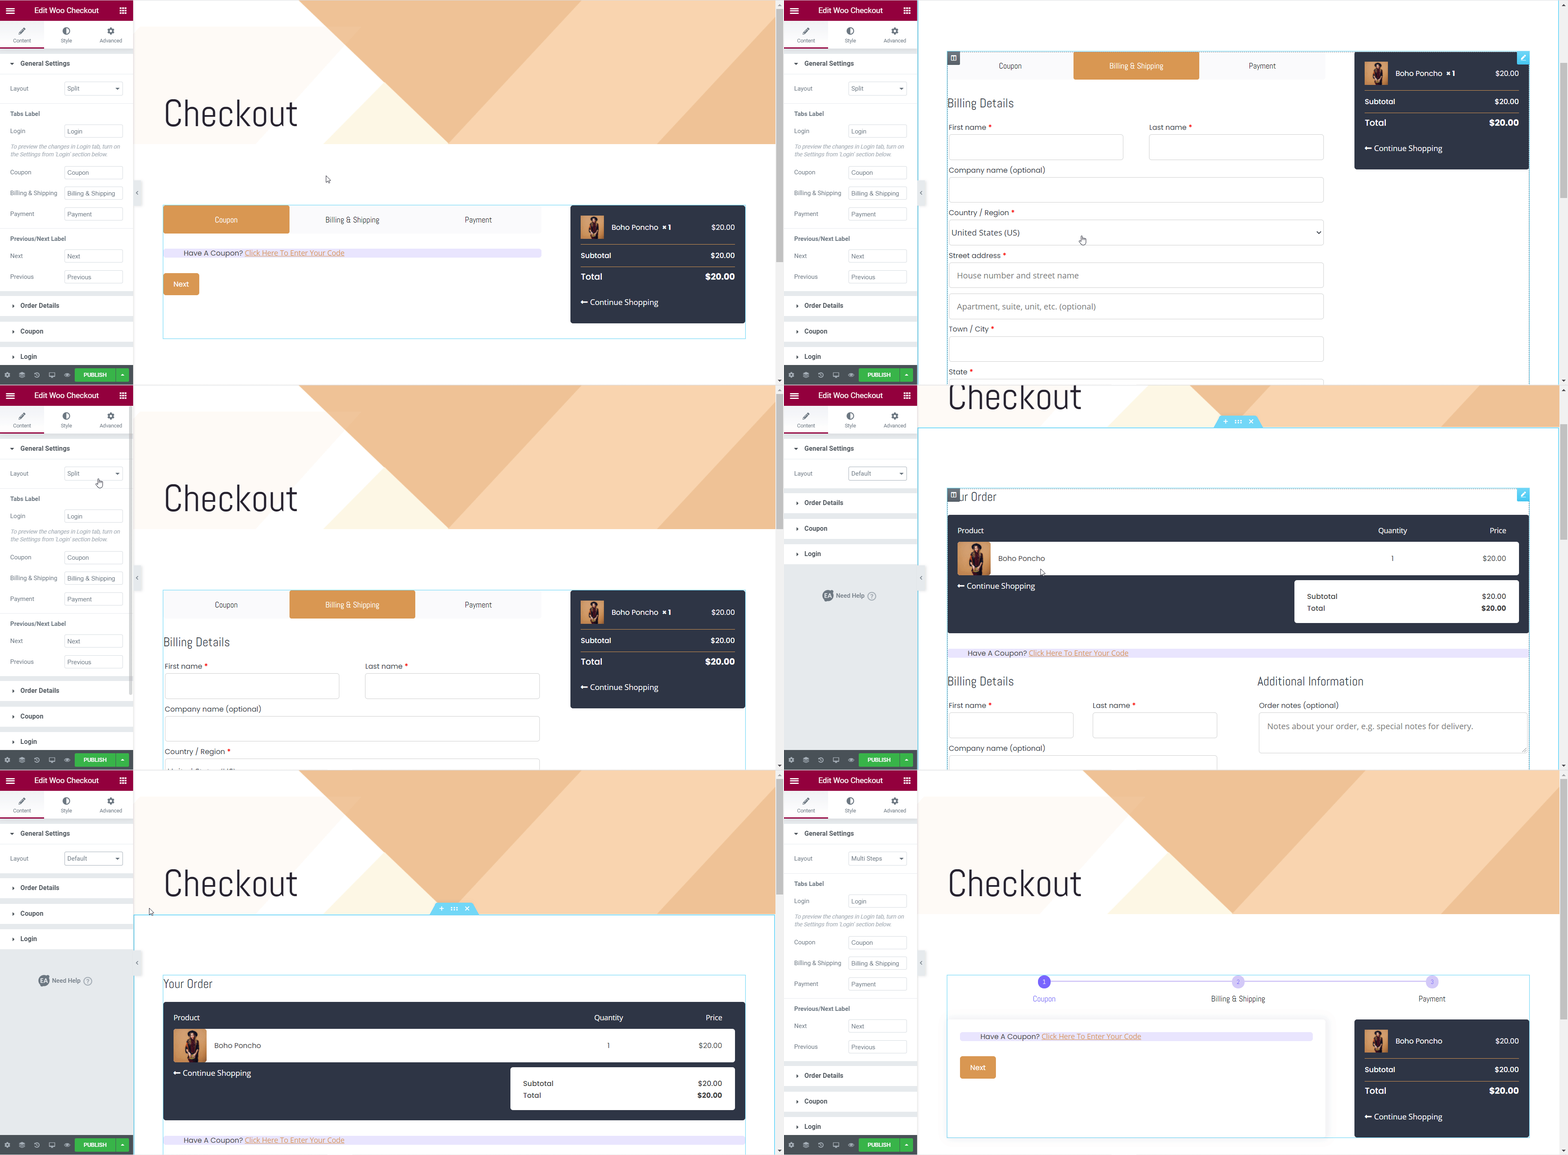
You can now customize your Woo Checkout page any way you want in Elementor Editor. From the ‘Content’ tab you can choose different layouts for your Checkout page. Currently, you can choose between the ‘Default’, ‘Multi-Step’, and ‘Split’ layout styles for your Checkout page. From the ‘Style’ tab, you can change the colors, typography, font styles, and much more. To find out more about different styling and customizing options, read this documentation.

How To Create A Woo Checkout Page And Cart Page In Elementor With Templately

Step 3: Publish Your Checkout Page And Cart Page

When you are done customizing your Checkout page and Cart page, you can save the template design to MyCloud by right-clicking anywhere on your page and choosing the ‘Save Page To Templately’ option. This way you can save your page designs as a backup or share them with your team members using Templately WorkSpace. Afterward, click on ‘Publish’ to make your Checkout page and Cart page live.

Woo Checkout


By following these basic steps, you can use Templately to create your own Checkout page and Cart page in Elementor without coding.

If you face any difficulties, feel free to contact our support team for further assistance.

header and footer block

How To Use Templately Header And Footer Blocks In Elementor Theme Builder

Using the ready-made Templately header and footer blocks, you can instantly create stunning headers or footers for your website in Elementor Theme Builder. Once you have inserted a header and footer block and customized it in Elementor, you can use it on every page of your WordPress website if you want to. 

Note: Elementor Theme Builder is a feature that is only available with Elementor Pro. Therefore you must install both Elementor and Elementor Pro on your website to create your header and footer blocks with Templately.

How To Create A Header In Elementor

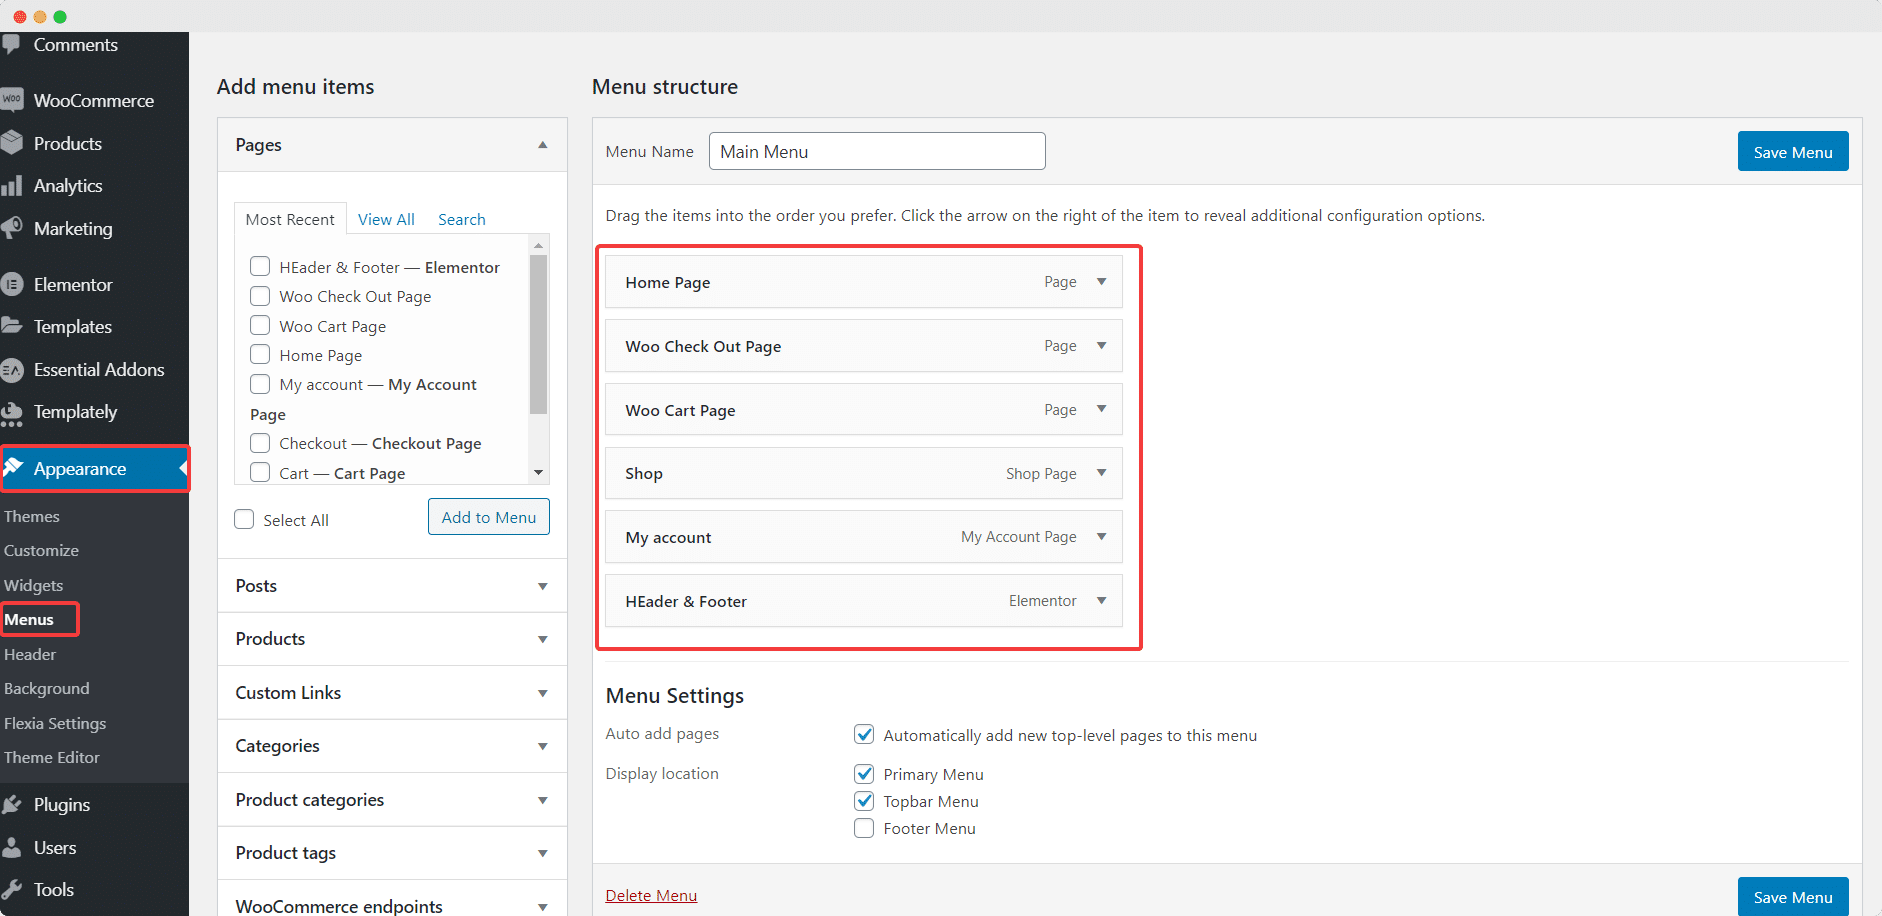
You can create a header for your webpage in Elementor using the ready header blocks from Templately. But first, you will have to set up a menu in WordPress. You can do this by navigating to Appearance→ Themes→ Menus from your WordPress dashboard as shown below.

Header And Footer Block

After completing this step, save your changes and follow these step-by-step instructions below.

Step 1: Create A Template In Elementor Theme Builder

From your WordPress dashboard, navigate to Elementor→ Templates→ Theme Builder. This will take you to the Elementor Theme Builder. Click on ‘Header’ to add a new header block in Elementor.

Header and Footer block

Step 2: Insert Header Blocks From Templately

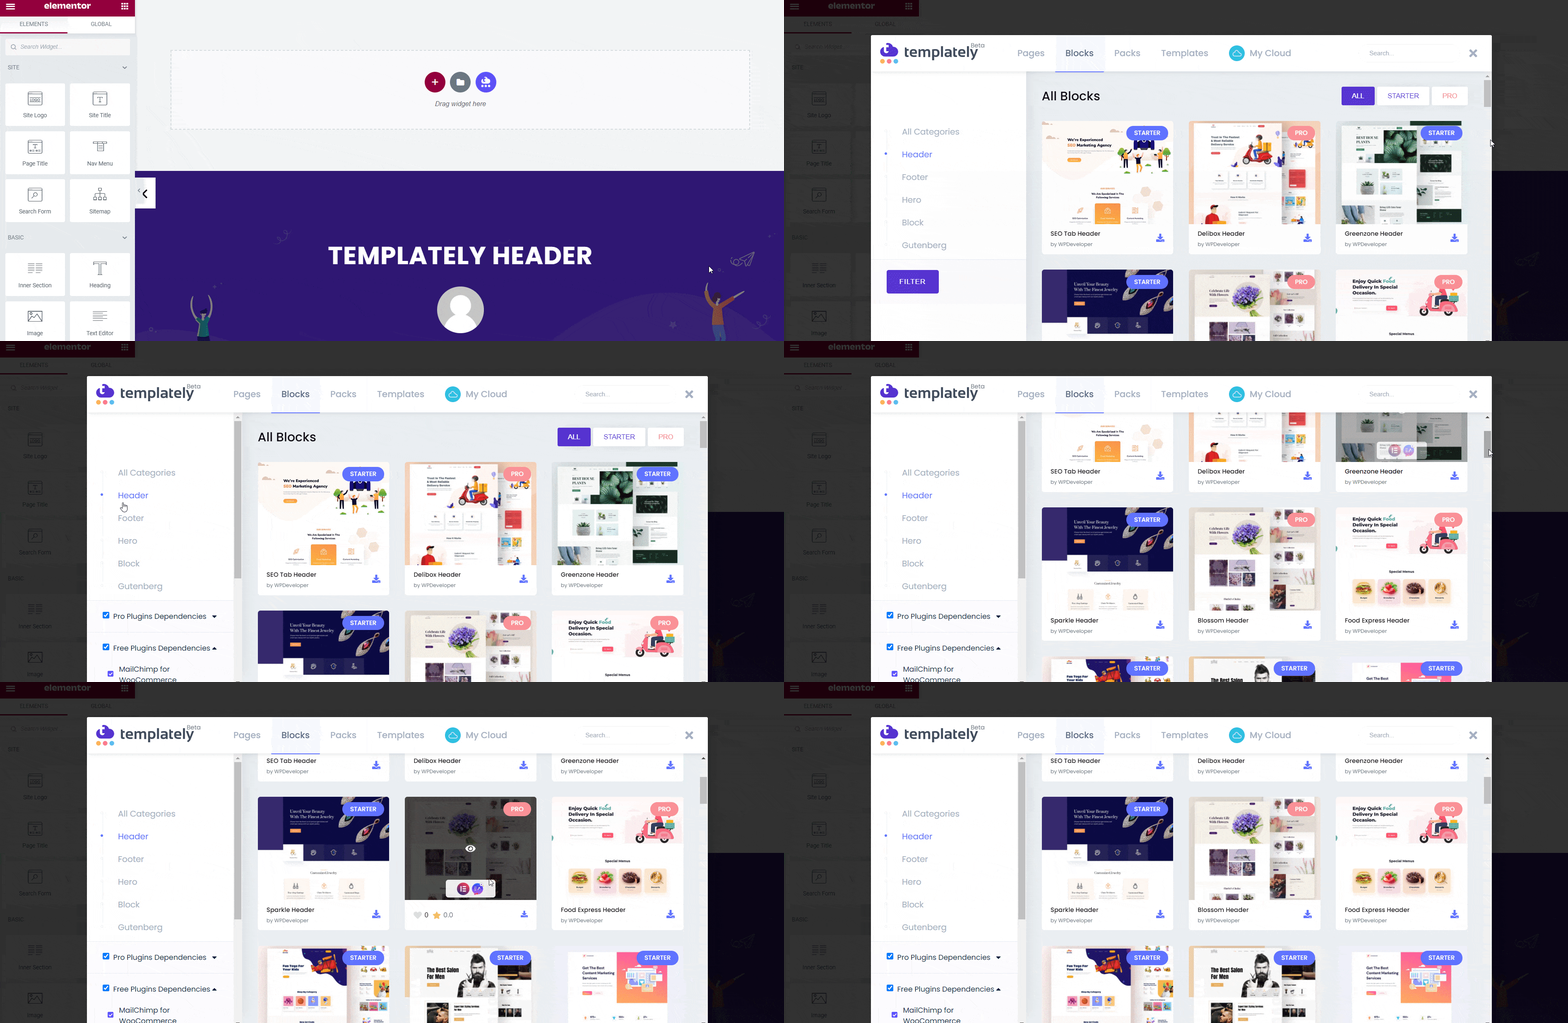
Next, click on the blue ‘Templately’ icon in Elementor Editor. A popup window will appear displaying all the ready header and footer blocks from Templately. Pick any of the header blocks that you like and click on the ‘Insert’ button.

Header and Footer block

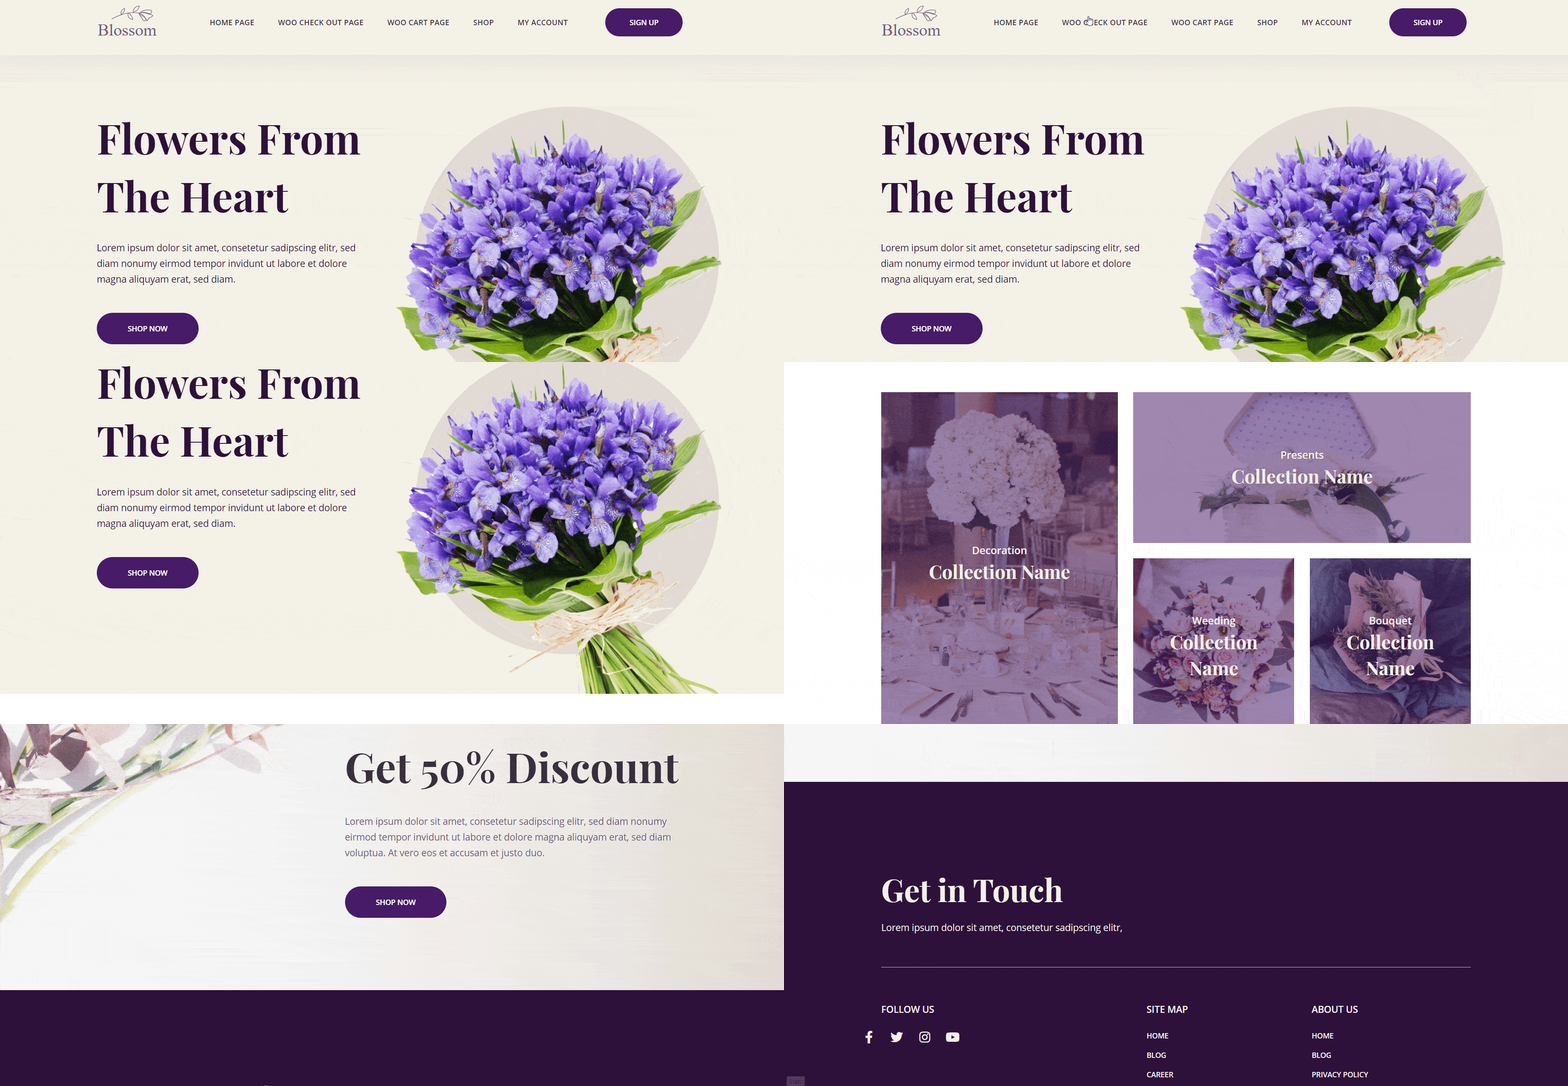
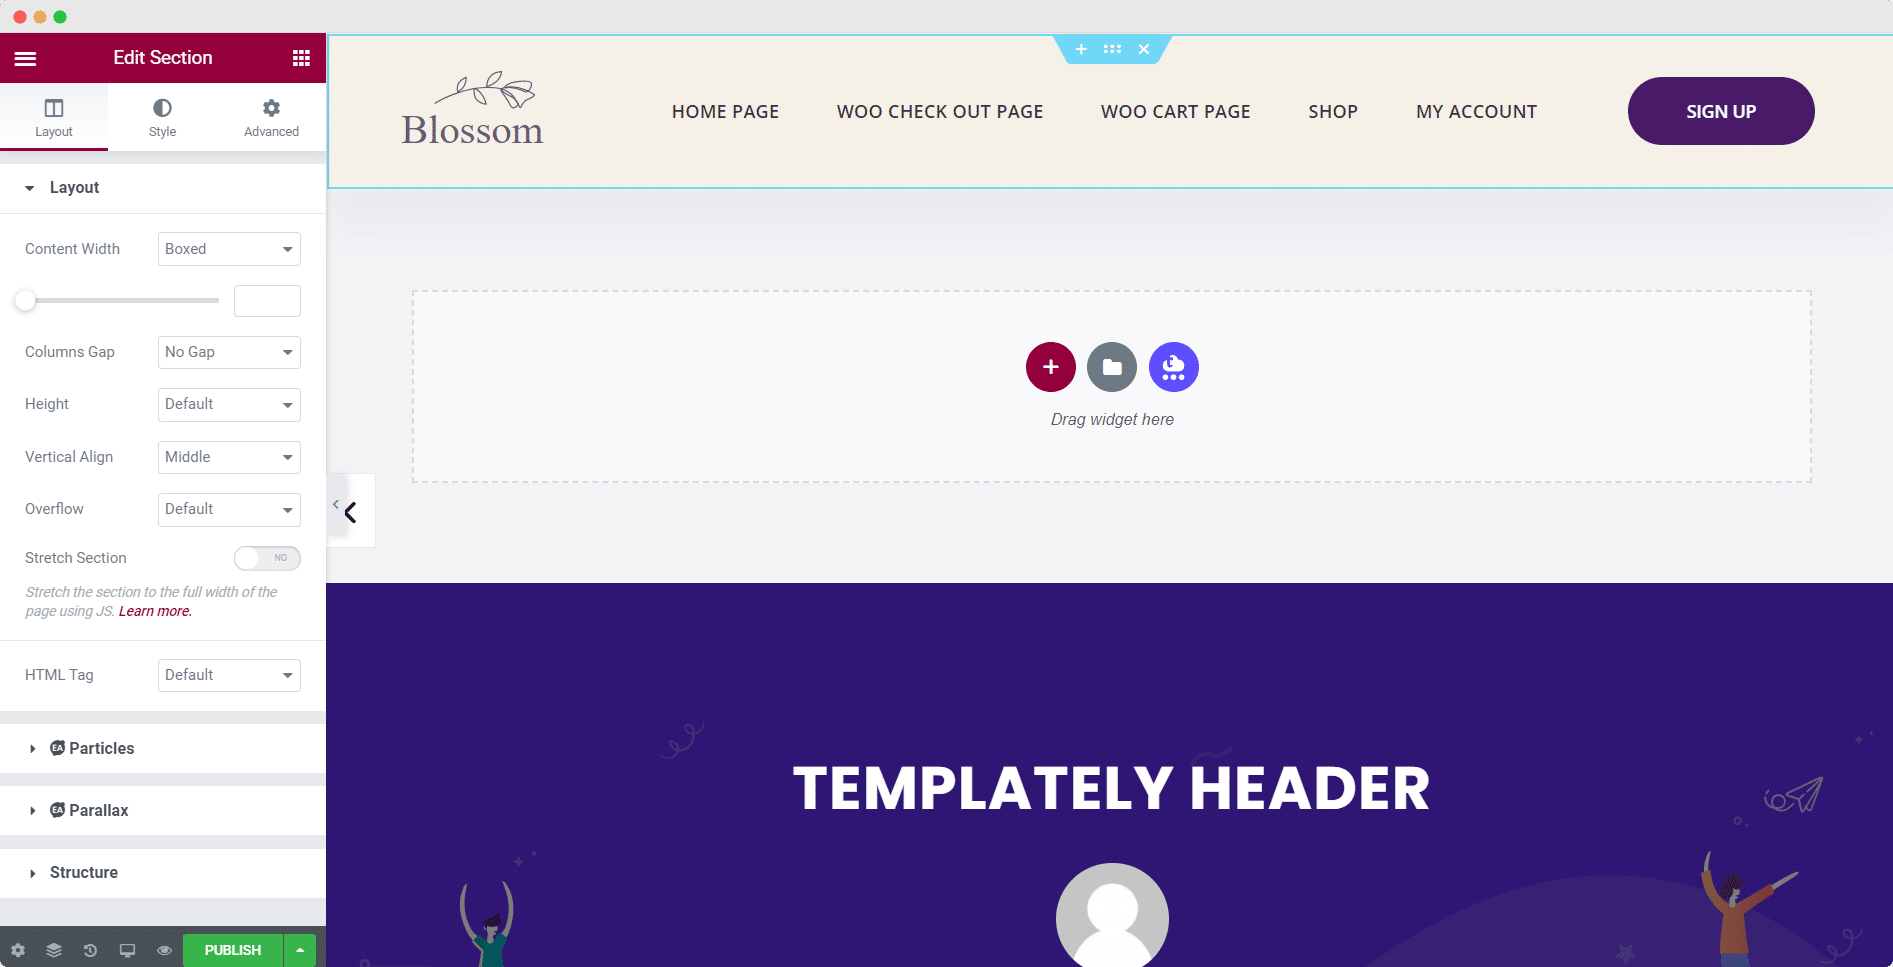
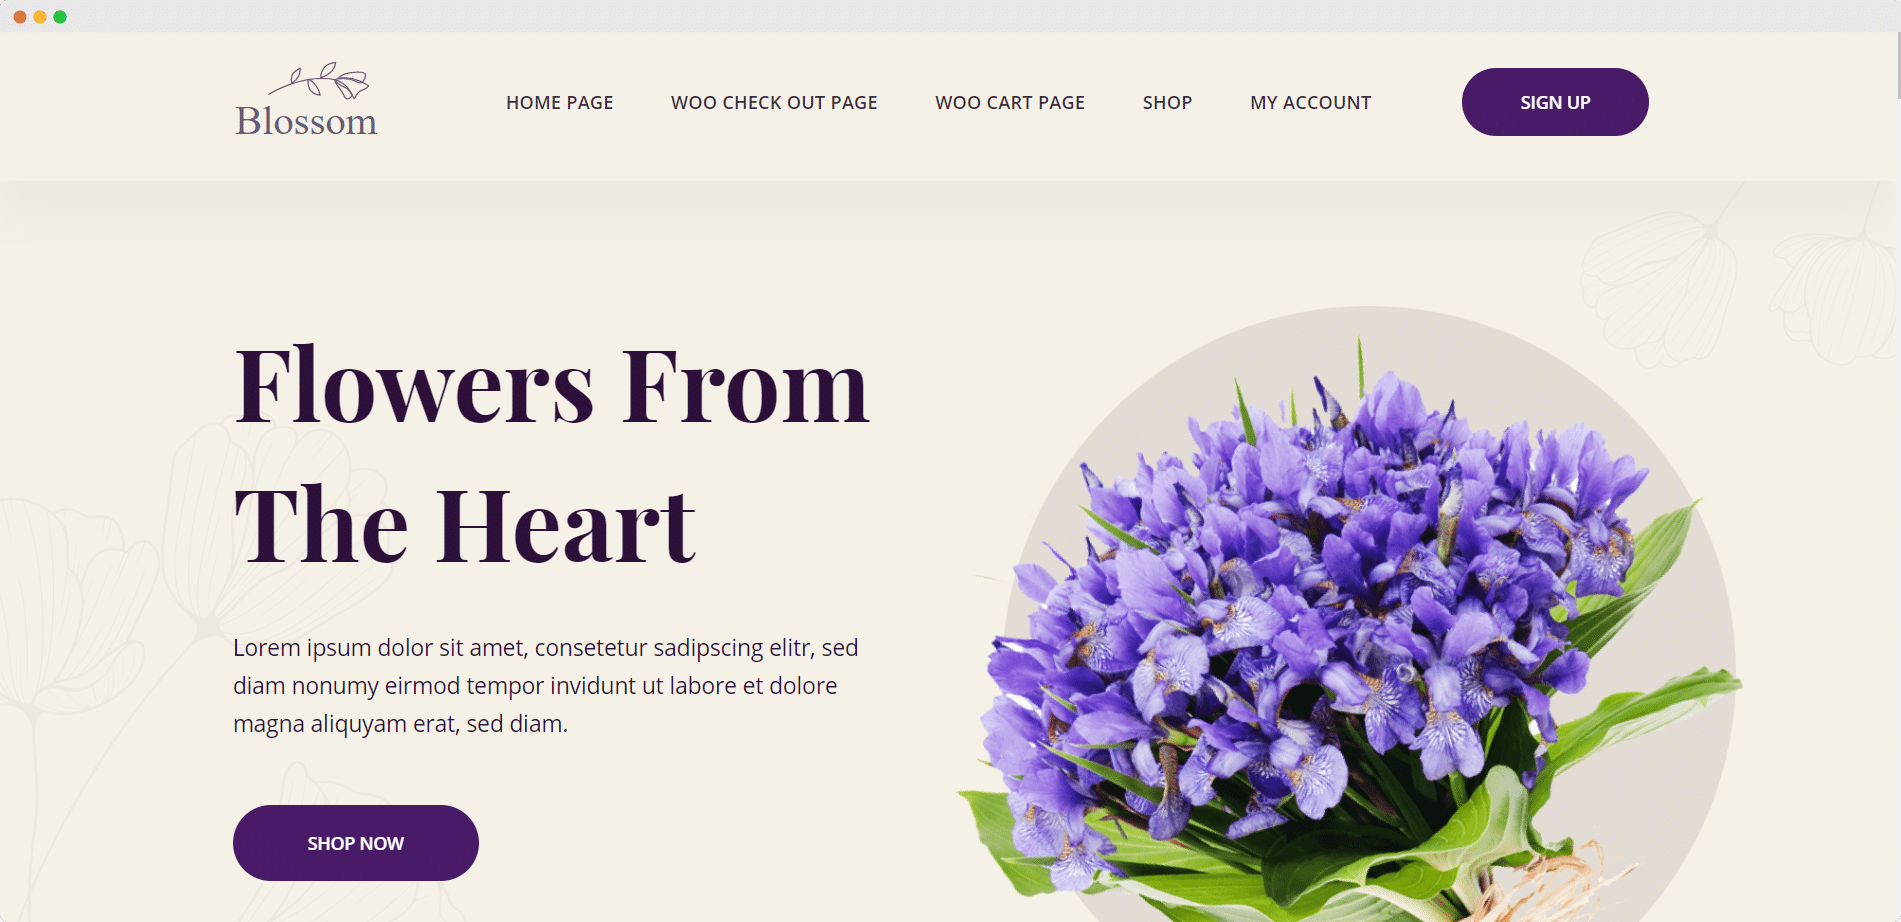
For this documentation, we will be using the Blossom Header block from Templately. By default, the block will appear on your website as shown below.

Header and Footer block

Step 3: Customize & Publish Your Header 

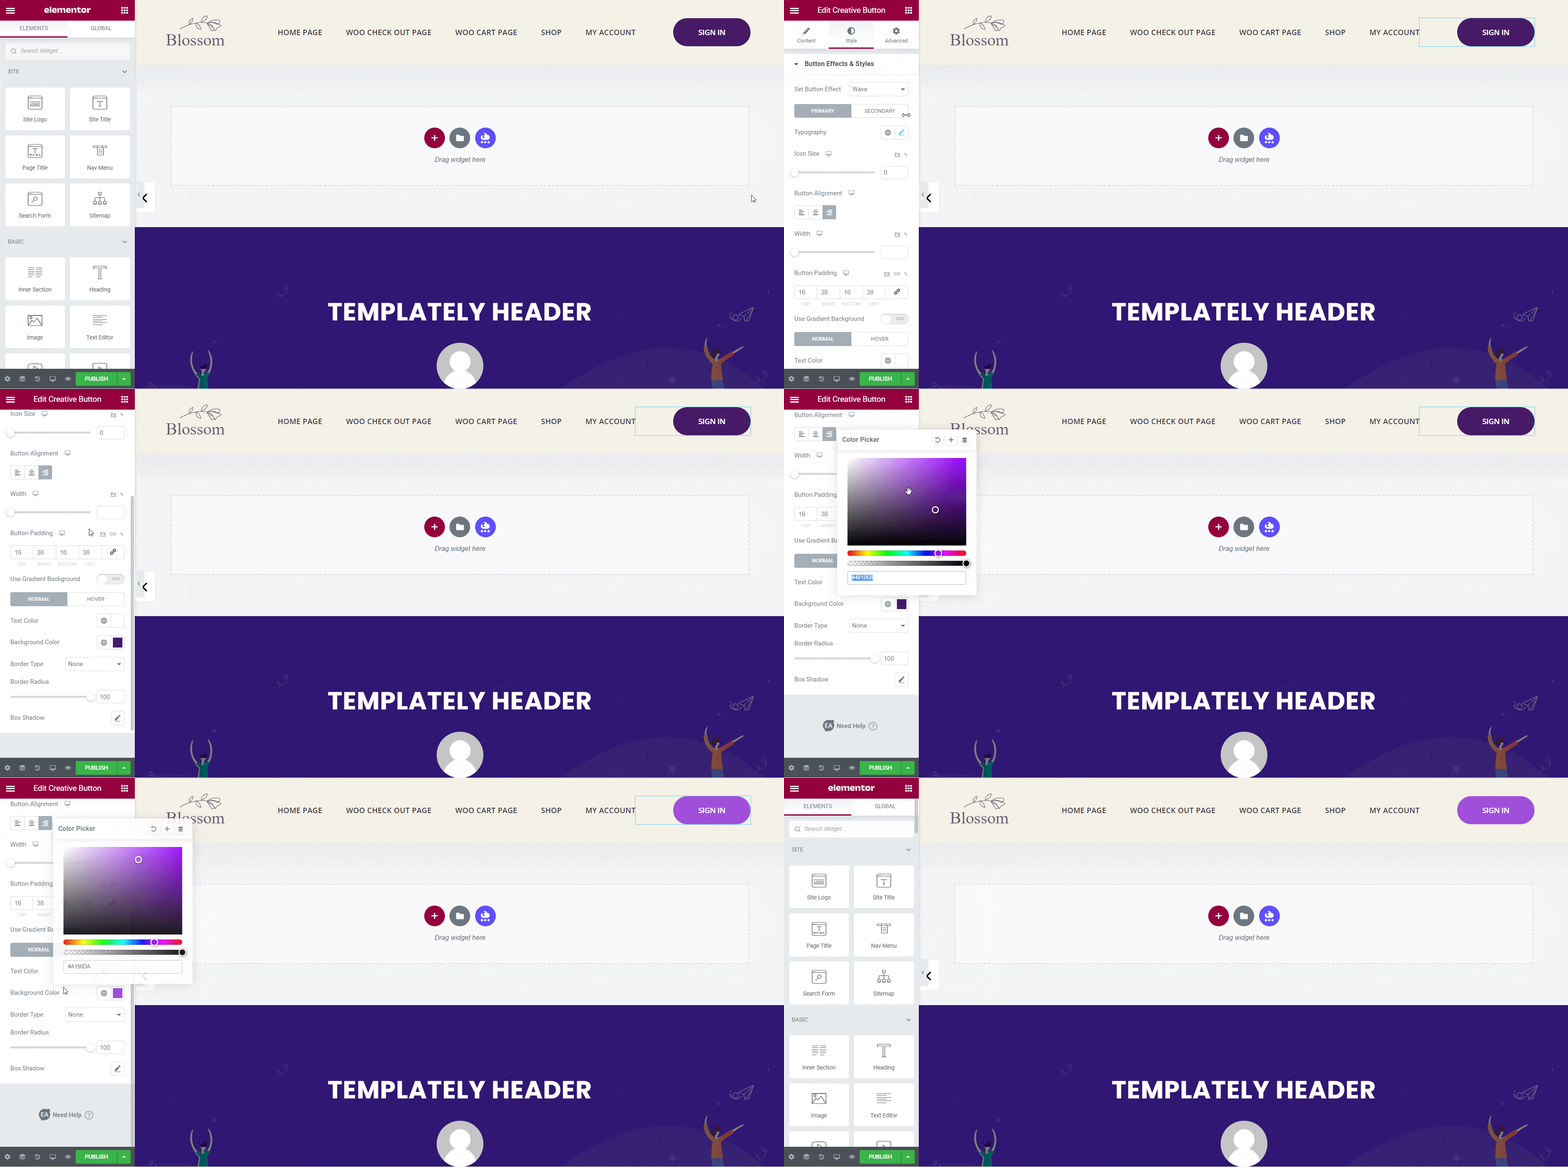
You can customize your header in Elementor Theme Builder any way you want. Click anywhere on your header. Then, from the ‘Content’ tab, add your own content for your header. Similarly, from the ‘Style’ tab, you can change the colors, typography, and more.

Header and Footer block

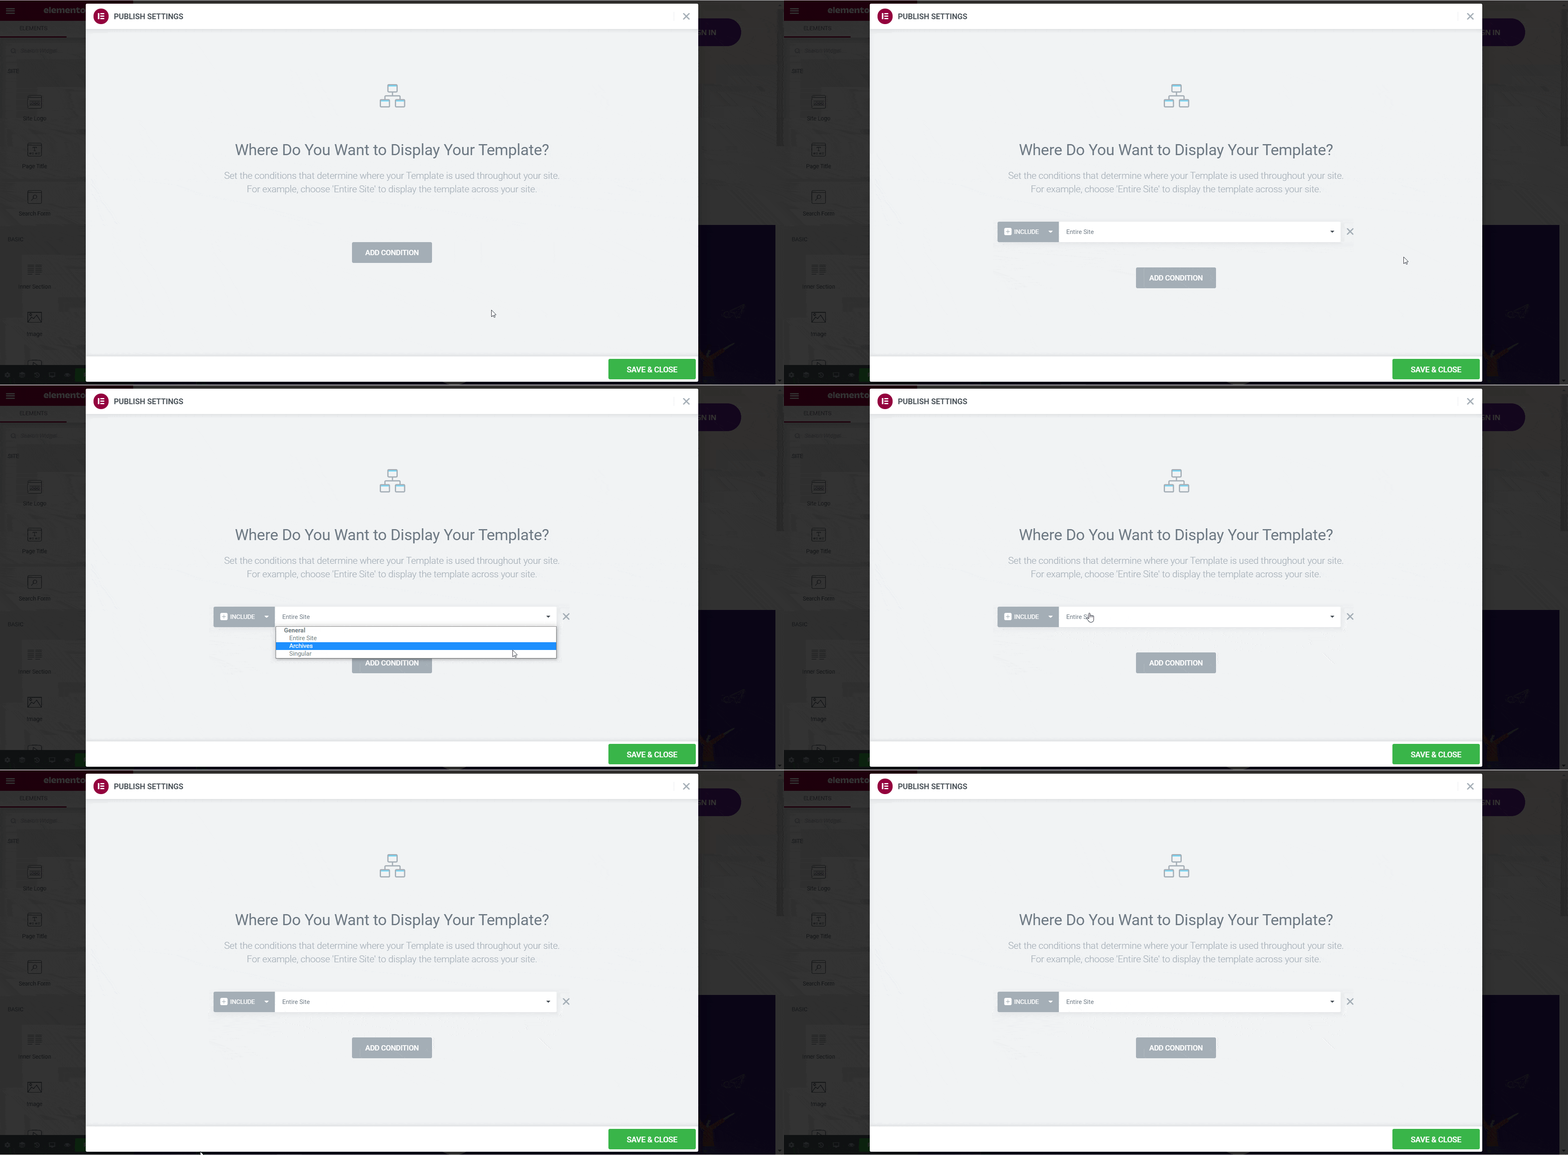
When you are done customizing, you can publish your header block by clicking on the ‘Publish’ button. A popup will appear asking you to set conditions and choose where you want your header to be displayed. This step is completely optional. If you are ready to make your header live, click on the ‘Save & Close’ button.

header and footer block

You have successfully created your own header in Elementor Theme Builder using the ready header blocks from Templately. This is how your header will appear on your webpages. 

header and footer block

How To Create A Footer In Elementor

To instantly create a footer in Elementor using ready Templately footer blocks, follow these step-by-step instructions below.

Step 1: Create A Template In Elementor Theme Builder

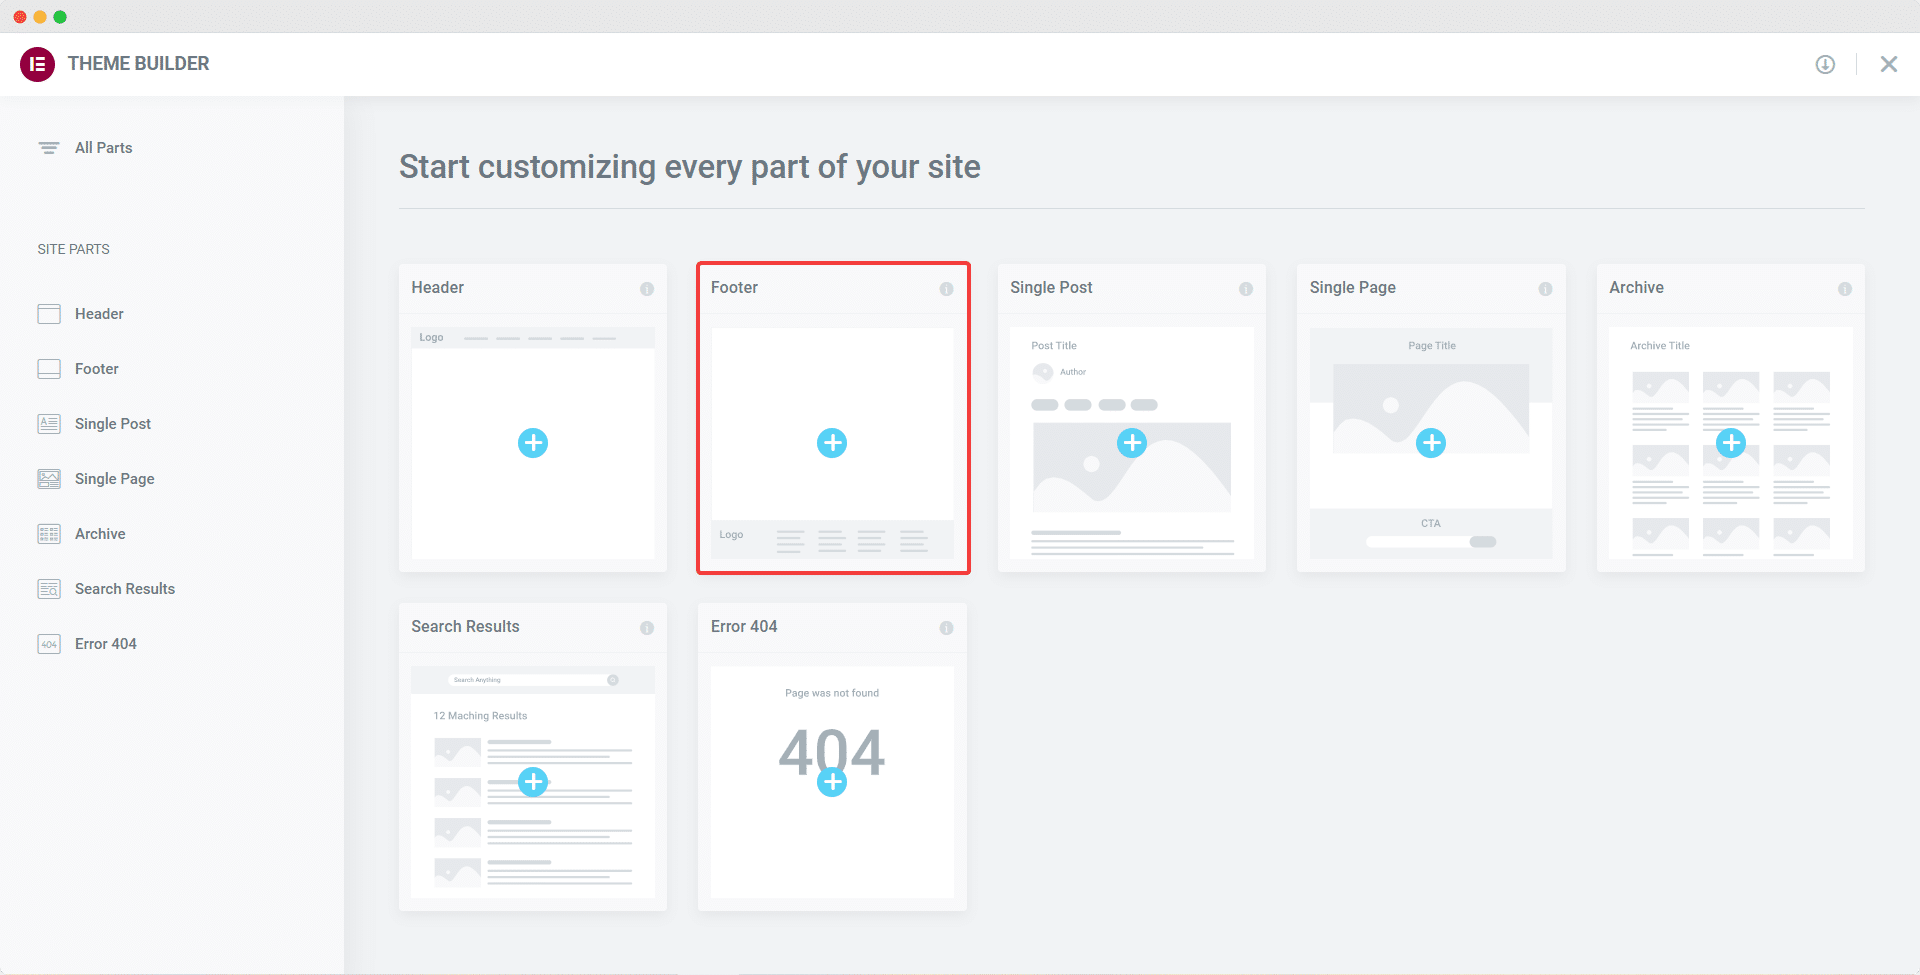
Navigate to Elementor→ Templates→ Theme Builder from your WordPress dashboard. This will take you to the Elementor Theme Builder. Click on ‘Footer’ to add a new footer block in Elementor.

header and footer block

Step 2: Insert Footer Blocks From Templately

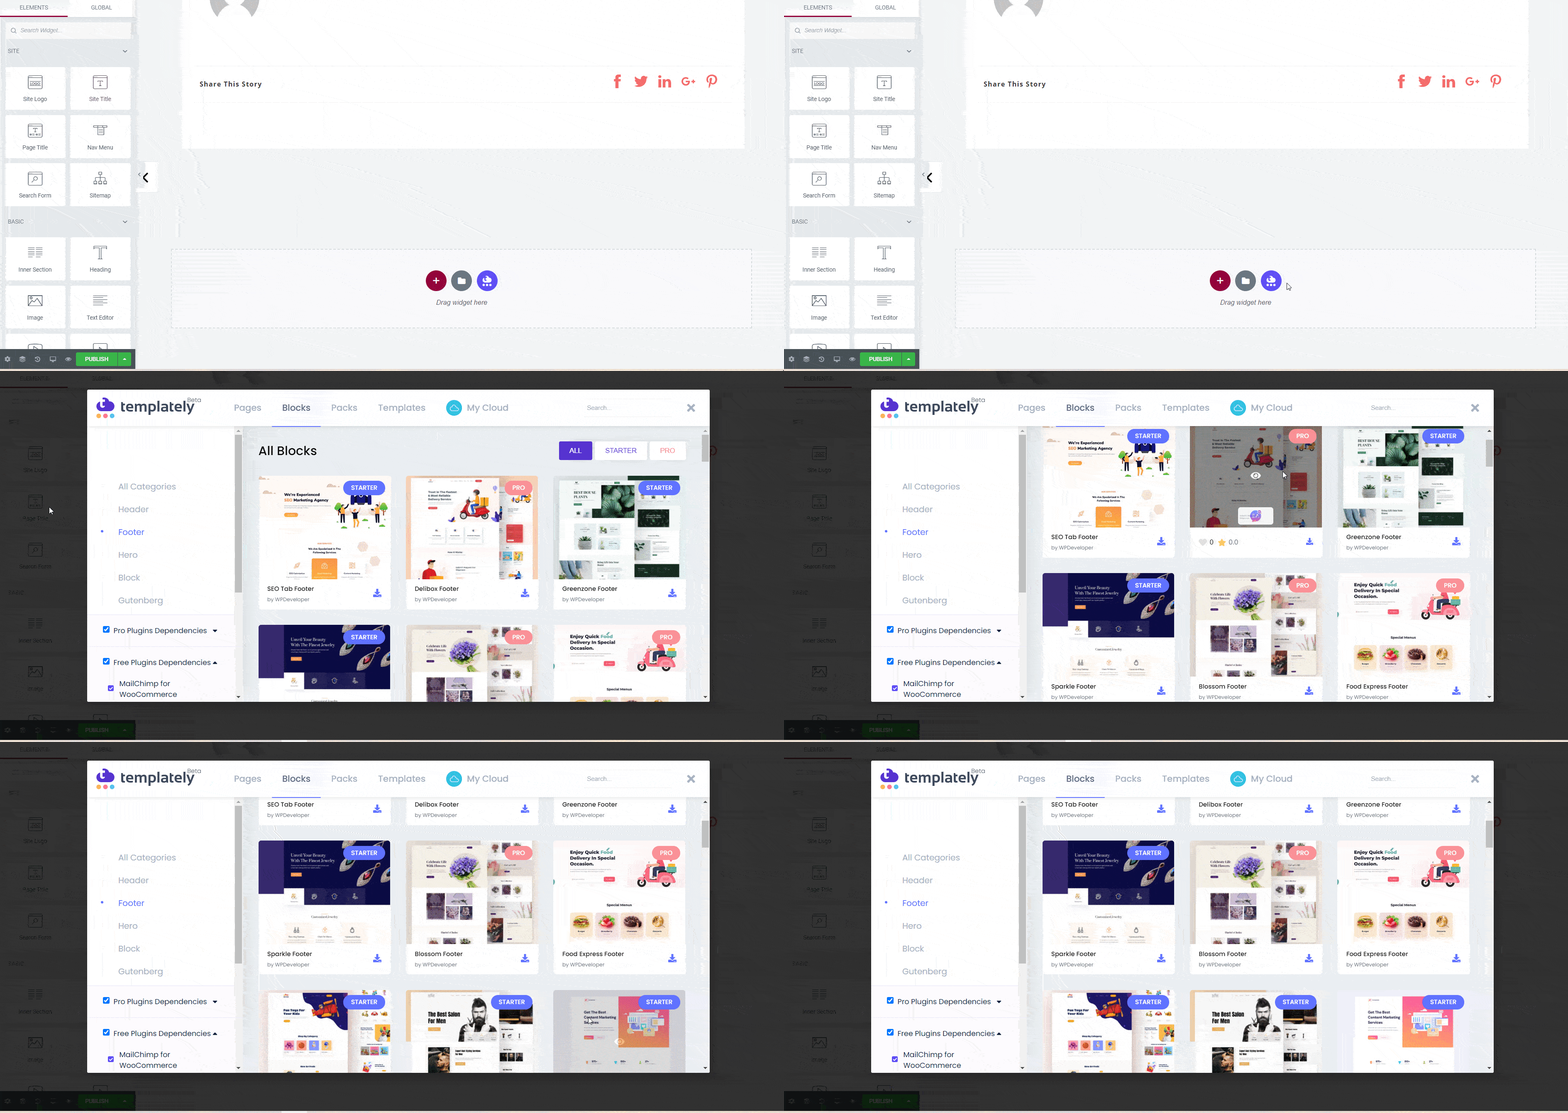
Click on the blue ‘Templately’ icon in Elementor Editor to insert any footer block. A popup window will appear displaying all the ready header and footer blocks available in Templately library. Choose any of the footer blocks that you like and click on the ‘Insert’ button.

Header and footer block

For this documentation, we will be using the Blossom Footer block from Templately. By default, the block will appear on your website as shown below.

Header and footer block

Step 3: Customize & Publish Your Footer

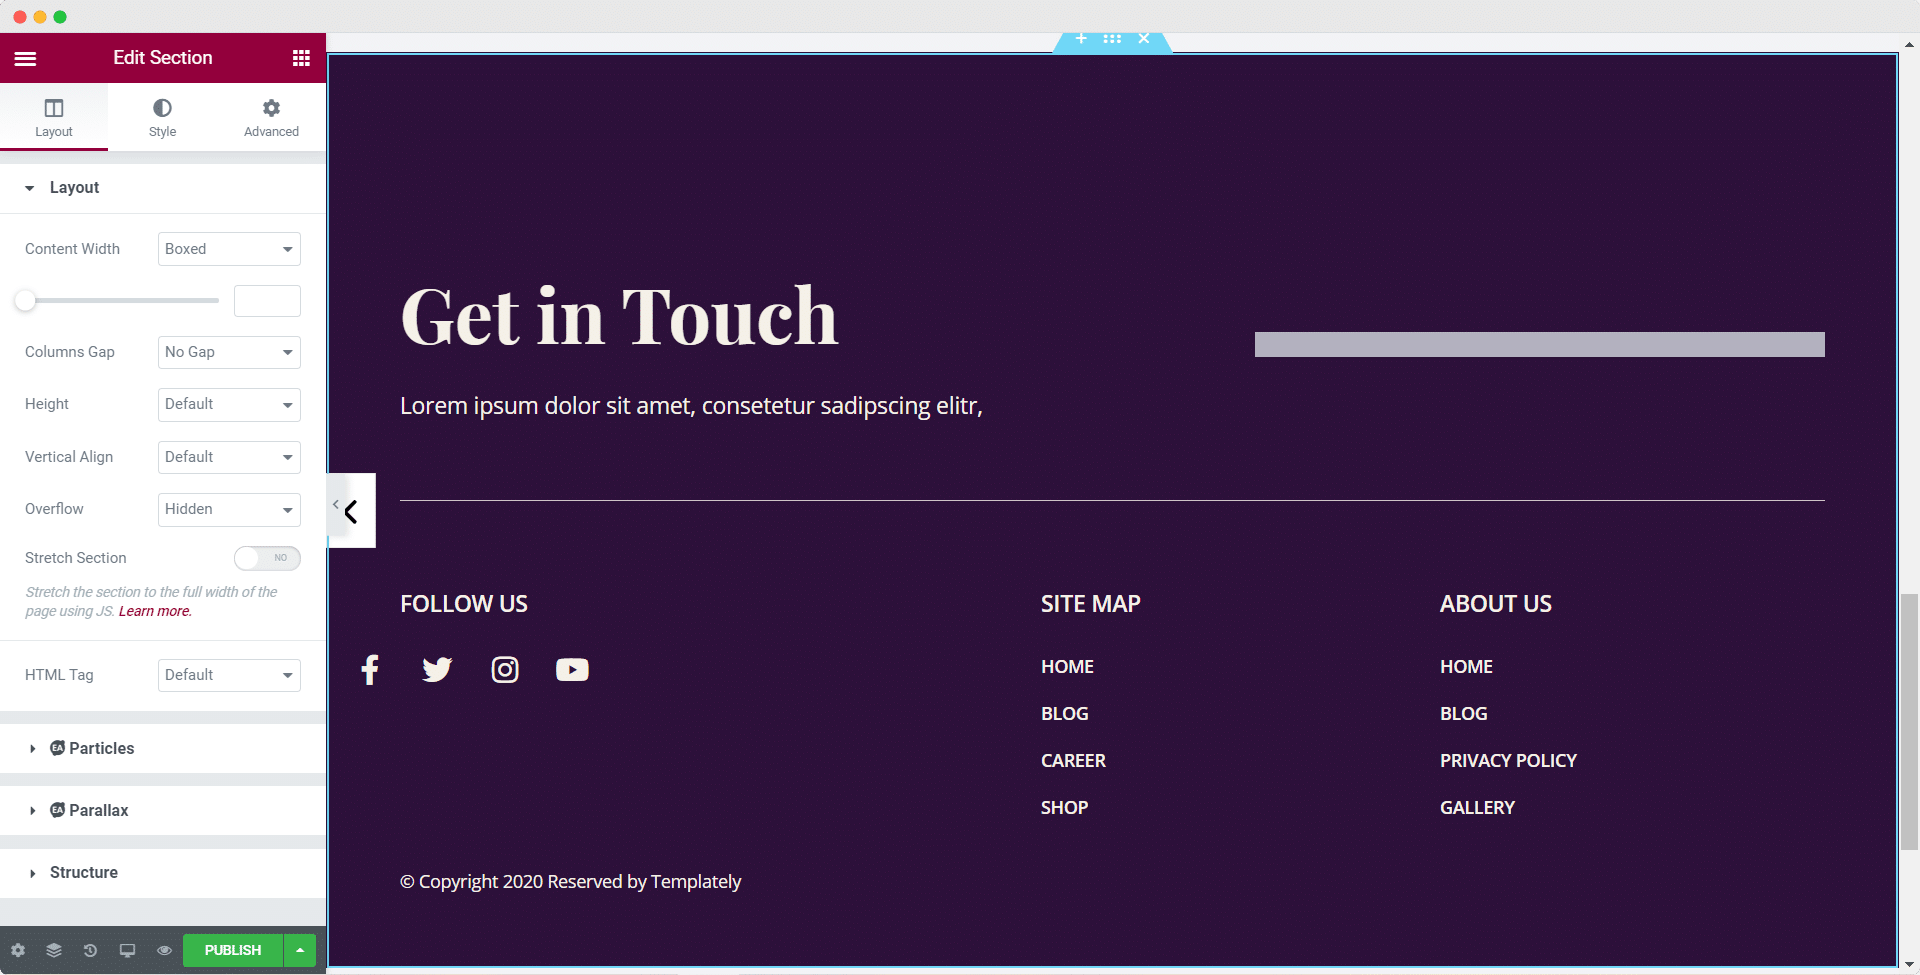
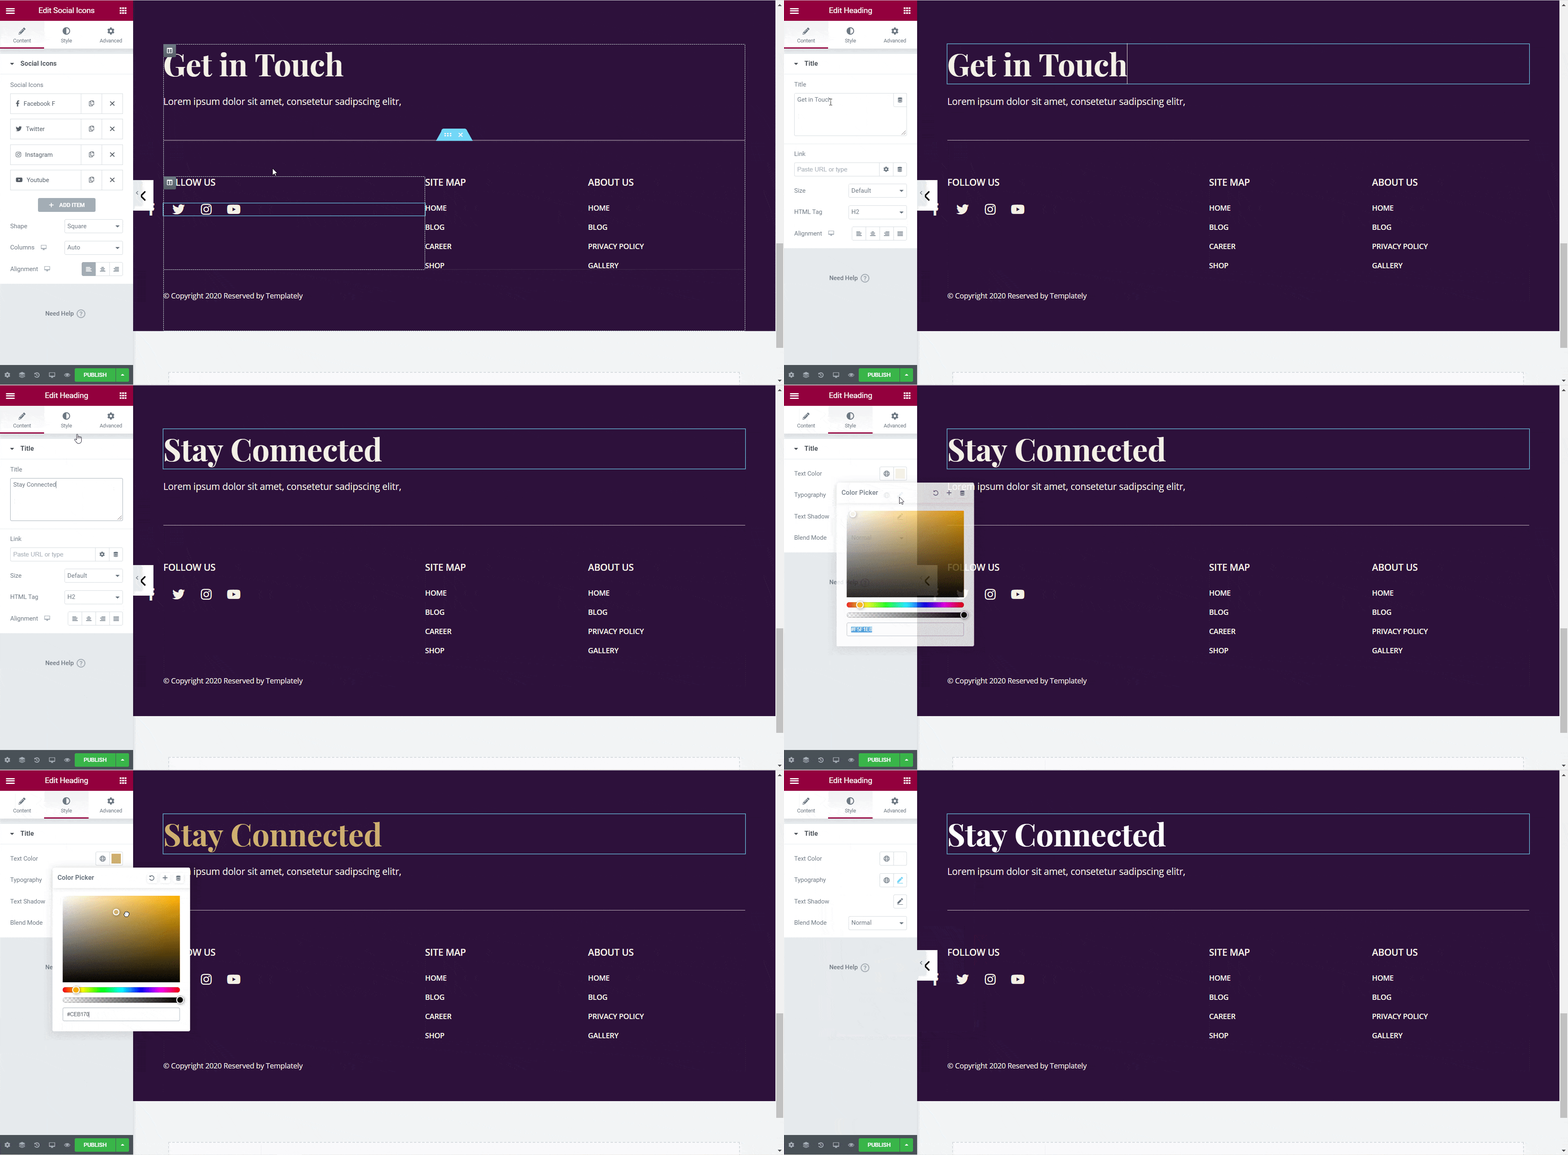
Using the Elementor panel on your left, you can customize your footer block in Elementor Theme Builder. From the ‘Content’ tab, you can add your own content for your footer. Similarly, from the ‘Style’ tab, you can change the colors, typography, and more.

header and footer block

When you are done customizing, click on the ‘Publish’ button. A popup will appear asking you to set conditions and choose where you want your footer to be displayed. This step is completely optional. If you are ready to make your footer live, click on the ‘Save & Close’ button.

header and footer block

Your footer will now appear on your website as shown below. 

header and footer block

By following these basic steps, you can use Templately to create your own header and footer blocks in Elementor Theme builder without coding. You can also check our guide on inserting ready Elementor packs from Templately, or find out how to save your design to MyCloud

If you face any difficulties, feel free to contact our support team for further assistance.

USE TEMPLATELY FOR GUTENBERG

How To Use Templately For Gutenberg

You can use Templately for Gutenberg to instantly create and use stunning blocks for your posts and pages. Follow these instructions to use Templately in the Block Editor. Follow these instructions below to create a stunning page in Gutenberg or Block Editor with Templately.

Step 1: Create A New Page In Gutenberg Editor

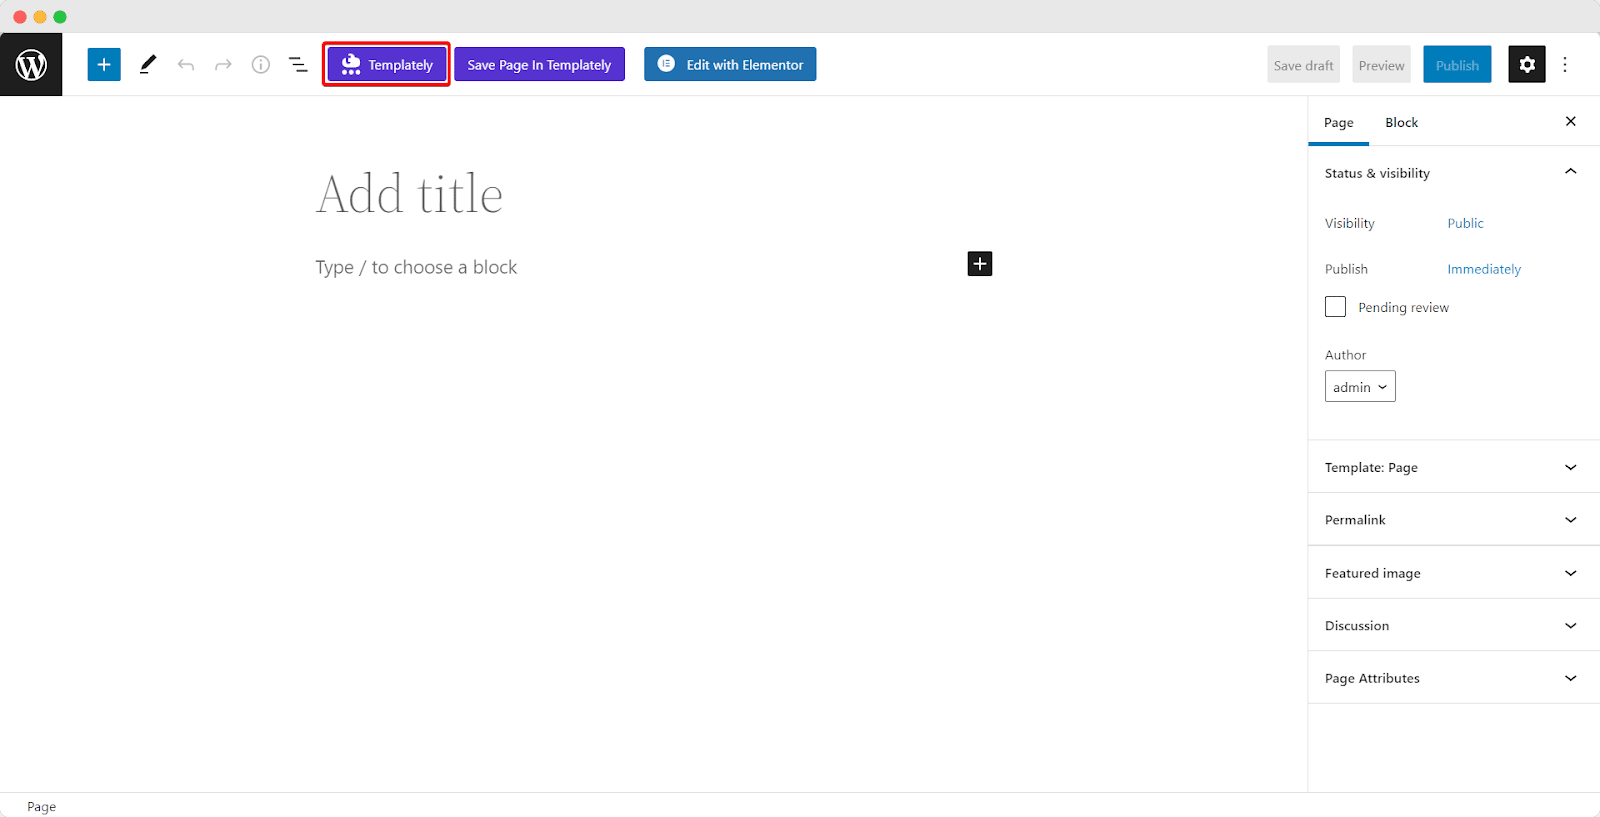
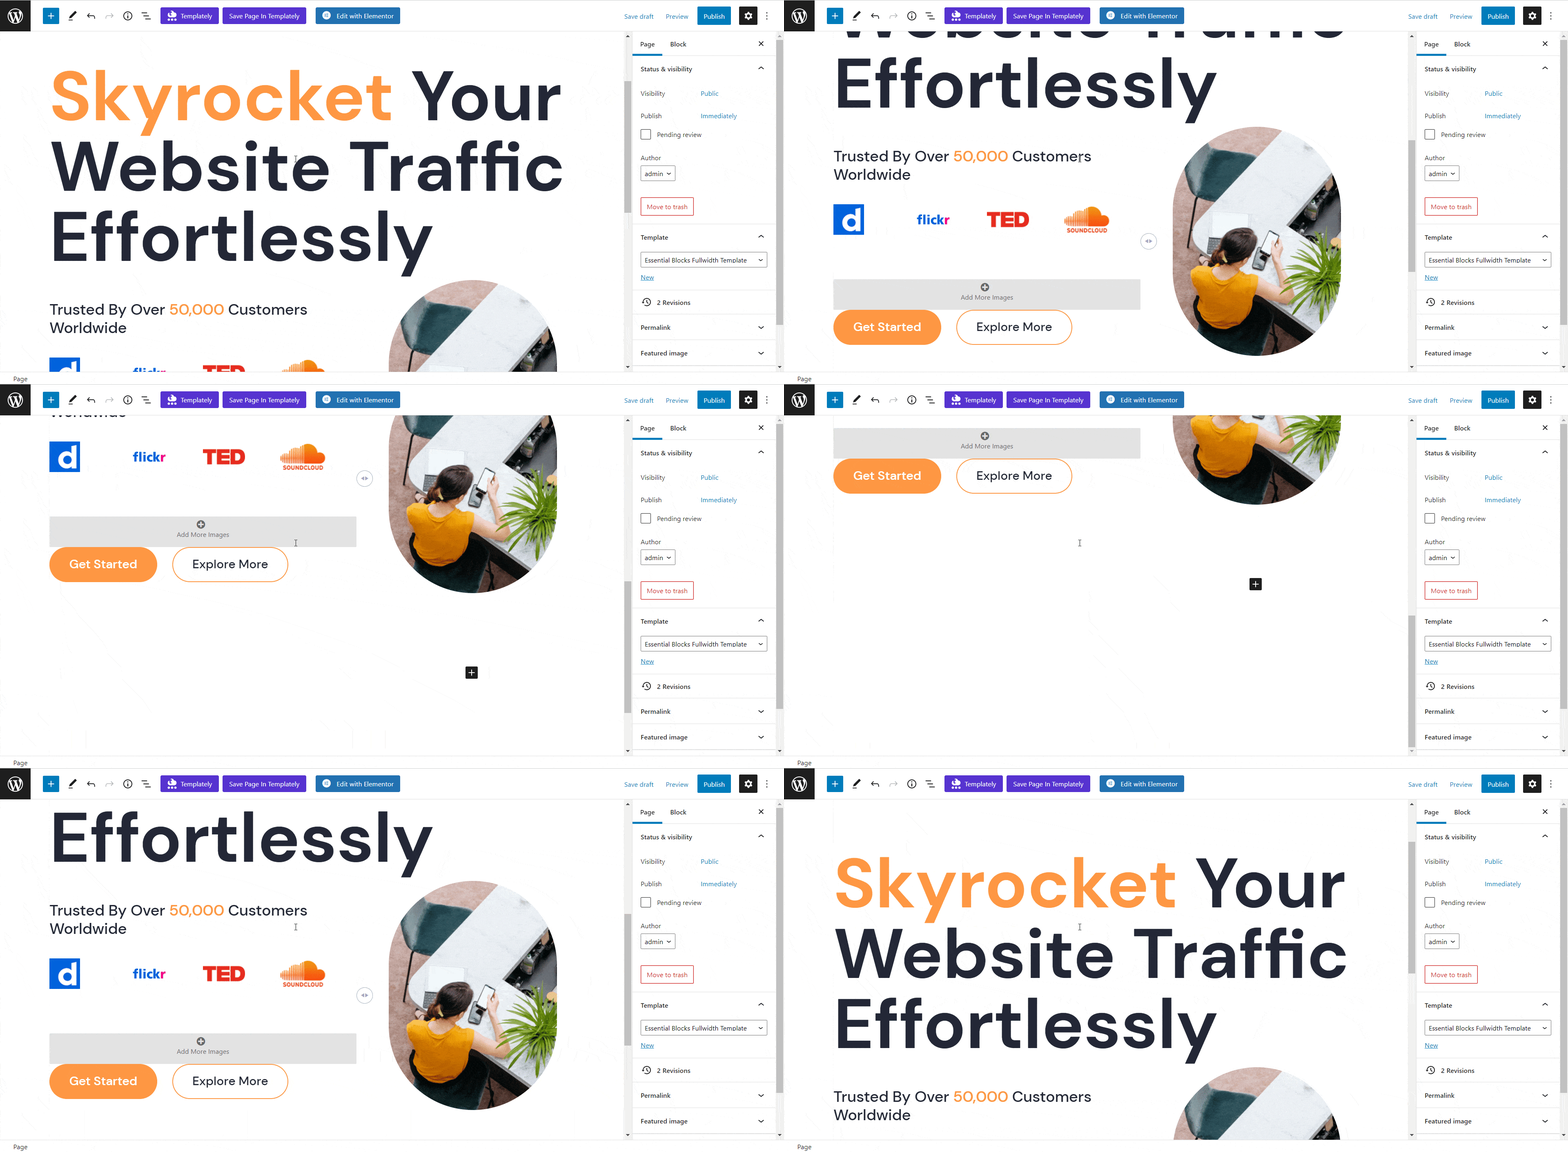
First, install the Templately WordPress plugin and then create a new page in Gutenberg Editor from your WordPress dashboard by going to Pages→ Add New. From there, click on the blue Templately icon at the very top.

USE TEMPLATELY FOR GUTENBERG

Step 2: Insert Any Gutenberg Blocks From Templately

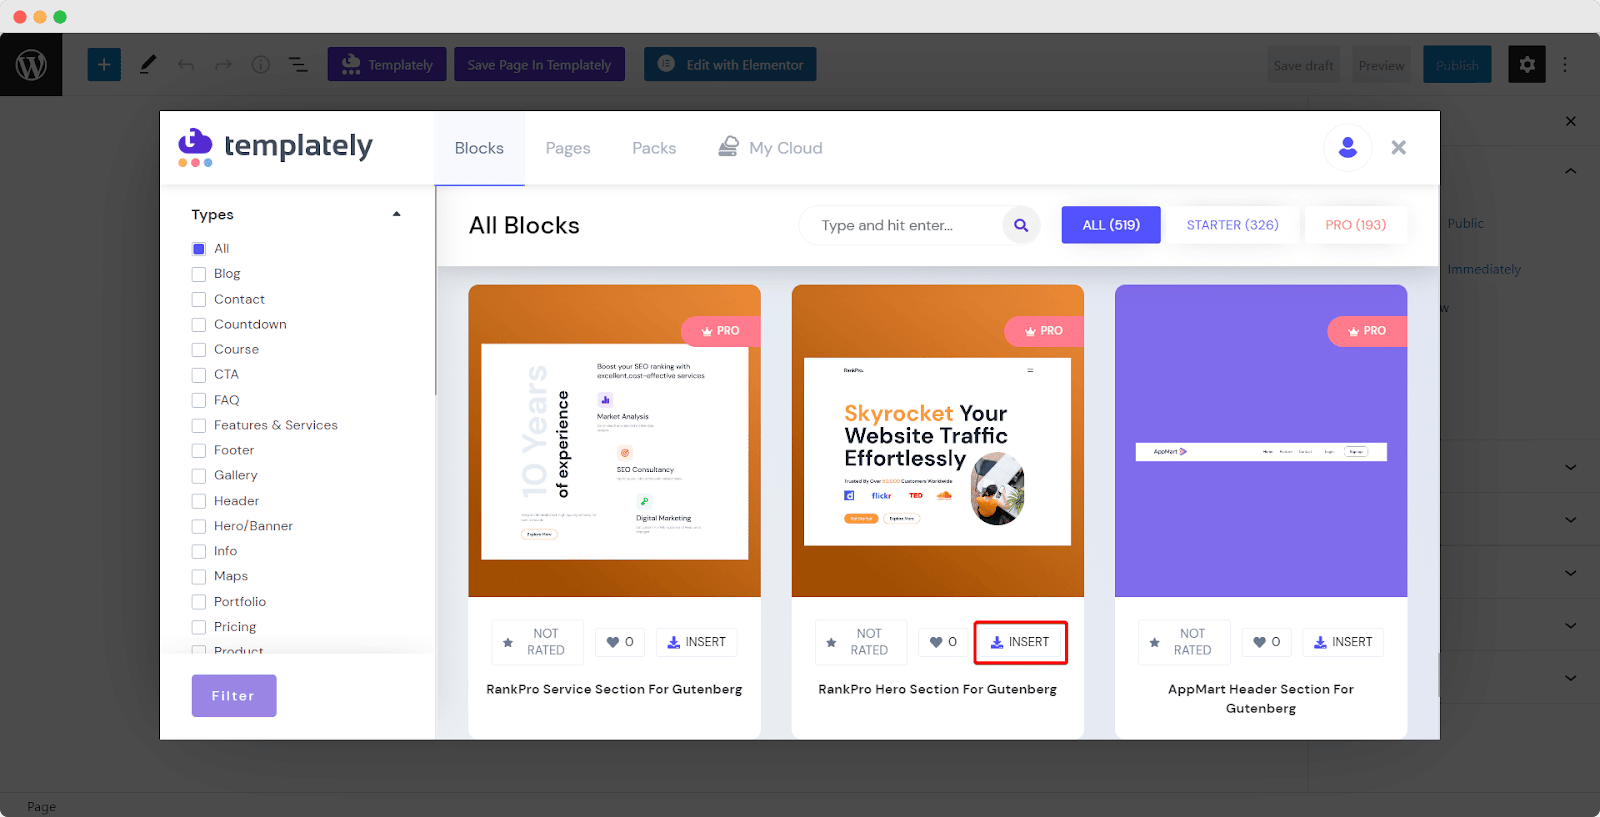
After clicking on the blue Templately icon shown above, a pop-up window will appear displaying all the premade Gutenberg blocks available with Templately. Pick any of the blocks you like and click on the ‘Insert’ button as shown below.

USE TEMPLATELY FOR GUTENBERG

After inserting the block, it will appear in your Gutenberg editor by default like this.

USE TEMPLATELY FOR GUTENBERG

Step 3: Save Your Design To MyCloud

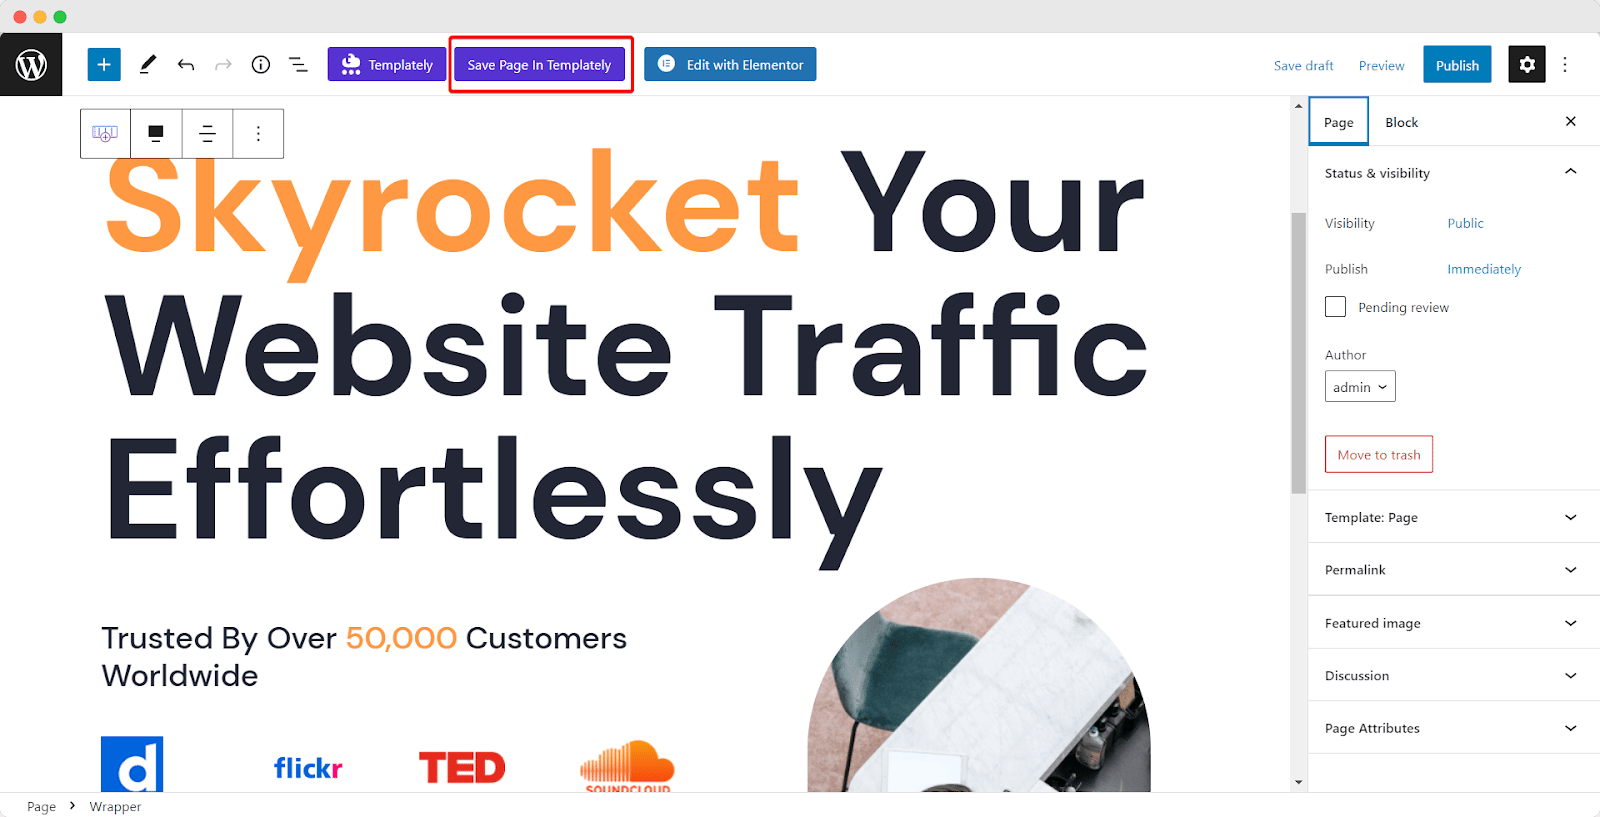
Customize the block to suit your style with the Gutenberg block editor. When you are done, you can choose to save your design to MyCloud by clicking on the ‘Save Page In Templately’ button.

USE TEMPLATELY FOR GUTENBERG

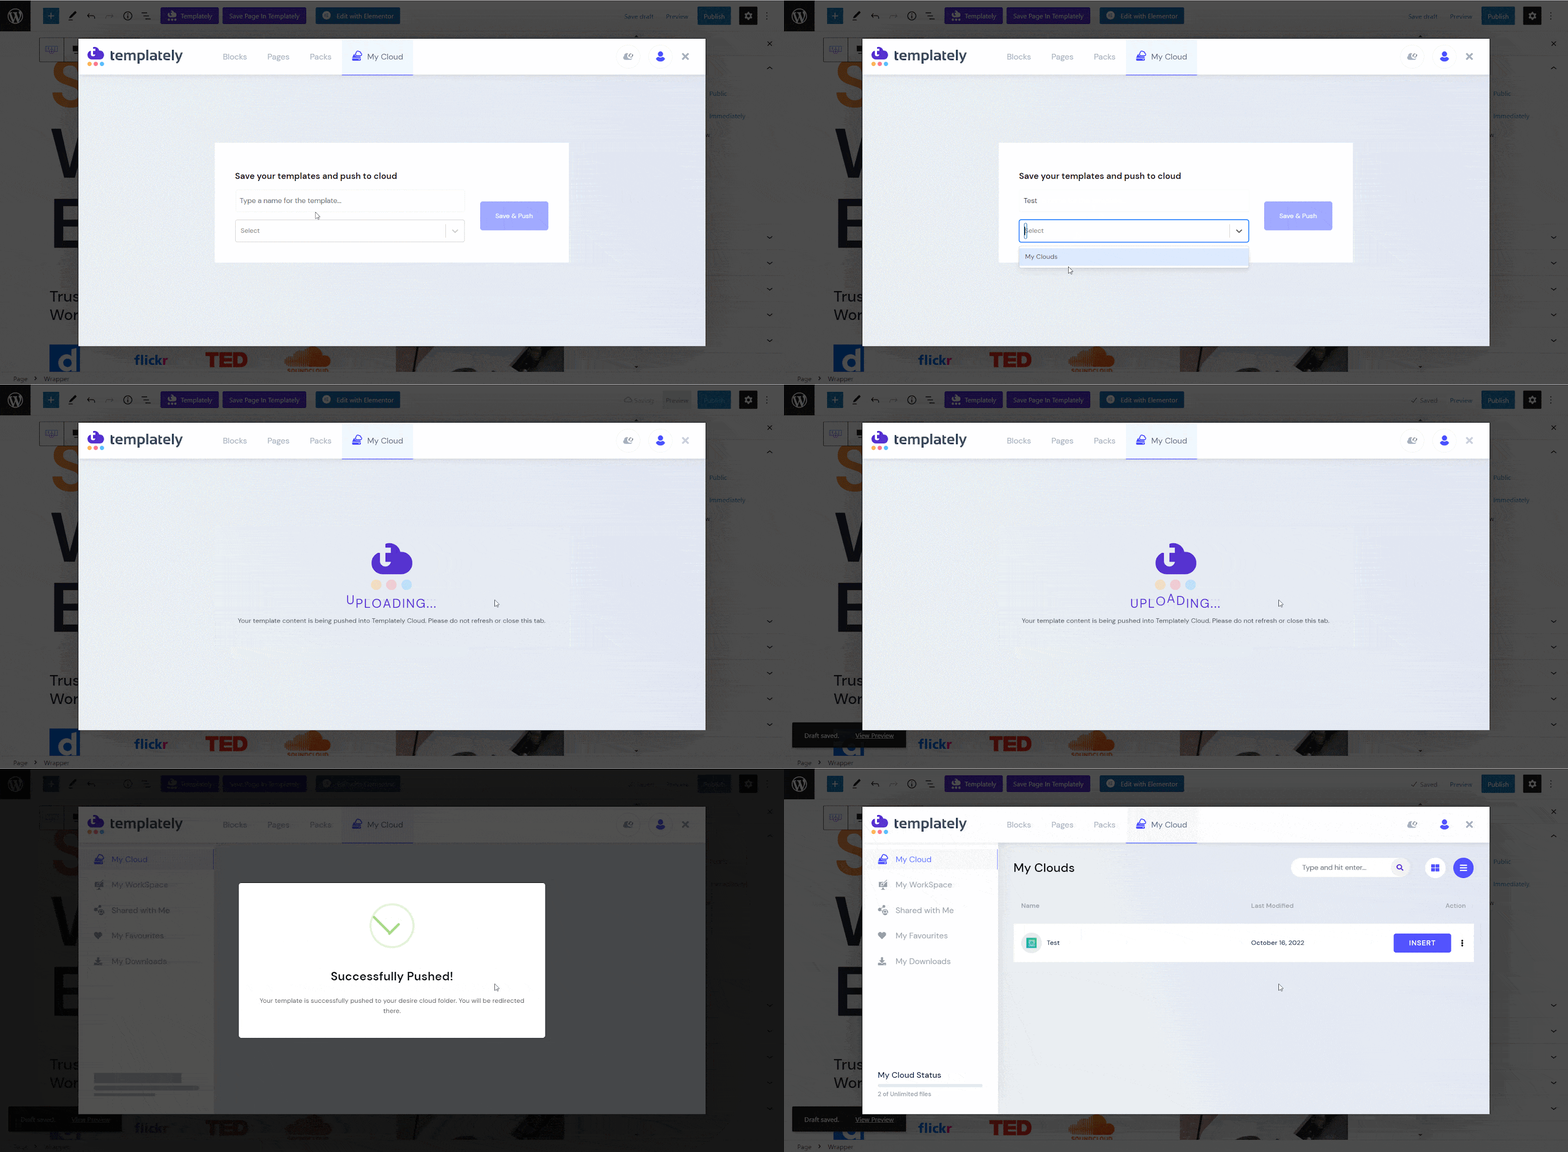
Give a name to your block then select ‘My Cloud’ and click on ‘Save & Push’ to save your design on MyCloud.

USE TEMPLATELY FOR GUTENBERG

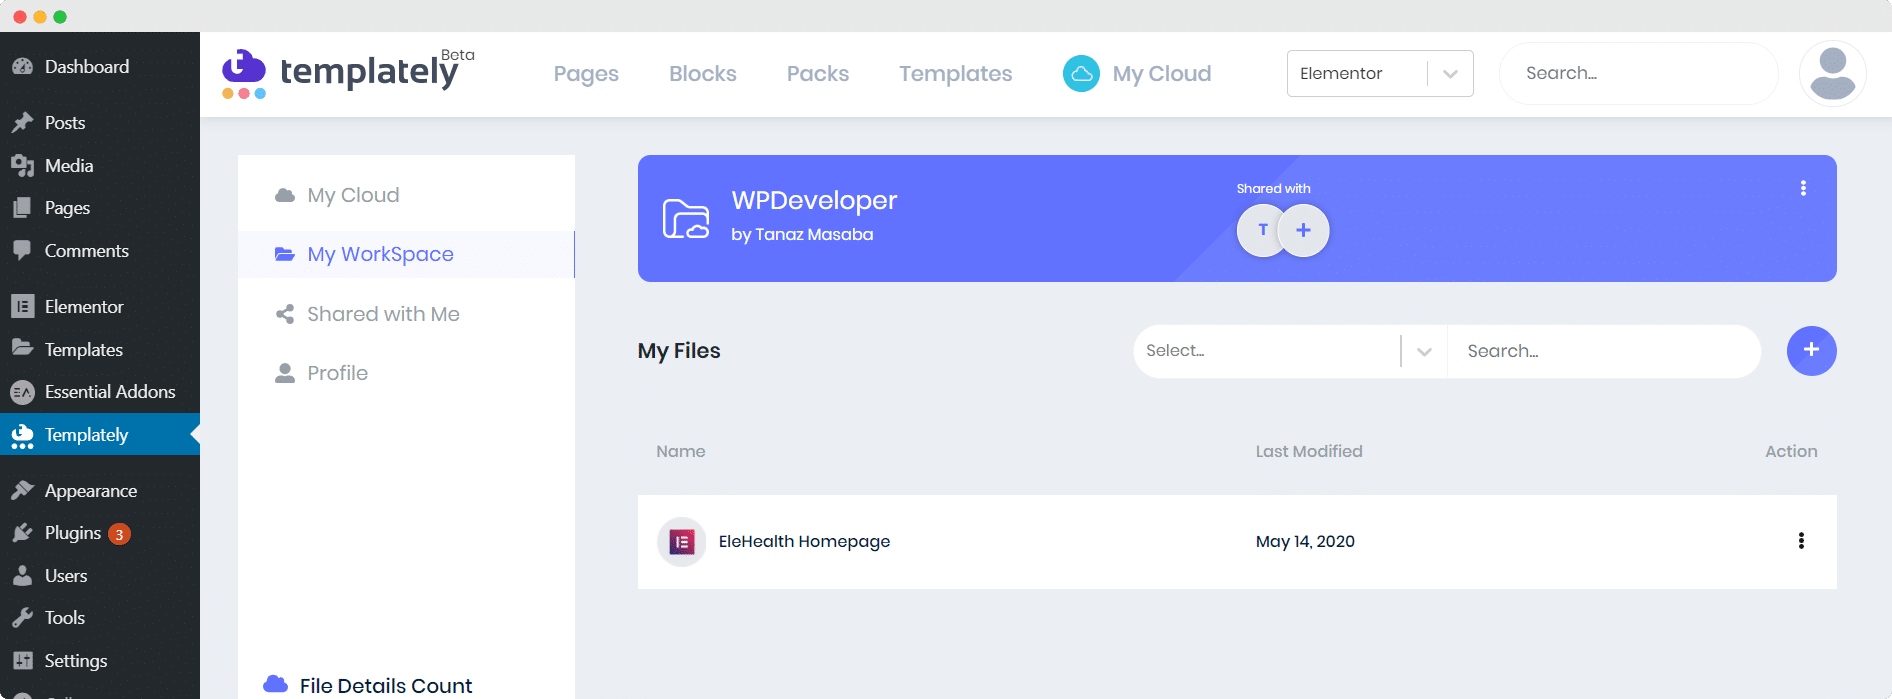
By following these basic steps you should be able easily use Templately for Gutenberg.

If you face any difficulties, feel free to contact our support team for further assistance.


Templately Workspace

How To Configure Templately WorkSpace

Introducing Templately WorkSpace – Cloud space to share with your team members & collaborate seamlessly to improve productivity. In this shared WorkSpace, you can save any template you like and reuse them on any WordPress website. The templates you save on your Templately WorkSpace will be accessible to all of your team members, making it easier to collaborate with your team from anywhere at any time.
To get started with Templately WorkSpace, check out our guidelines below:

How to Set Up Templately WorkSpace

The first thing you need to do is set up your Templately WorkSpace for you and your team. You can do this in three easy steps. 

Step 1: Sign In to Your Templately Account

First, navigate to your WordPress Dashboard and click on ‘Templately’. From here, you can sign in to your account.

Configure Templately WorkSpace


Step 2: Create A WorkSpace

After you have signed into your account, it is time to create your WorkSpace. Navigate to MyCloud >> My WorkSpace and click on ‘Add New WorkSpace’.

Note: With the premium version of Templately, you can have an unlimited number of WorkSpace and also get access to unlimited Pro templates for Elementor, and MyCloud items. You can check out our flexible pricing plans here.

Templately WorkSpace


Step 3: Invite Members

You should now see a pop-up window like the one shown below. Give a name for your WorkSpace and add your team members’ email addresses to invite them to join. Click on ‘Create WorkSpace’ to create a new WorkSpace for your team.

My WorkSpace


After successfully completing this step, you should be able to see your new shared Templately WorkSpace. For this example, our Templately WorkSpace is named ‘Template Designs’.

My WorkSpace


How To Share Saved Templates On WorkSpace

Now that you have successfully created your Templately WorkSpace, you and your team members can easily collaborate on your work by uploading your designs or saving your favorite templates to MyCloud, and then sharing them on your WorkSpace. All templates shared on a WorkSpace will be accessible to all team members. 

Step 1: Save Your Template To MyCloud

First, you have to save your template to MyCloud. All you have to do is right-click on the page you have designed and choose ‘Save Page to Templately’. For more details, check out our guide on saving templates/designs to MyCloud

My WorkSpace

You should be able to see this template when you head over to MyCloud now.

My WorkSpace

Step 2: Add Saved Template To WorkSpace

You can now add your saved Template to your Templately WorkSpace and share it with your team members. There are two ways you can do this. The first method is to add the saved template from within your WorkSpace.

Click on ‘My WorkSpace’ and enter the Templately WorkSpace you’ve created. Here, click on the ‘+’ icon to add your saved template to your WorkSpace.

My WorkSpace


You should see a pop-up menu like the one shown below. Choose the template you want to share with your WorkSpace from the drop-down menu.

My WorkSpace

Alternatively, you can also add any saved template to your WorkSpace directly from MyCloud. Simply click on the three dots on the saved template in MyCloud. Click on either ‘Copy to WorkSpace’ or ‘Move to WorkSpace’ from the list of options.

My WorkSpace


Whichever method you choose, your end result should always show your saved template in your shared Templately WorkSpace.

My WorkSpace


This is how you can quickly and easily set up a Templately WorkSpace where you can collaborate with your team members, share your designs with each other, and reuse them on any site from anywhere.

If you face any issues, feel free to contact our support team for further assistance.

How To Save Your Template/Design On MyCloud?

How To Save Your Template/Design On MyCloud?

Check out the guideline below to learn how to save your template/design/pages on Templately MyCloud.

Step 1: To save your template. page, section or any design on MyCloud, first you need to Right-click on the section you want to save and select save in Templately.
Templately mycloud

Step 2: Give it a name and hit the Save & Push button.
Templately

Step 3: If you have followed all the steps, congratulations! You have successfully saved your templates to MYCloud.

Templately

If you need any help, feel free to contact us on our support.