purchase Templately

How To Purchase Templately PRO version?

Templately brings you a PRO version with a large collection of exclusive templates to help you create stunning WordPress websites with ease. You can easily purchase Templately PRO in just a few steps. 

How To Purchase Templately PRO Easily?

If you are new to templately and want to purchase Templately PRO plan for it, simply follow the step-by-step guideline to easily upgrade to the premium version and enjoy all the exclusive features as a premium user.

Step 1: Select Your Preferable Pricing Plan

To purchase Templately PRO, simply head over to the Templately website and effortlessly find your way to the pricing plan section. Then choose the plan that suits your needs and simply click the ‘‘Get Started‘ button to proceed.

Purchase Templately

Once you click on the ‘Get Started’ button, you will be directed to the Templately purchase page. Click on the ‘Sign in’ button if you already have a Templately account and log in with your details.  

Purchase Templately

Step 2: Select Your Payment Option

If you don’t have an account yet, provide your First Name, Last Name, and Email in the respective fields. Insert your discount code and hit the ‘Apply’ button if you have any discount code. Here, you have the choice of two payment options to purchase Templately PRO: ‘Credit Card’ or ‘PayPal’. Select your preferred payment option to complete the Templately purchase process.

Purchase Templately

After that, you have to click on the checkbox next to the option ‘I agree with Terms of Services’. You can also choose to get free tips, tutorials, and discount codes from Templately by selecting the second checkbox. And finally, you just have to hit on the ‘Pay Now’ button, as shown below.

Purchase Templately

Step 3: Add Your Payment Details 

Clicking on the ‘Pay Now’ button will take you to the card details page. Provide the necessary details and then click on the ‘Subscribe’ button and complete the payment procedure. 

Purchase Templately

And that’s how simple it is to purchase Templately PRO plan. If you follow these steps, you will have successfully subscribed to Templately PRO with its stunning premium templates and exclusive features.

Still facing difficulties? If you need any help, feel free to contact our support team. 

Templately Full Site Import

How Does The Templately Full Site Import Work (All Details)?

Templately offers a convenient full-site import feature that allows users to effortlessly integrate their preferred template packs into their websites with just a single click. Follow the steps below to understand the seamless process of how Templately Full Site Import functions and explore all the details.

How Templately Full Site Import Works?

Templately 1-click Full Site Import will help you to import your entire template pack only changing your existing design and not going to affect your current designs at all. By opting to import the entire pack, your existing design will be automatically changed without any risk of removal or disruption. 

You can get the complete flexibility to decide later to choose which design you should keep or discard for your existing website page. 

Templately Full Site Import

How To Configure Templately Full Site Import Feature?

Here in this section, you will get a step-by-step guide to import the full-site template of Templately below:  

Step 1: Log in to your Templately account with the necessary credentials. You can check out this documentation for a detailed guide.

Templately Full Site Import

Step 2: Once you sign in, you can see the Templately dashboard that showcases all ready templates. You can find the ‘Full Site Import’ tag on the templates that support full site import. 

Templately Full Site Import

Now, you just have to pick any of these template packs and hit the ‘Insert Full Site’ button on the right-hand side panel. 

Templately Full Site Import

It will come up with a window, you can insert the ‘Site Title’ and ‘Site Tagline’ there. Afterward, just hit the ‘Continue’ button, it will automatically ‘Import Dummy Content’ there and will showcase you a list of ‘Required Dependencies’

Note: If you don’t want any dummy content to install with your desired template pack, simply just uncheck the ‘Import Dummy Content’ option

Templately Full Site Import

If any of the dependencies are not being installed, just press the ‘Install And Proceed’ button. It will then install all dependencies and automatically live your required Templately template pack. And that’s it, you can now hit the ‘Visit Your Website’ and preview the changes.

Note: Templately Full Site Import feature will change the ‘Home Page’ and ‘Blog page’ settings. However, you can easily manage these settings through your WordPress dashboard Settings → Reading option and make the changes as per your preference.  

Templately Full Site Import

Thus, you can insert the entire template pack easily just with one click. Getting stuck? Contact our support team for any help you need.

Manage Sites In Templately 2

How To Manage Sites In Templately?

Templately lets you access WordPress templates on a specific number of live sites (and unlimited local sites) according to the Subscription plan you’re using. You can easily manage sites that you have connected to your Templately account from the ‘Manage Sites’ tab in just a few steps. 

Read the steps below to learn how site management in Templately works. 

How To Manage Sites In Templately?

You can check the number of sites you can connect to your Templately account from the Subscription Plans here. Afterward, you can find and manage websites as needed.

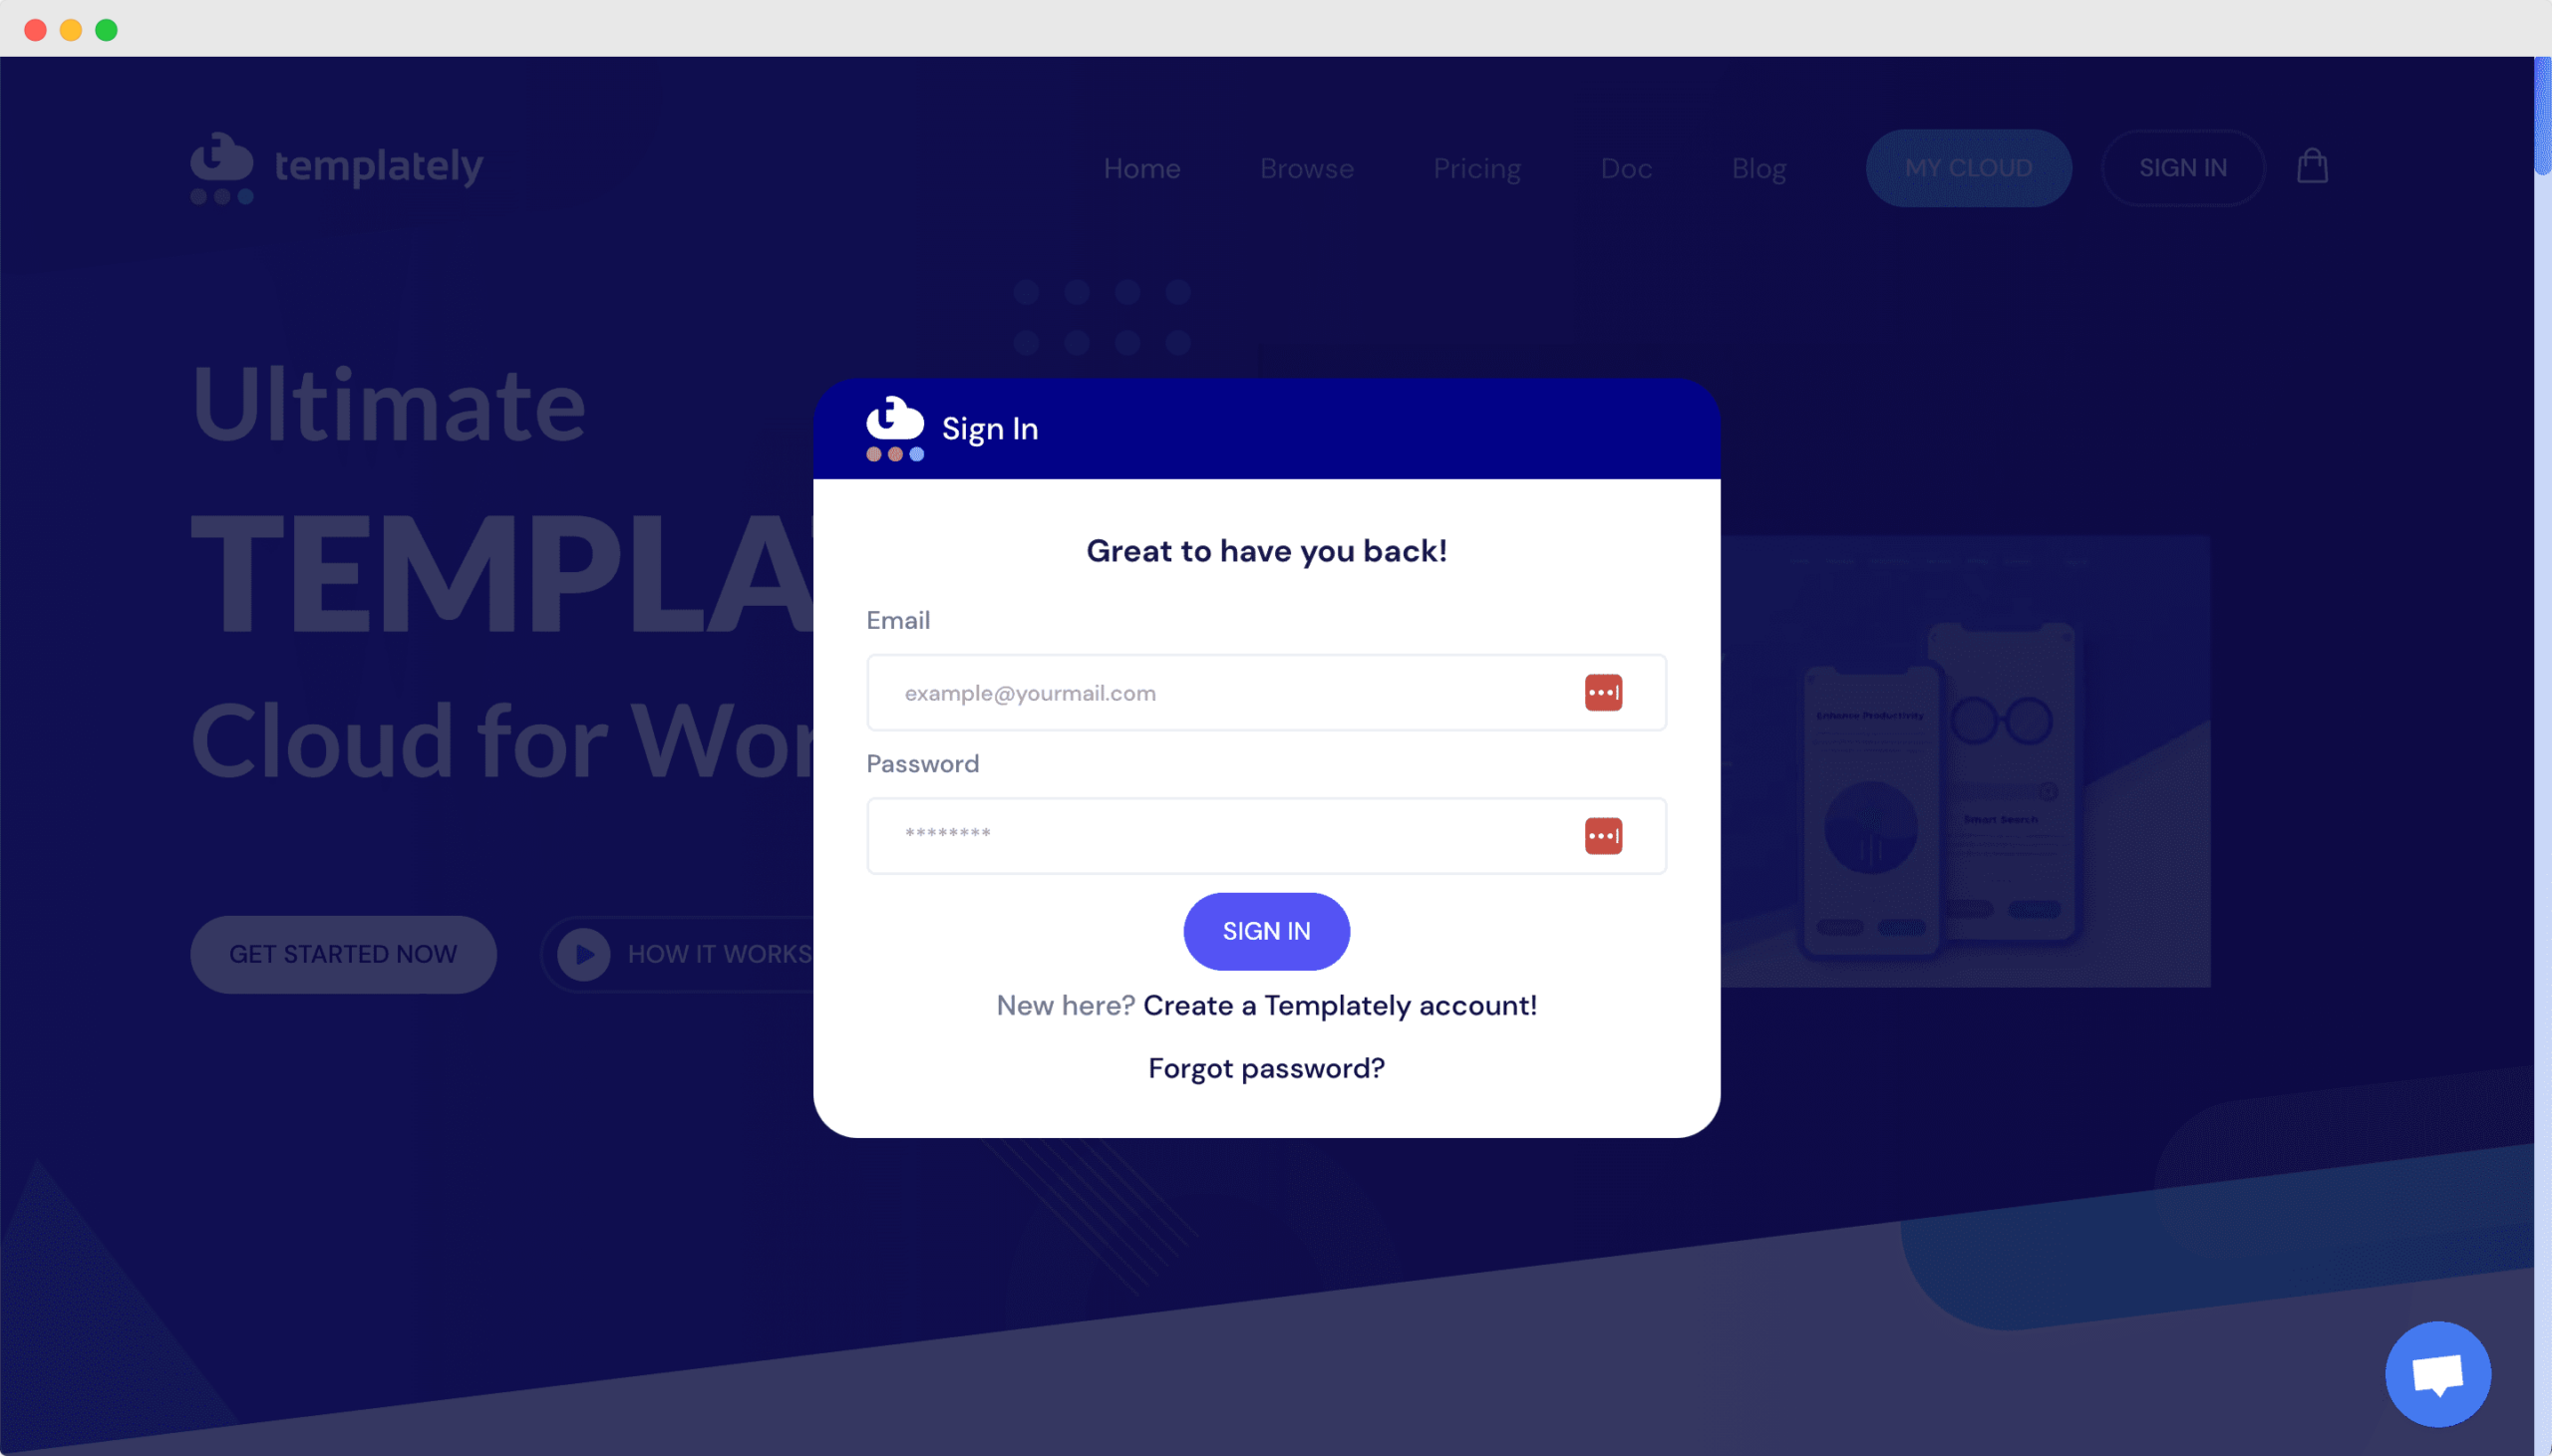
Step 1: Log in to your Templately account with the necessary credentials. You can check out this documentation for a detailed guide.

Manage sites in Templately 1

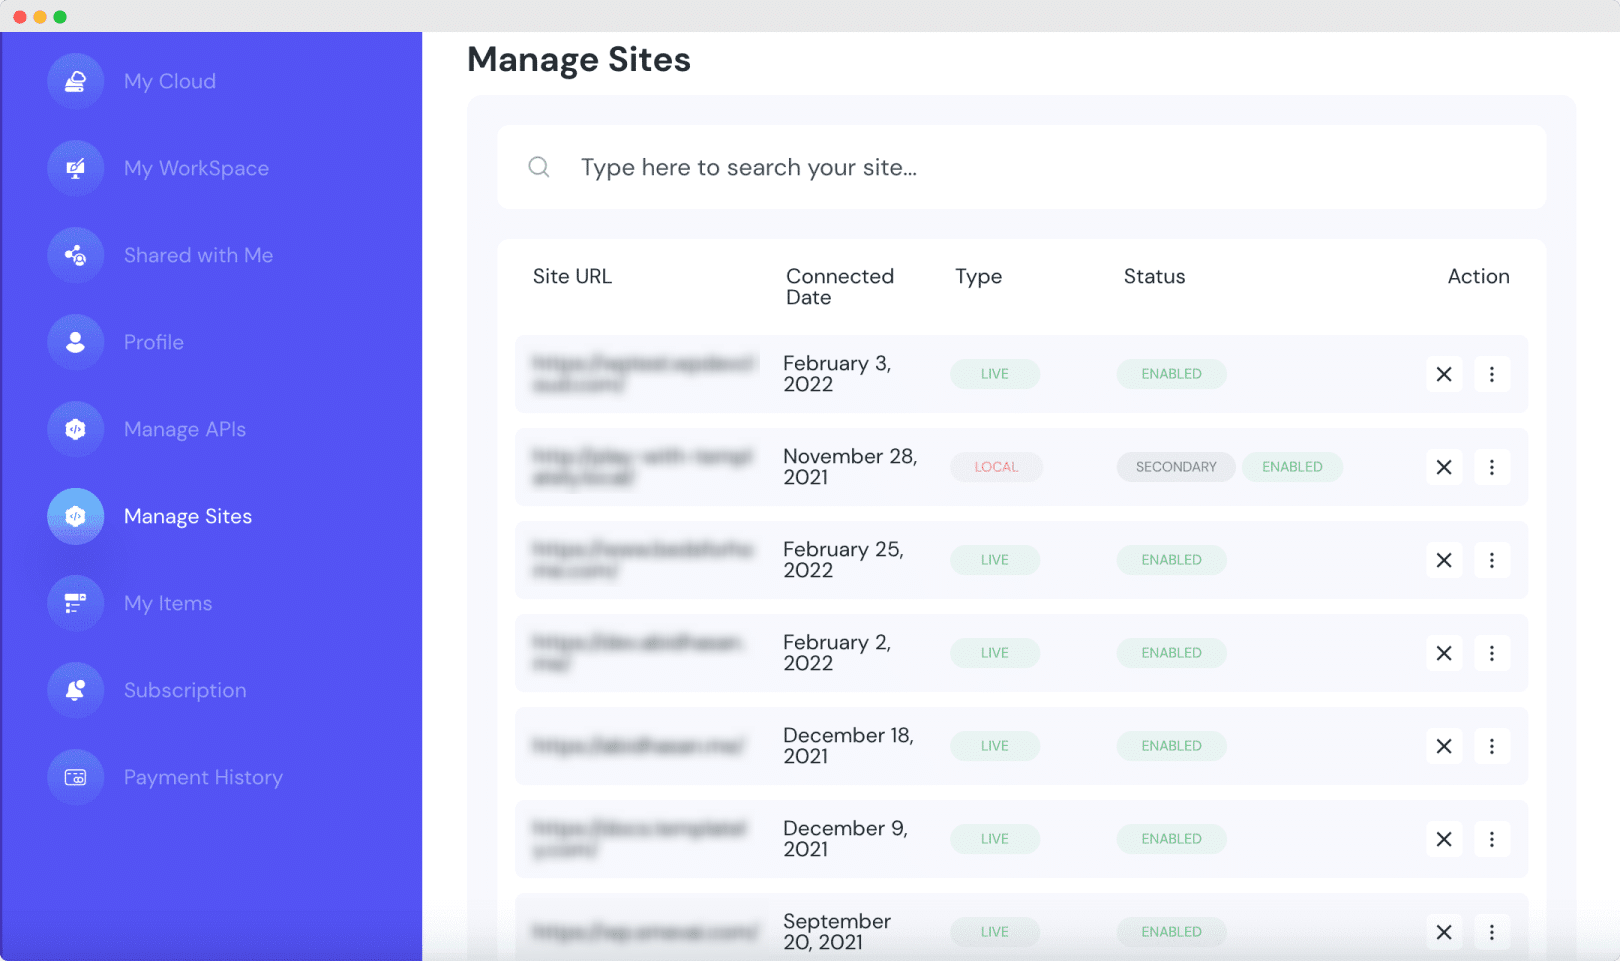
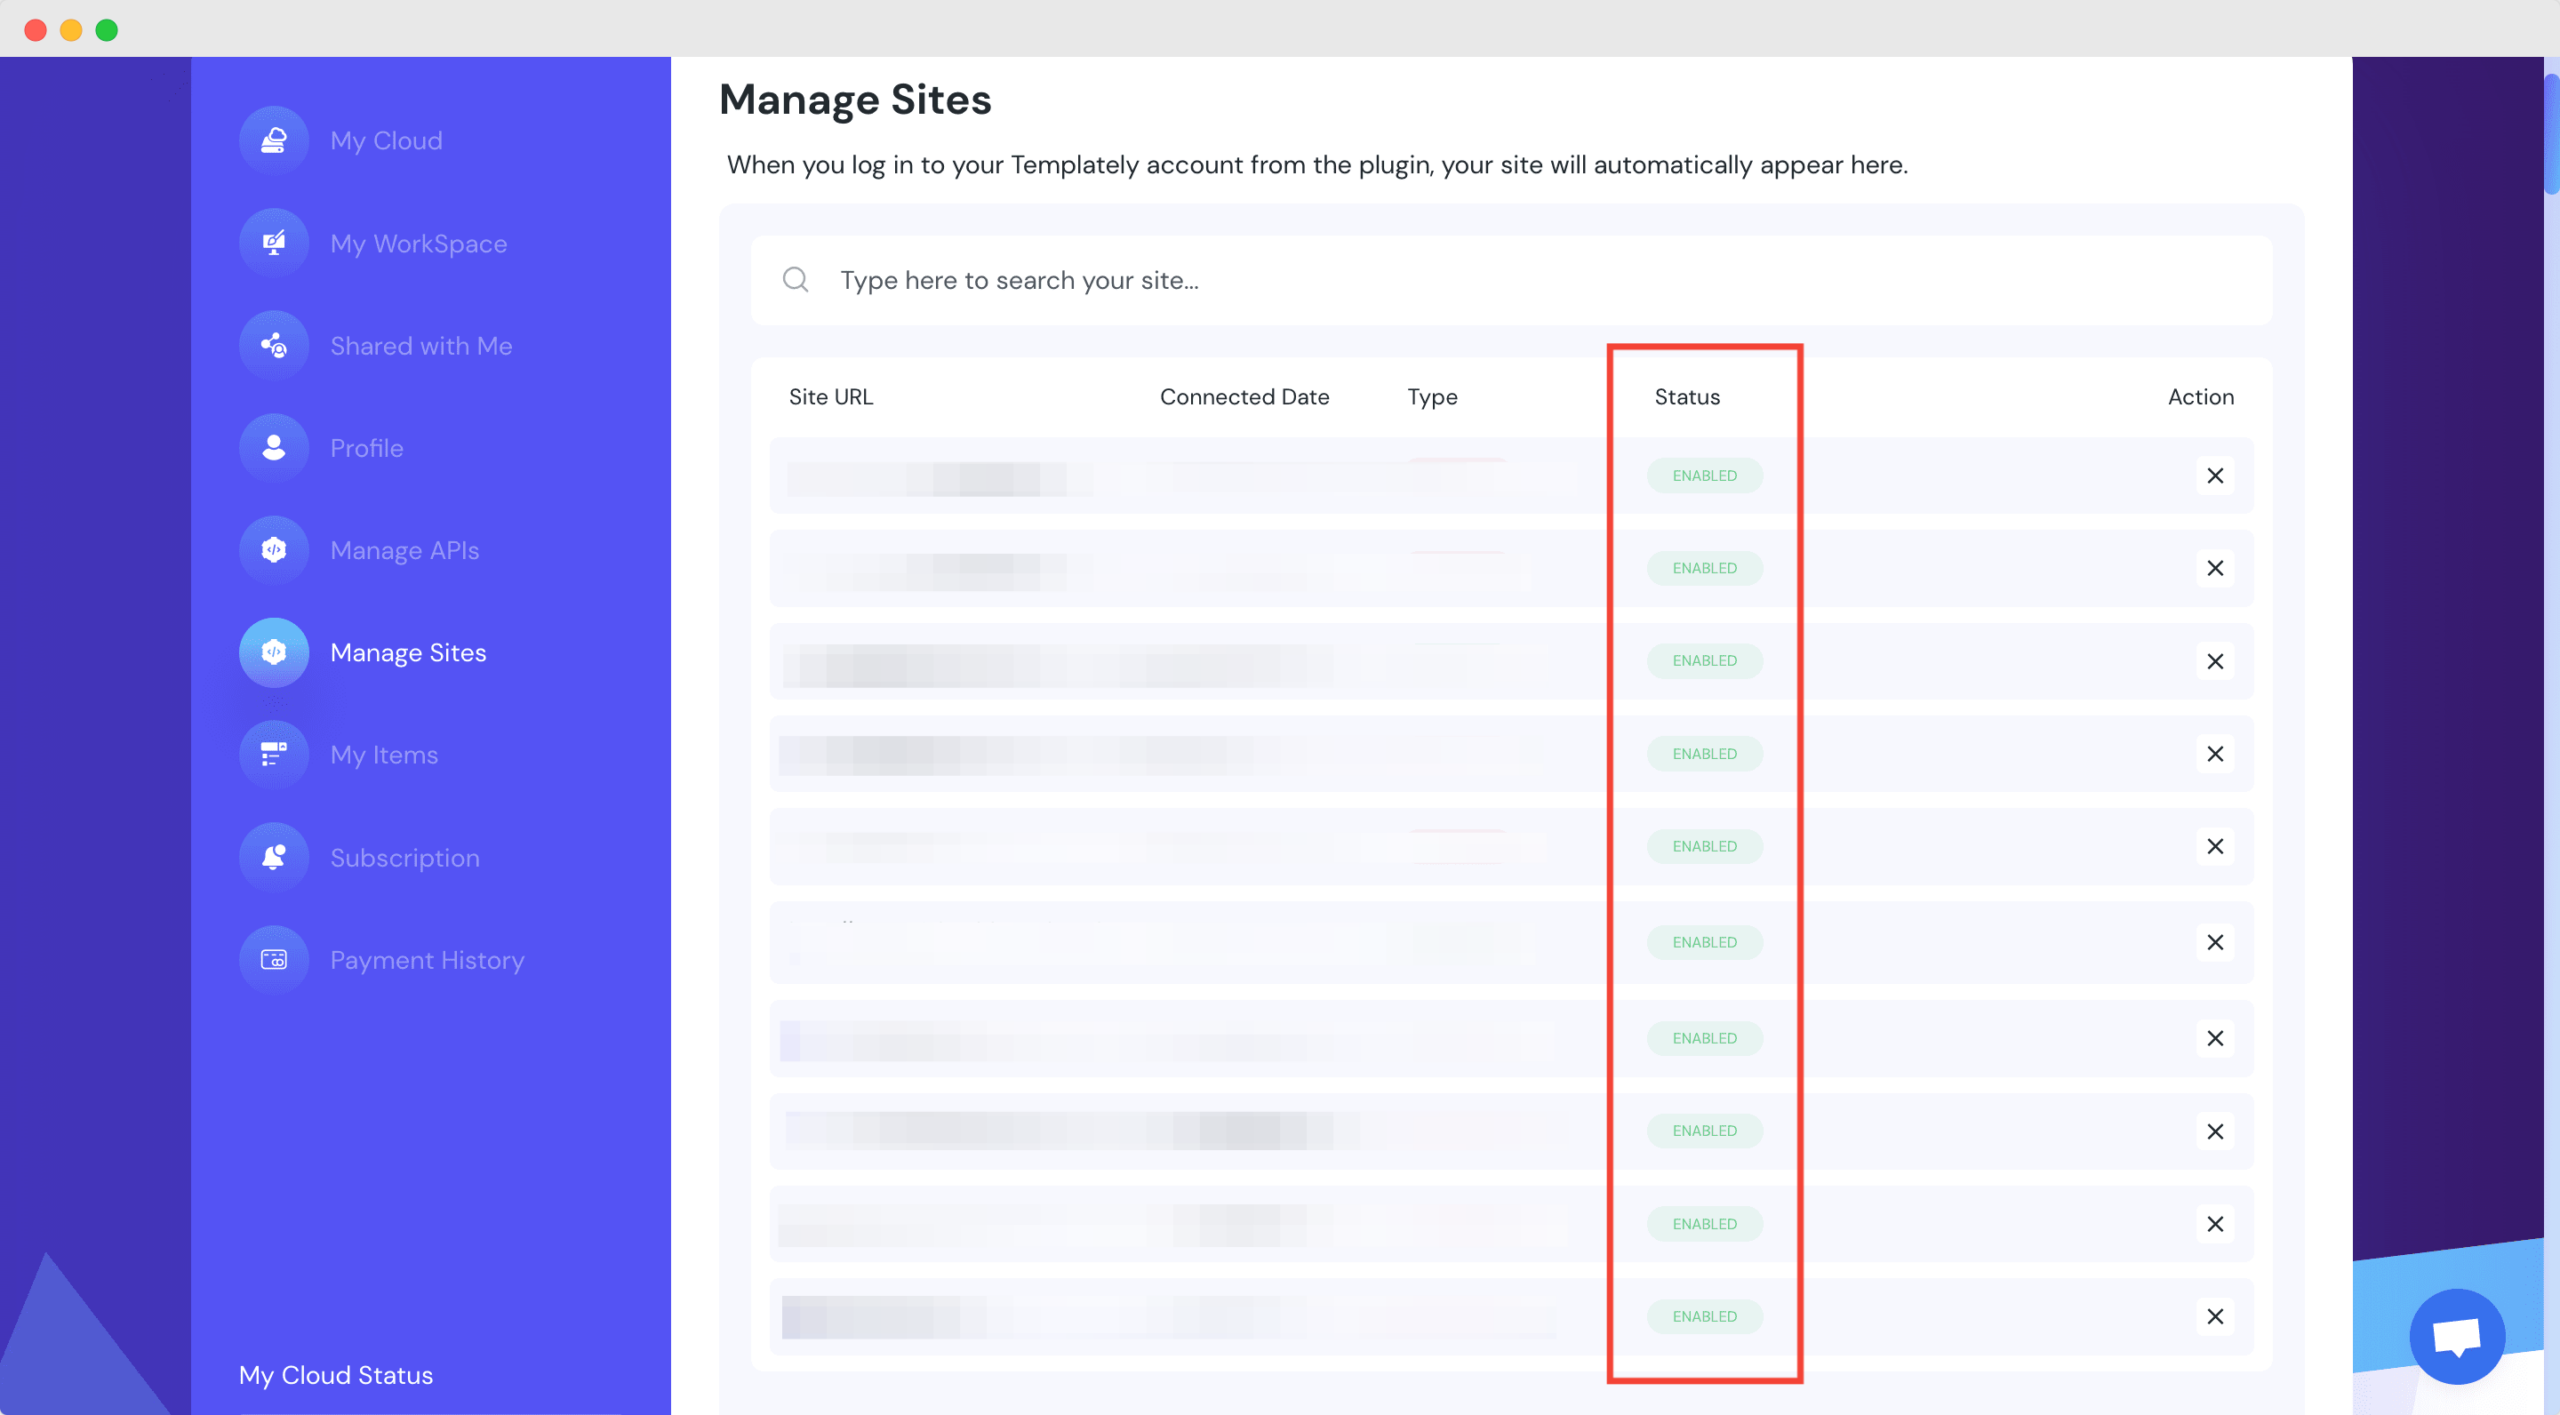
Step 2: Once you sign in, you will find yourself in the ‘My Cloud’ window. Head over to the ‘Manage Sites’ tab. This is where all your connected websites will be listed with their Site URL, connected date, type, and status. You will be able to check which of your WordPress websites are connected or enabled with Templately, and take action from this tab.

Manage sites in Templately 2

How To Remove A Connected Site From Templately?

To connect Templately to a new site after reaching the subscription plan limit, you will need to remove one of your existing sites from your Templately account. And then proceed to add Templately to the new website.

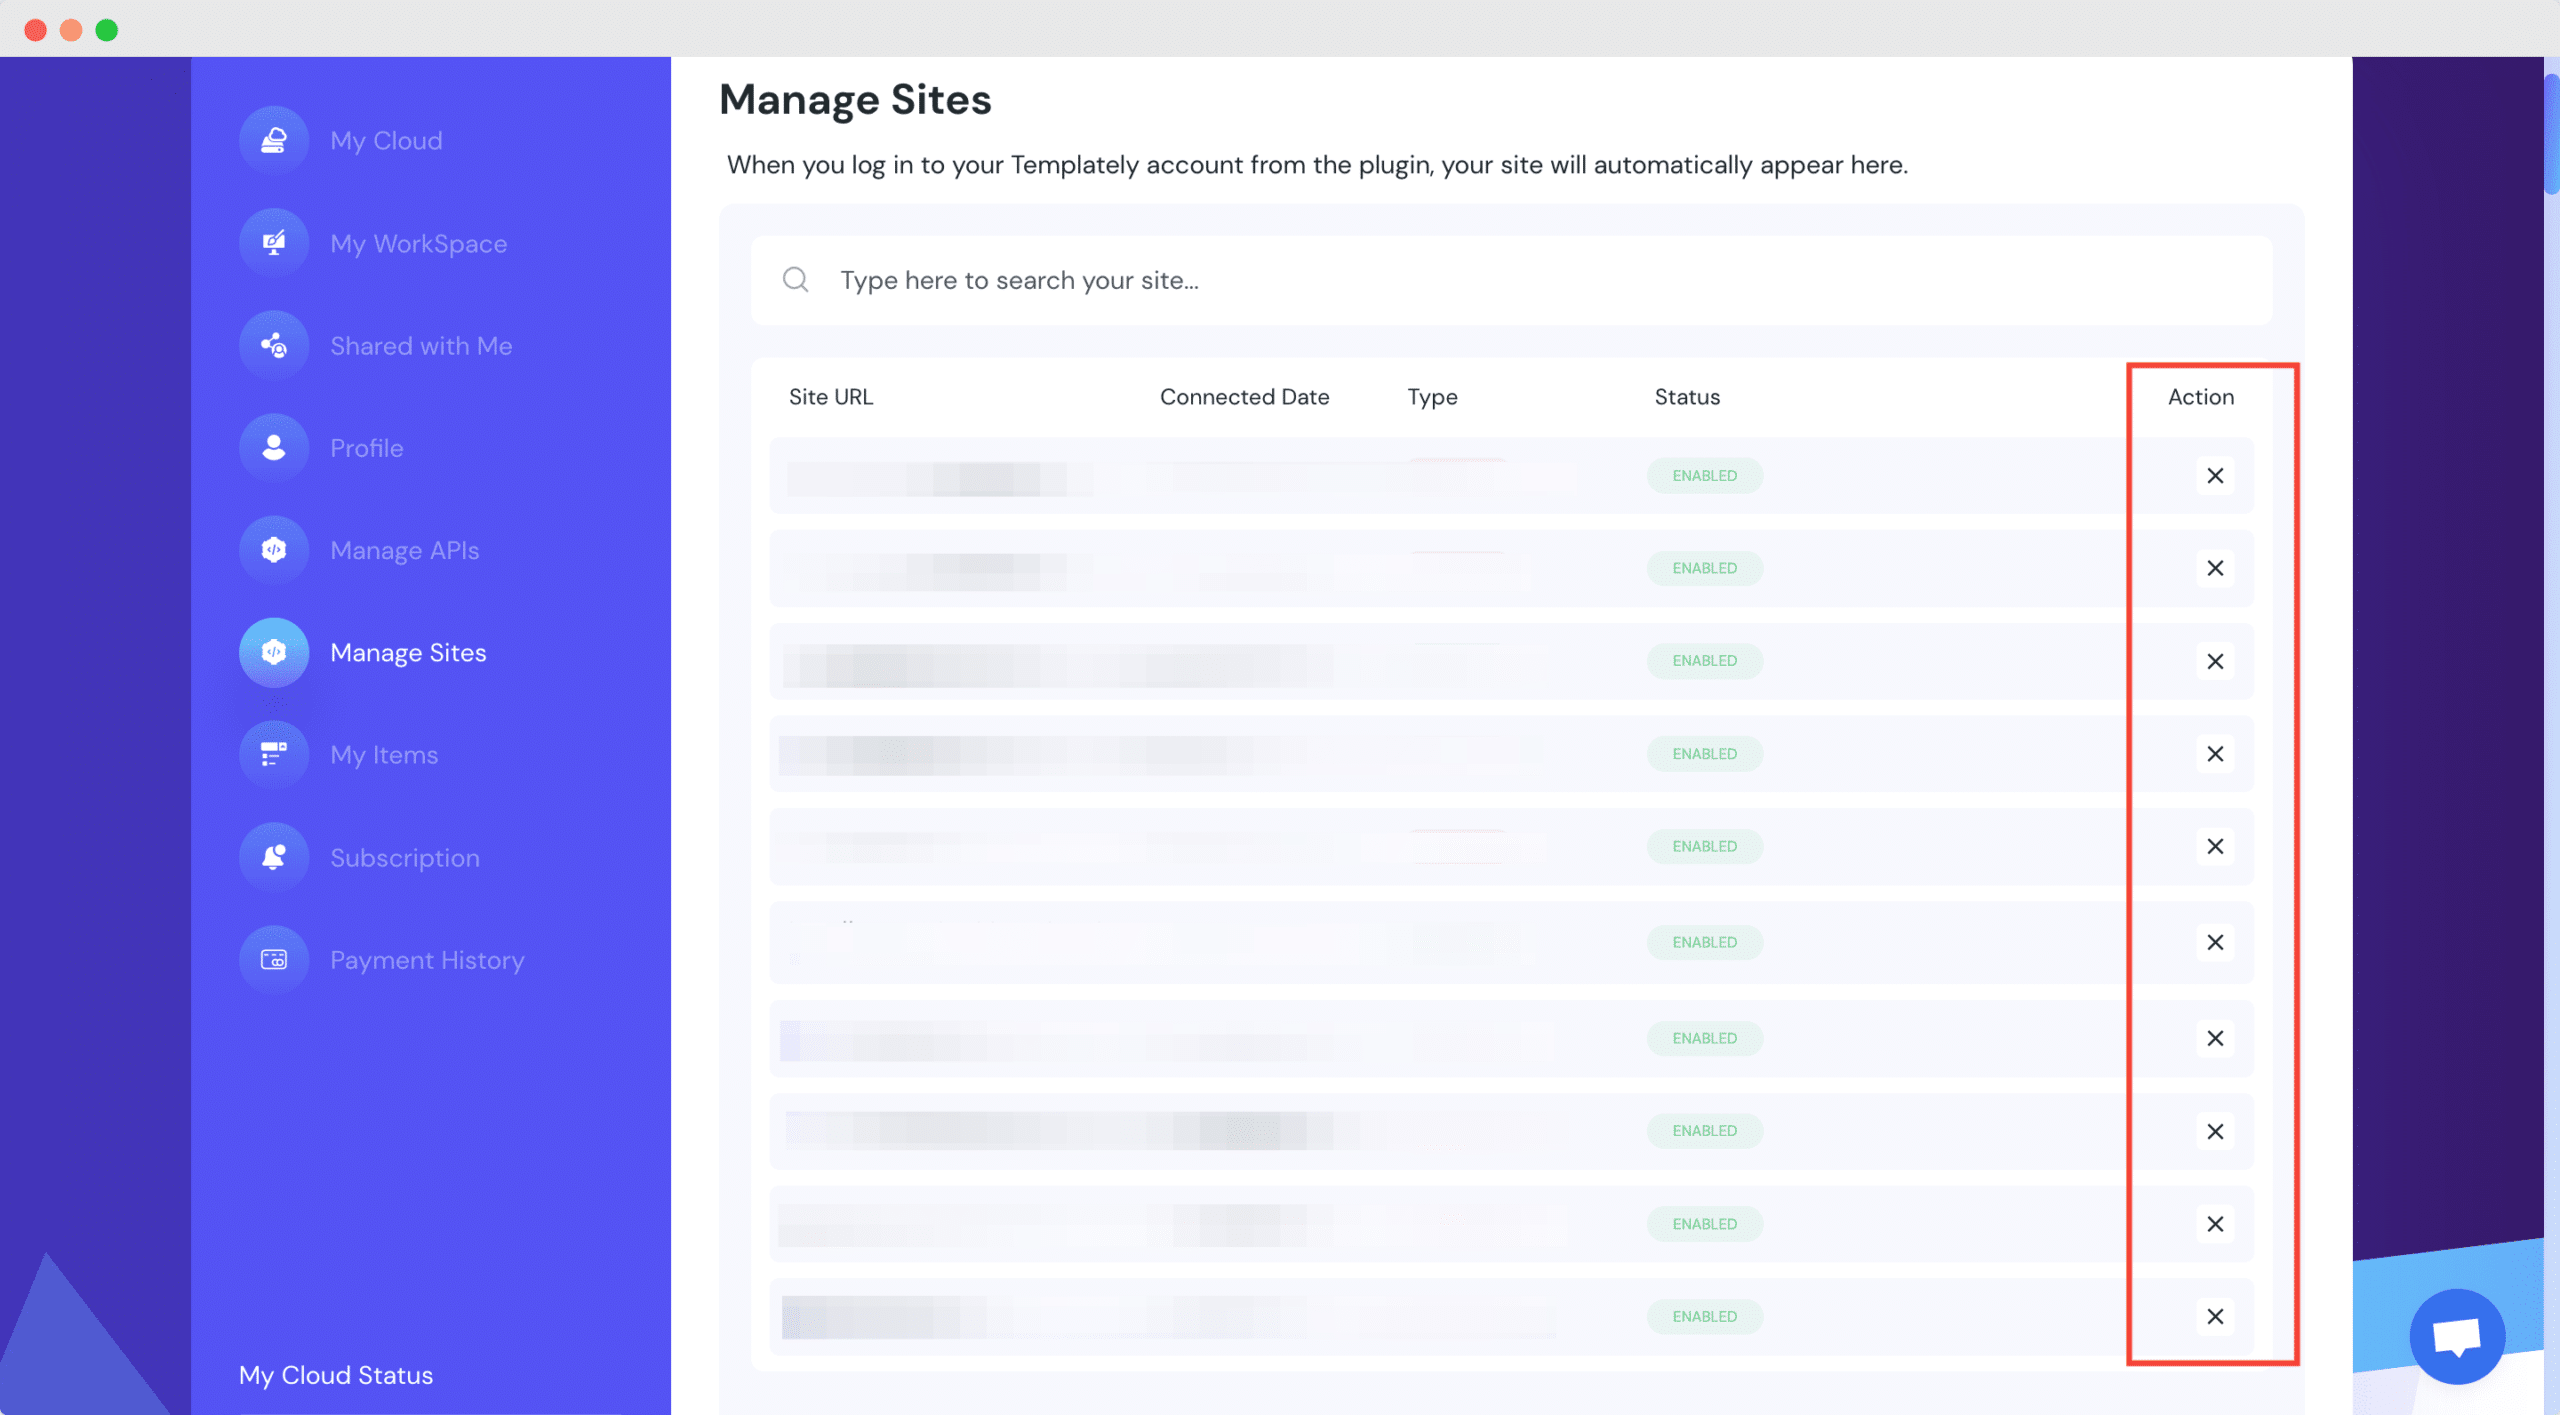
Step 1: Log into your Templately account and switch to the ‘Manage Sites’ tab as shown below, and click on the close icon for the site you want to delete.

Manage sites in Templately 3

Now go to the website that you want to connect to your Templately account and enjoy access to all free and PRO WordPress templates. And that’s it.

Thus, you can insert purchased single template packs or pages easily. Getting stuck? Contact our support team for any help you need.

Purchase Templately Single Templates

How To Purchase Templately Single Templates From WordPress Dashboard?

Templately provides a wide range of over 4000 templates for both Elementor and Gutenberg. Learn how to purchase Templately single templates from the WordPress dashboard. These templates are available in packs or as individual items for purchase, allowing you to choose the ones that best suit your needs conveniently. 

Note: The template packs or single templates you want to purchase may depend on some other plugins. If you want a particular template to work properly on your website, you need to have those dependency plugins installed & activated on your website.

How To Purchase Templately Single Templates From WordPress Dashboard?

Follow the guidelines below to learn how to purchase Templately single templates from the WordPress dashboard.

Step 1: Go To Templately From Your Dashboard

First, from your WordPress dashboard, go to ‘Templately’ → ‘Pages/Packs’. You need to log in to your Templately account to buy templates.

Purchase Templately Single Templates

Step 2: Choose Your Preferred Template

Select the template you want to purchase, or search for one. Click on the single template page or pack you want to buy. Now, hit the “Purchase This Pack” button. You will be directed to your Templately account now. 

Each of the template prices is mentioned below the template. You can choose the template that matches your requirements.

Purchase Templately Single Templates

There is an ‘Add To Cart’ button below the pricing of the template pack. Click on the ‘Add To Cart’ button and your preferred templates will be added to the cart. You can choose as many individual template packs or single templates as you want to purchase.

Purchase Templately Single Templates

You can browse more items and add them to your cart. You will find the ‘Add To Cart’ button beside each of the template packs while browsing.

Purchase Templately Single Templates

Step 3: Go To Your Cart 

To go to the cart page. For that, click on the button with a cart icon on top of your page and hit the ‘View Cart’ button. 

Purchase Templately Single Templates

Step 4: Proceed To Checkout

On your cart page, you will find the list of templates you added to your cart. Now, click on the ‘Proceed To Checkout’ button to purchase your selected templates.

Purchase Templately Single Templates

You will see a checkout page now. Here you will have to fill up the form with your name and email address. However, if you have already signed in, you don’t need to fill up the form. Select the payment method, consent to the Terms Of Services, and hit the ‘Pay Now’ button. 
Purchase Templately Single Templates

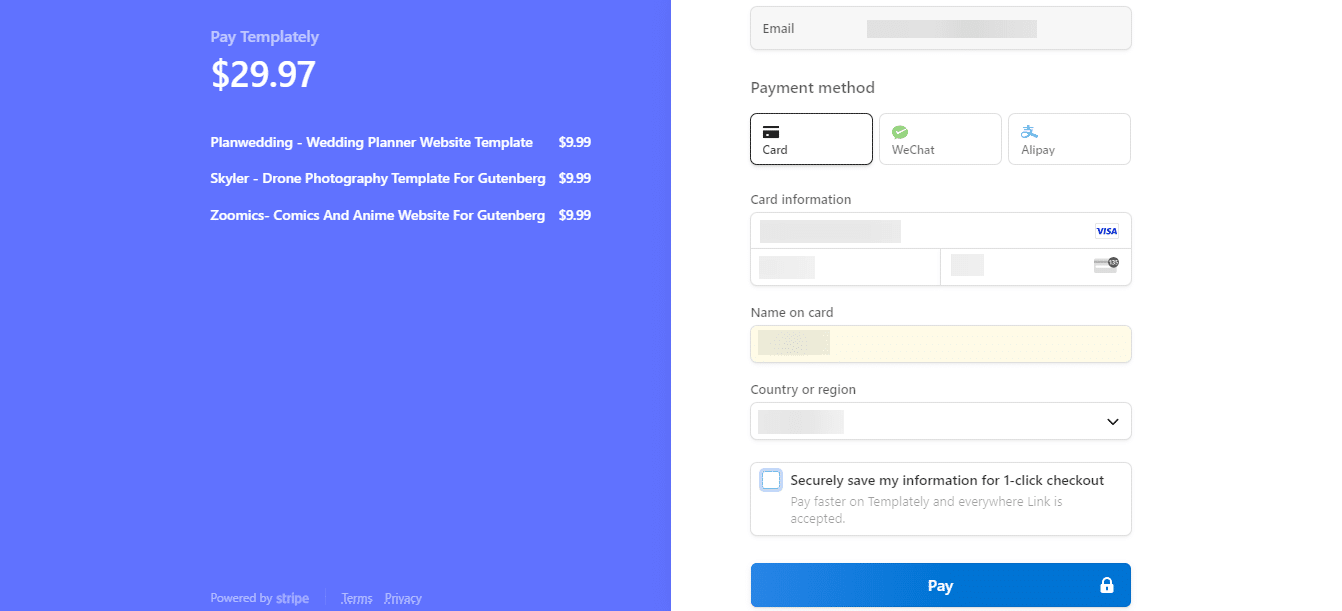
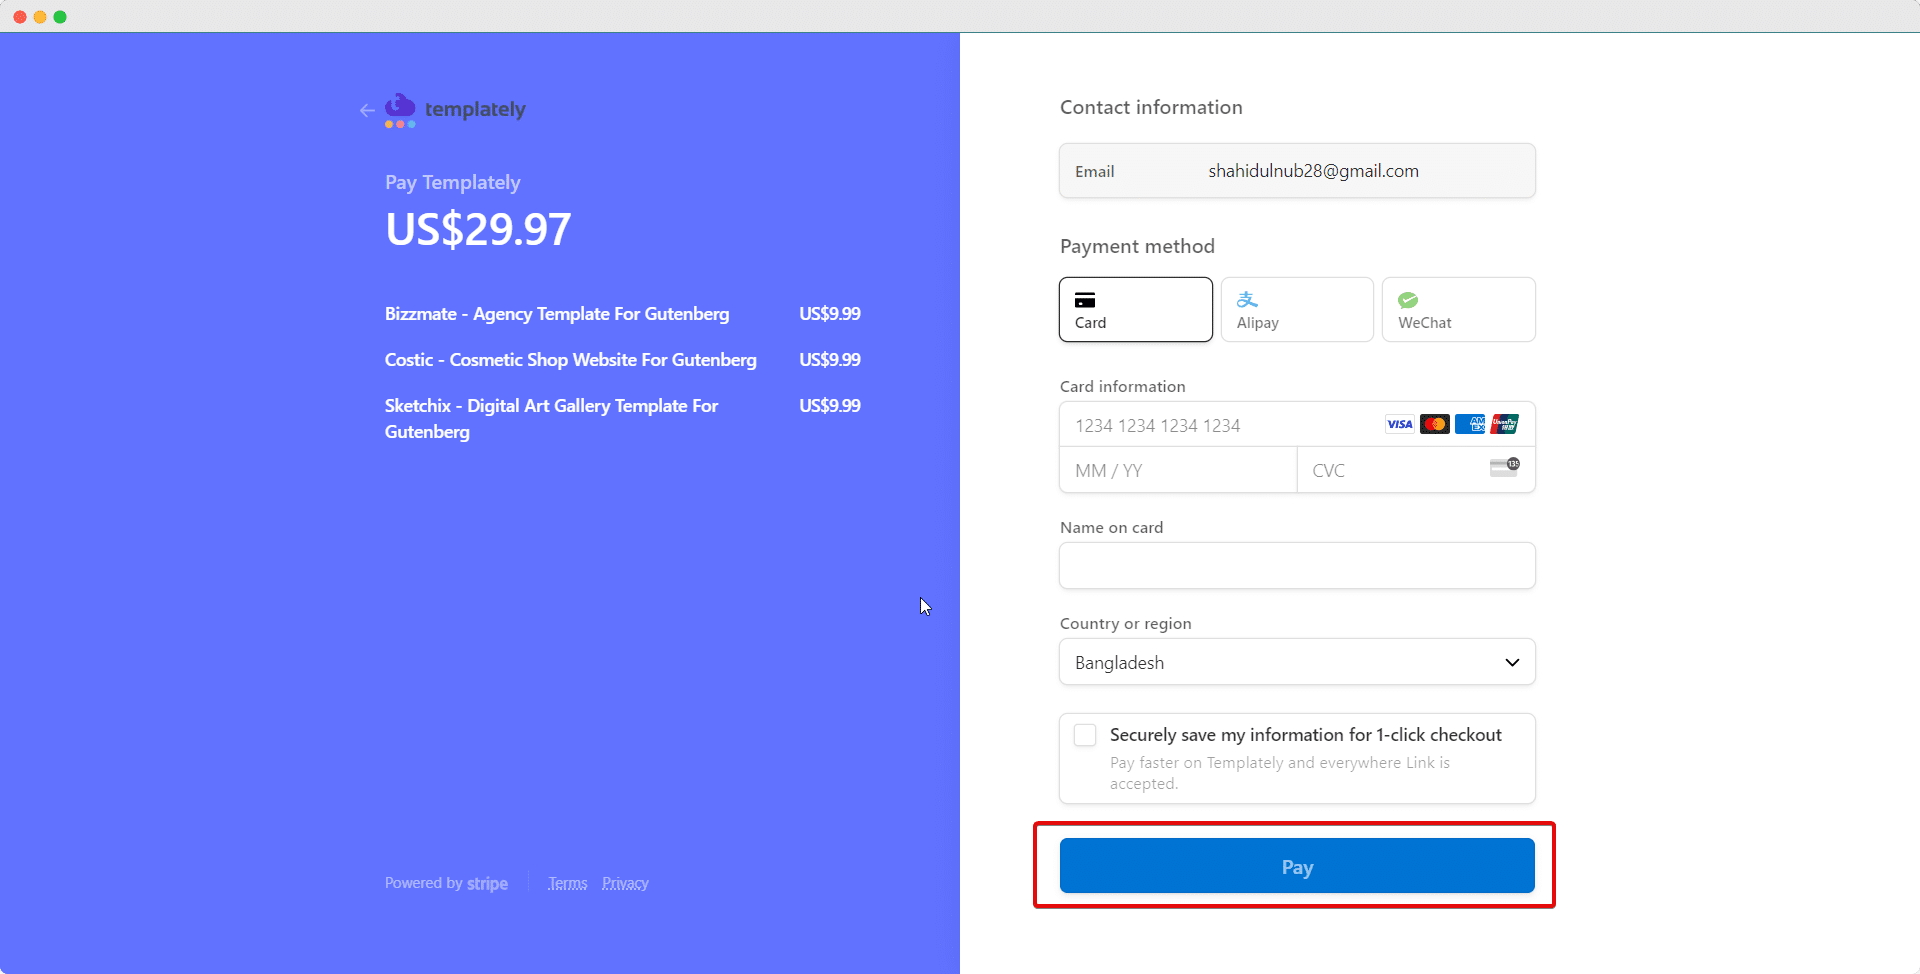
Now, you will be directed to another page where you will need to provide your card information and other required details for payment. After providing that information, hit the ‘Pay’ button. And congrats! You are done purchasing your desired templates. 

Purchase Templately Single Templates


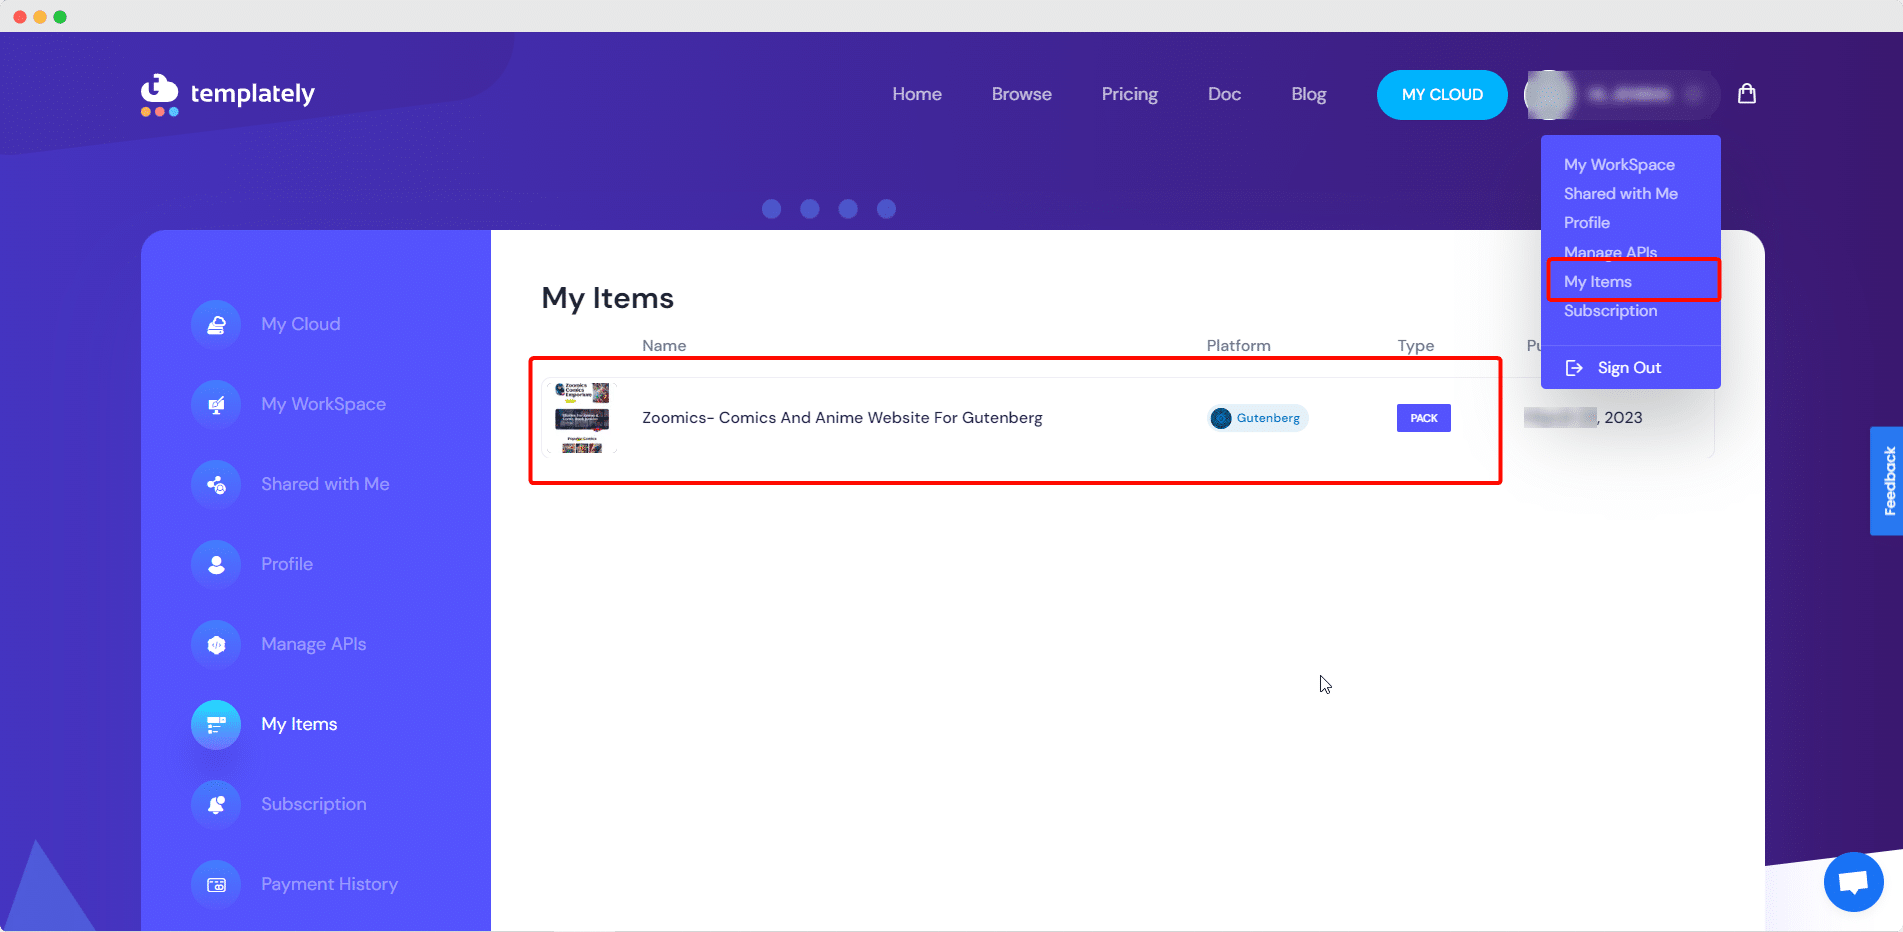
Once you buy the templates from the plugin’s dashboard through your account, they will be added to your “My Items” space.

Purchase Templately Single Templates

Thus, you can easily purchase template packs or single templates from the WordPress dashboard. Getting stuck? Feel free to contact our support team for any help.

purchase-template-packs

How To Purchase Template Packs Or Single Templates From Templately?

Templately offers you 4,000+ Elementor & Gutenberg templates to easily design your WordPress websites. While you can grab them all together when you purchase the PRO packages, you can buy the template packs and single templates individually as well. 

Note: The template packs or single templates you want to purchase may have dependencies with other external plugins. If you want a particular template to properly work on your website, you need to have the related dependency plugins installed & activated on your website as well.

How To Add Template Packs & Single Templates To Your Cart?

Adding templates to cart is very easy and simple. Follow the below simple steps to know how to add single templates or template packs to your cart in Templately.

Step 1: Navigate To Templately Browse Page

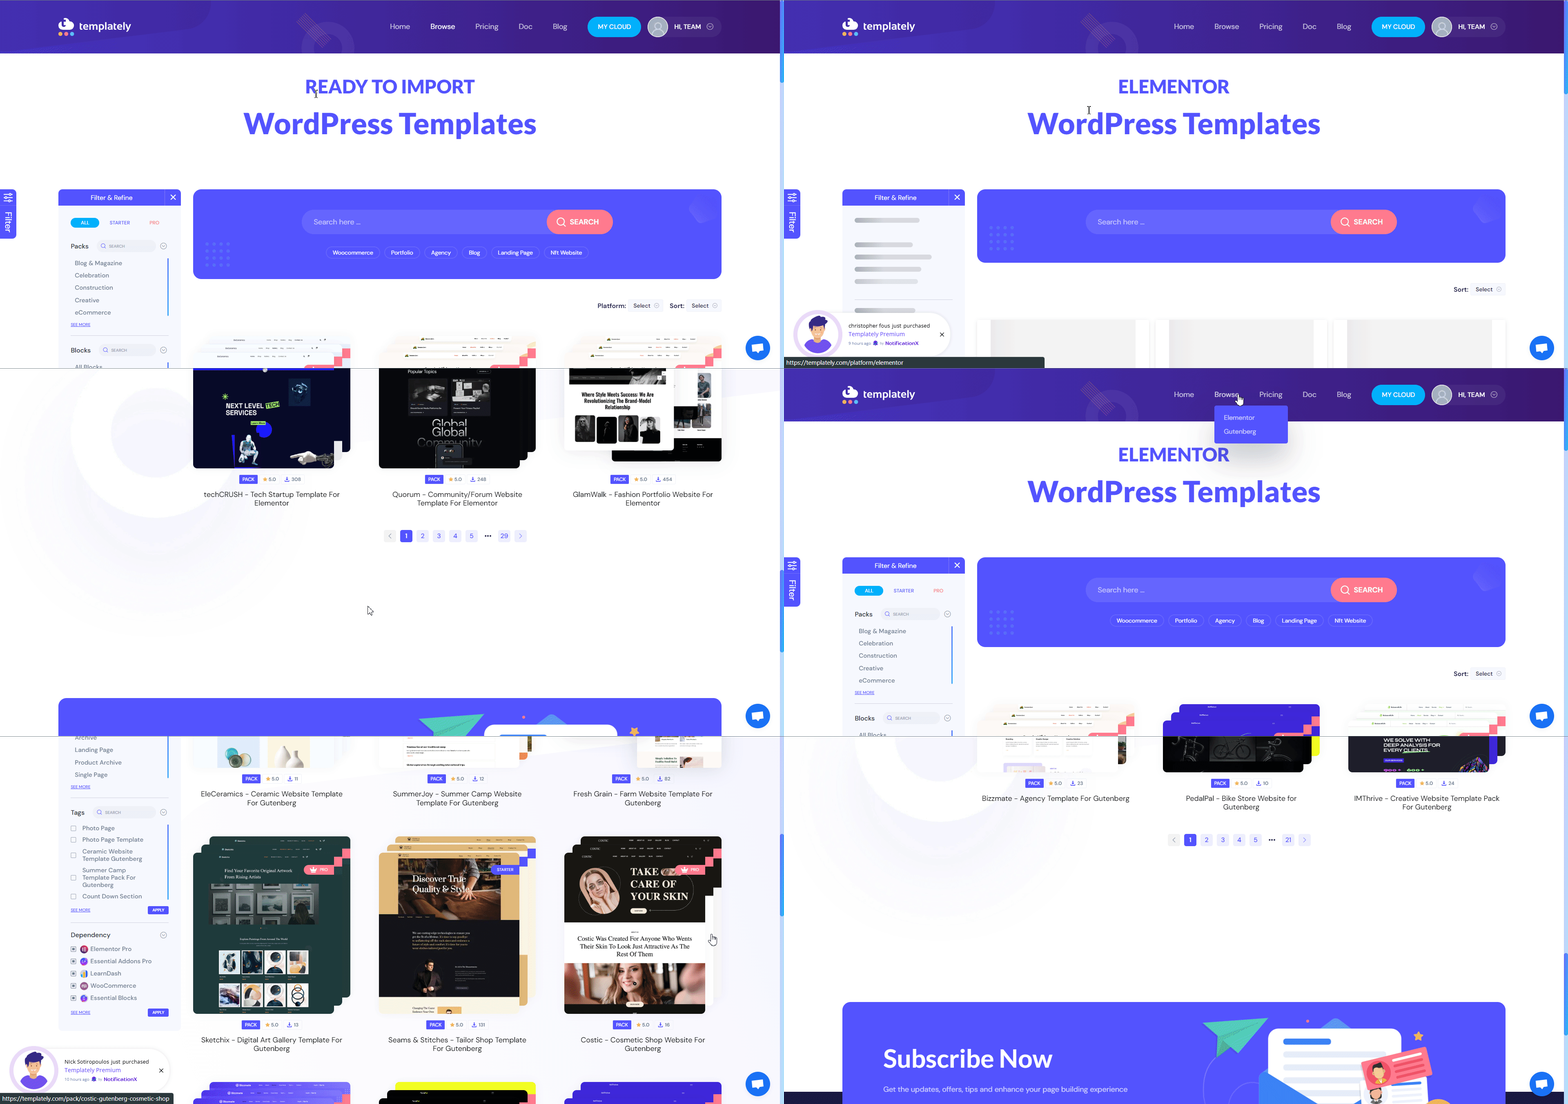
First, go to the ‘Browse’ tab of Templately from the top bar menu. Here, you will find a vast collection of website template packs and single templates. You can choose the Elementor or Gutenberg templates you like from there.

purchase-template-packs

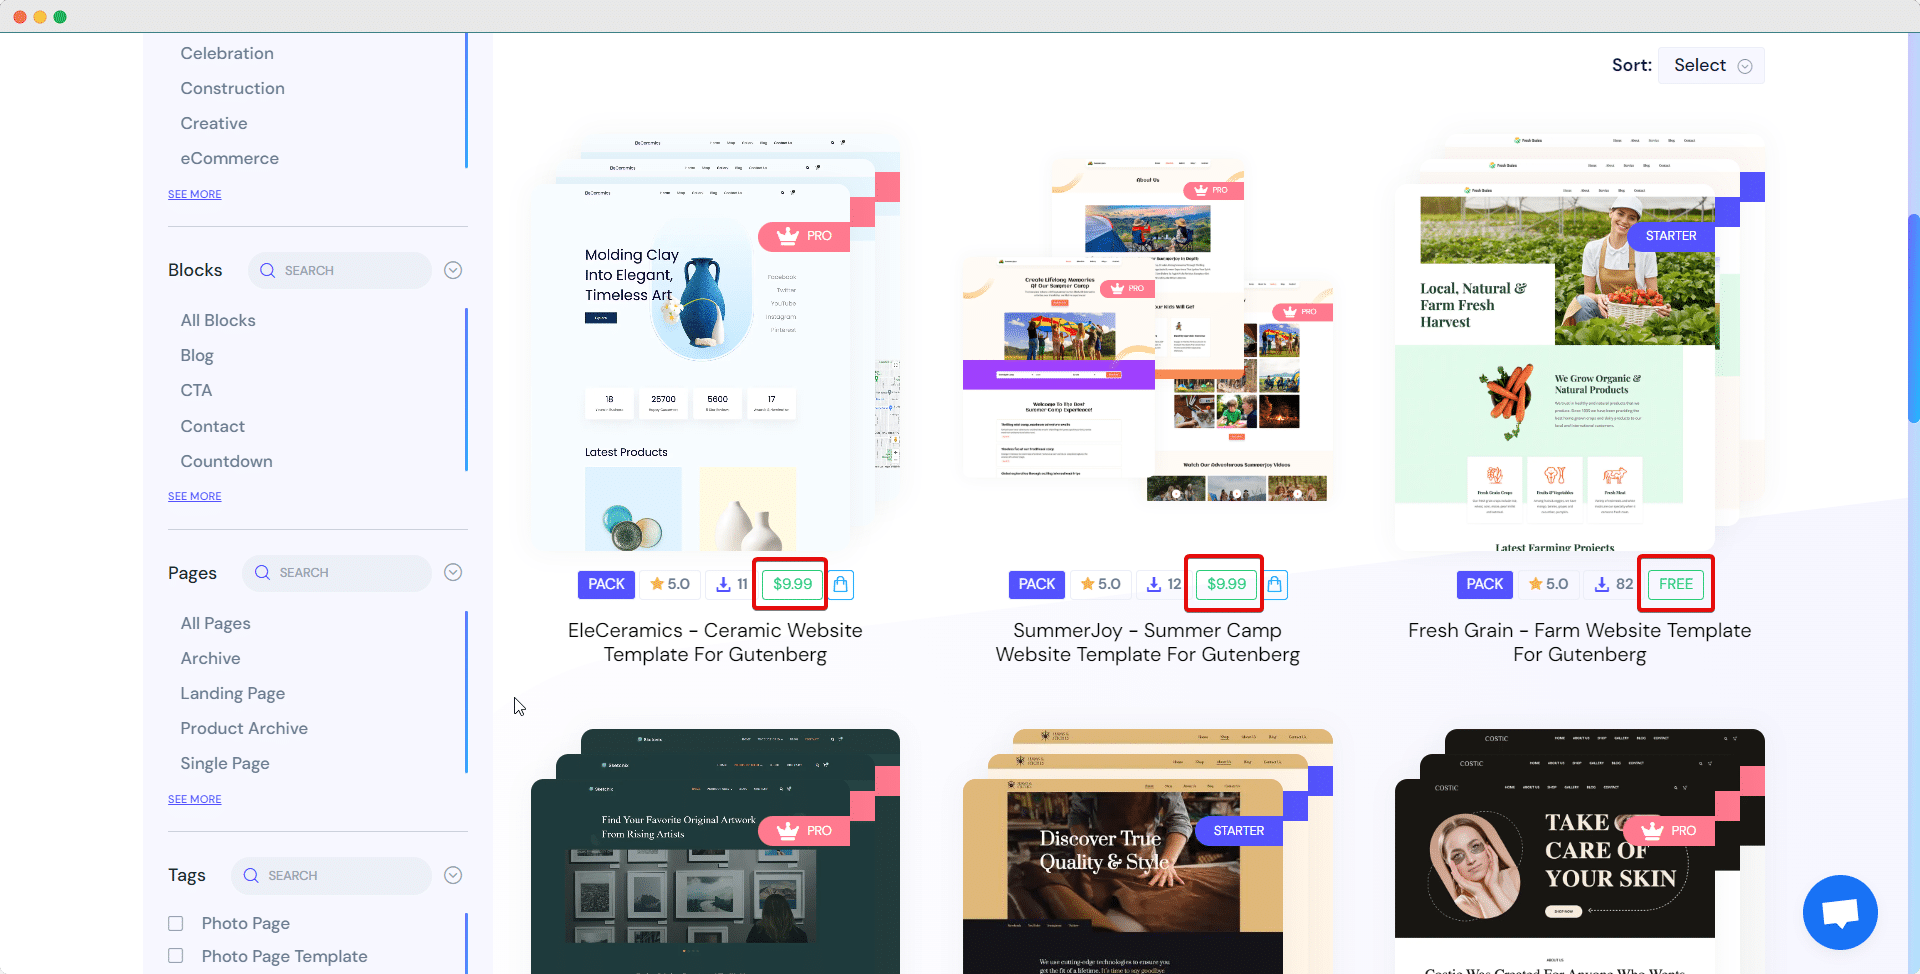
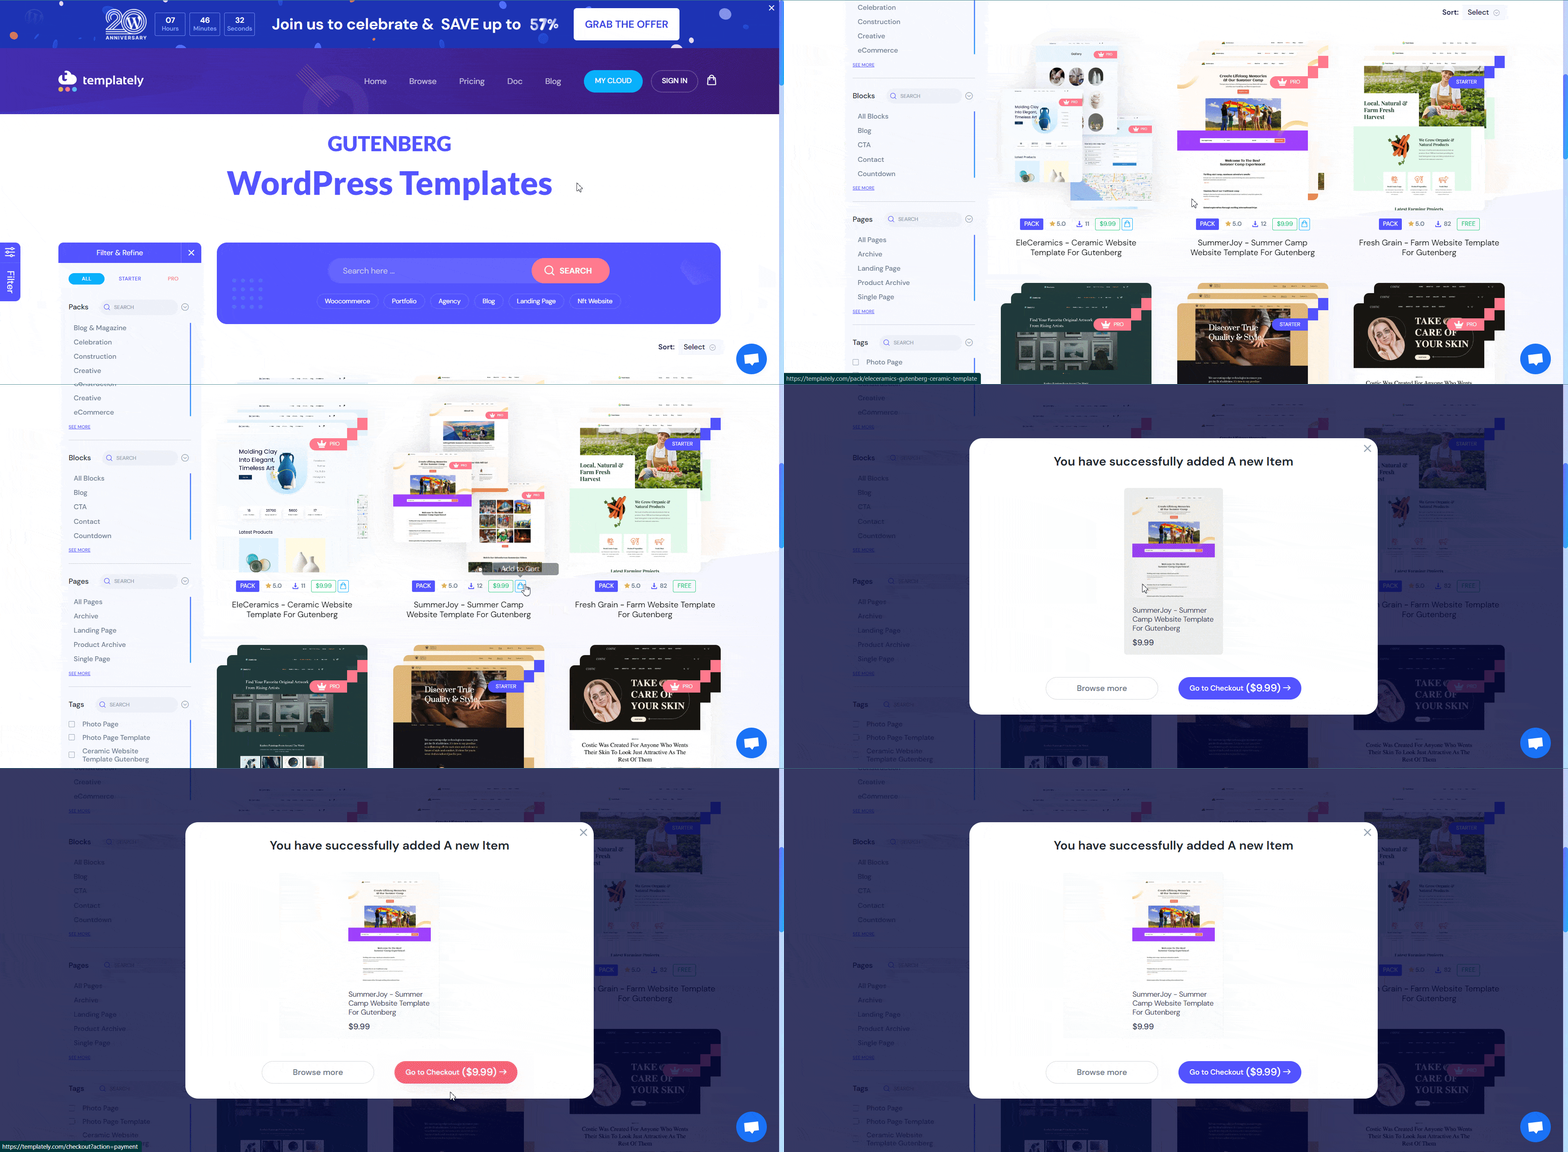
The template prices are mentioned below the template previews as you can see below. You can choose the template that matches your requirements.

purchase-template-packs

Step 2: Choose The Templates 

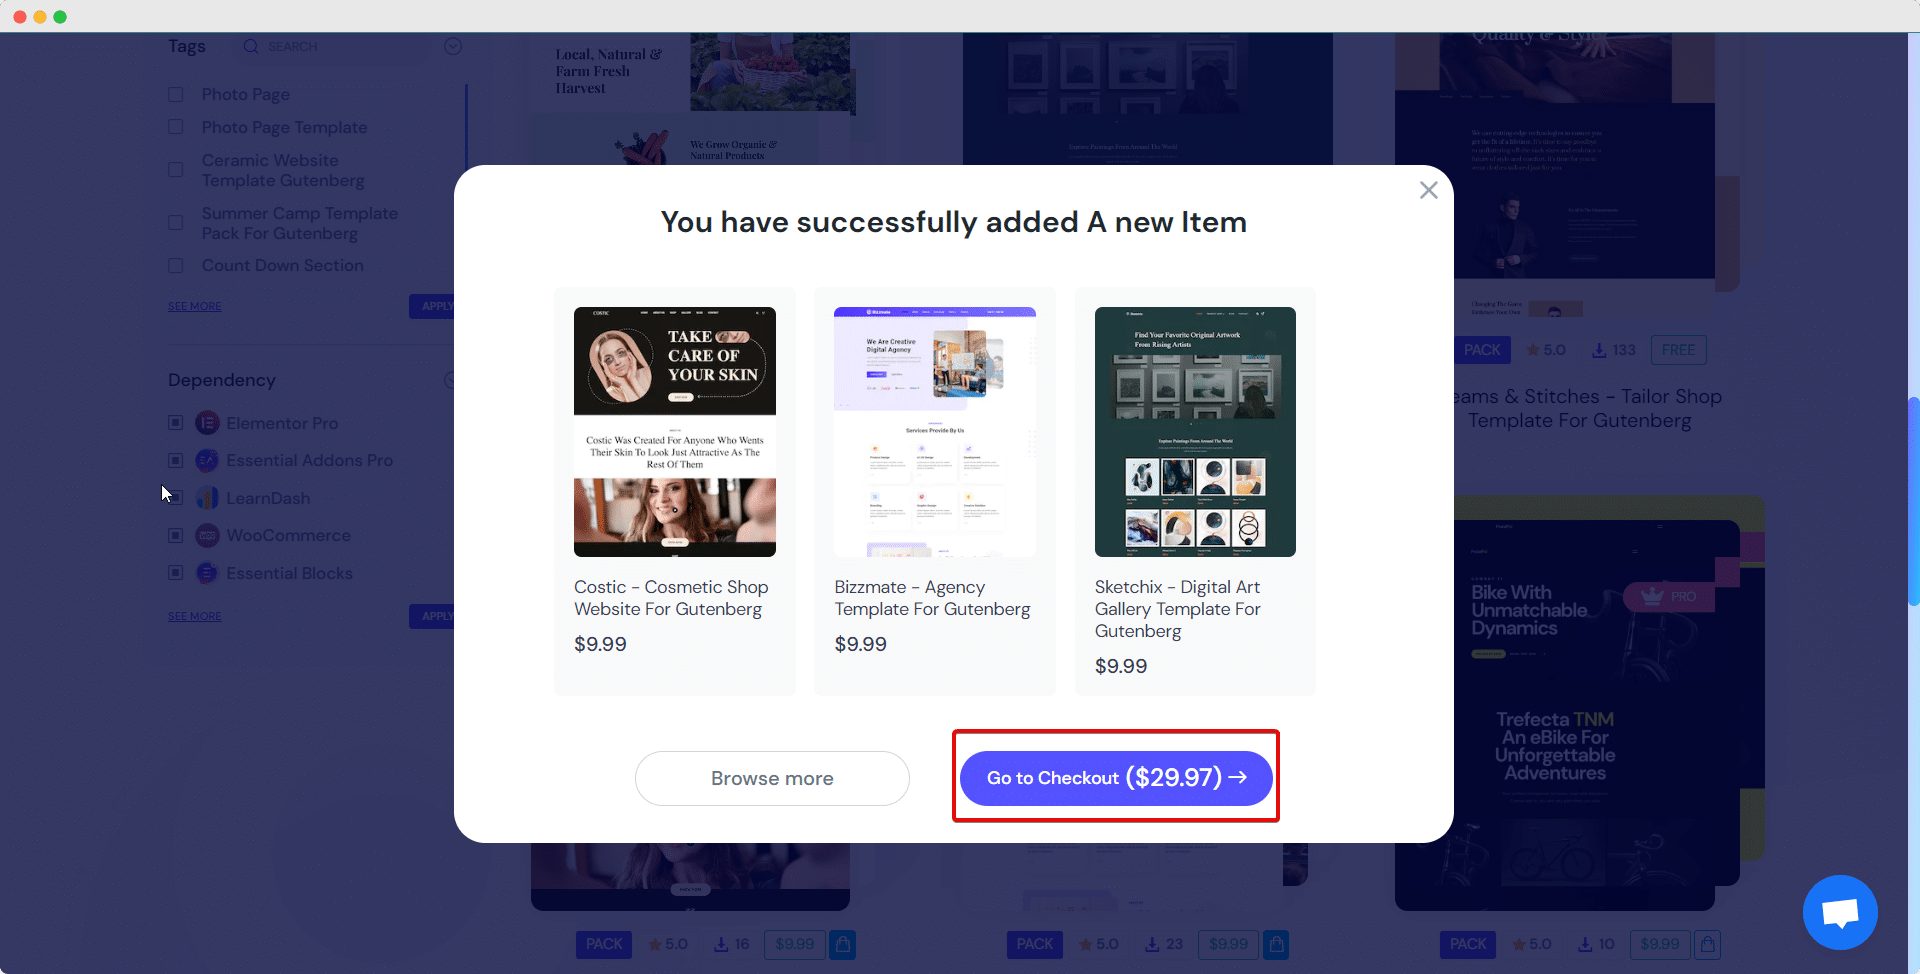
Now, select the template packs or single templates you want to purchase. There is an ‘Add To Cart’ button beside the pricing of each template. Click on the ‘Add To Cart’ button and your preferred templates will be added to the cart. Plus, you’ll notice a pop-up window that says, whether you want to browse more or go to checkout.

purchase-template-packs

How To Purchase Template Packs Or Single Templates?

There are two ways to purchase: going through add to cart page or the pop-up window page. Follow the guideline below to learn how to purchase template packs or single templates from Templately.

i. Via Clicking On The Cart Icon

By following the below simple steps, you can easily purchase your single templates or template packs from add to cart page.

Step 1: Go To Your Cart 

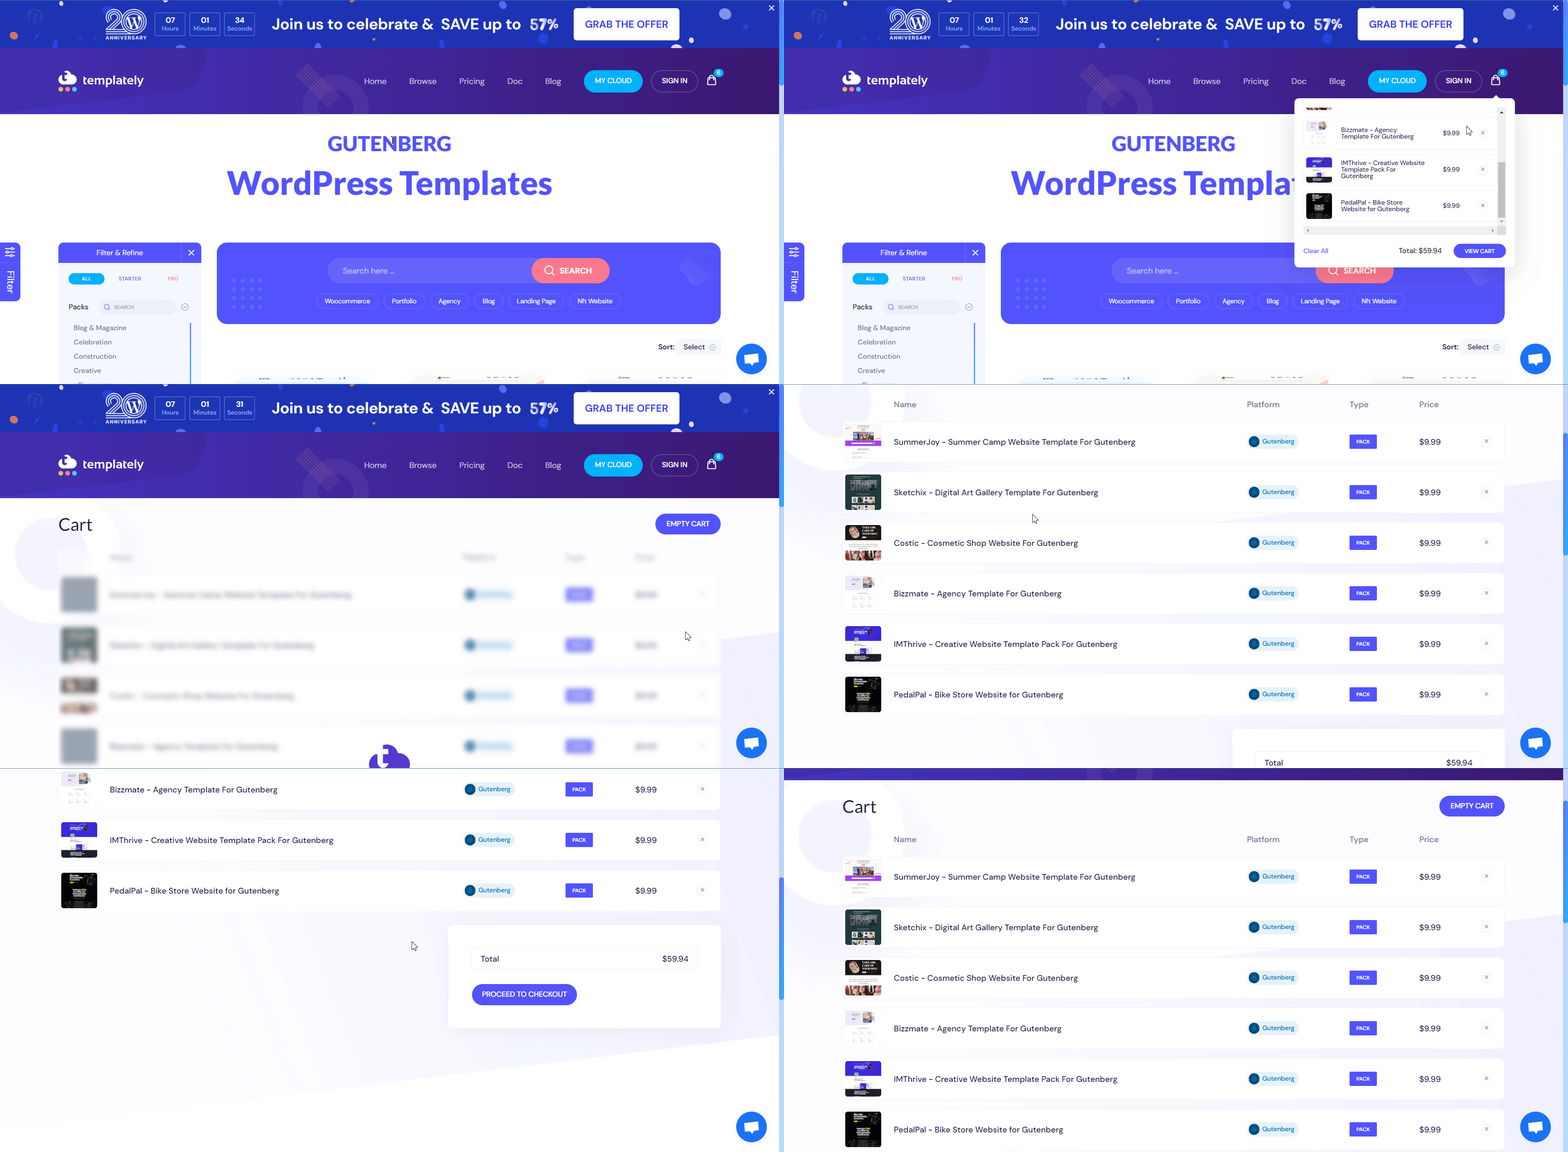
To go to the cart page. For that, click on the button with a cart icon on top of your page and hit the ‘View Cart’ button.

purchase-template-packs

Step 2: Proceed To Checkout

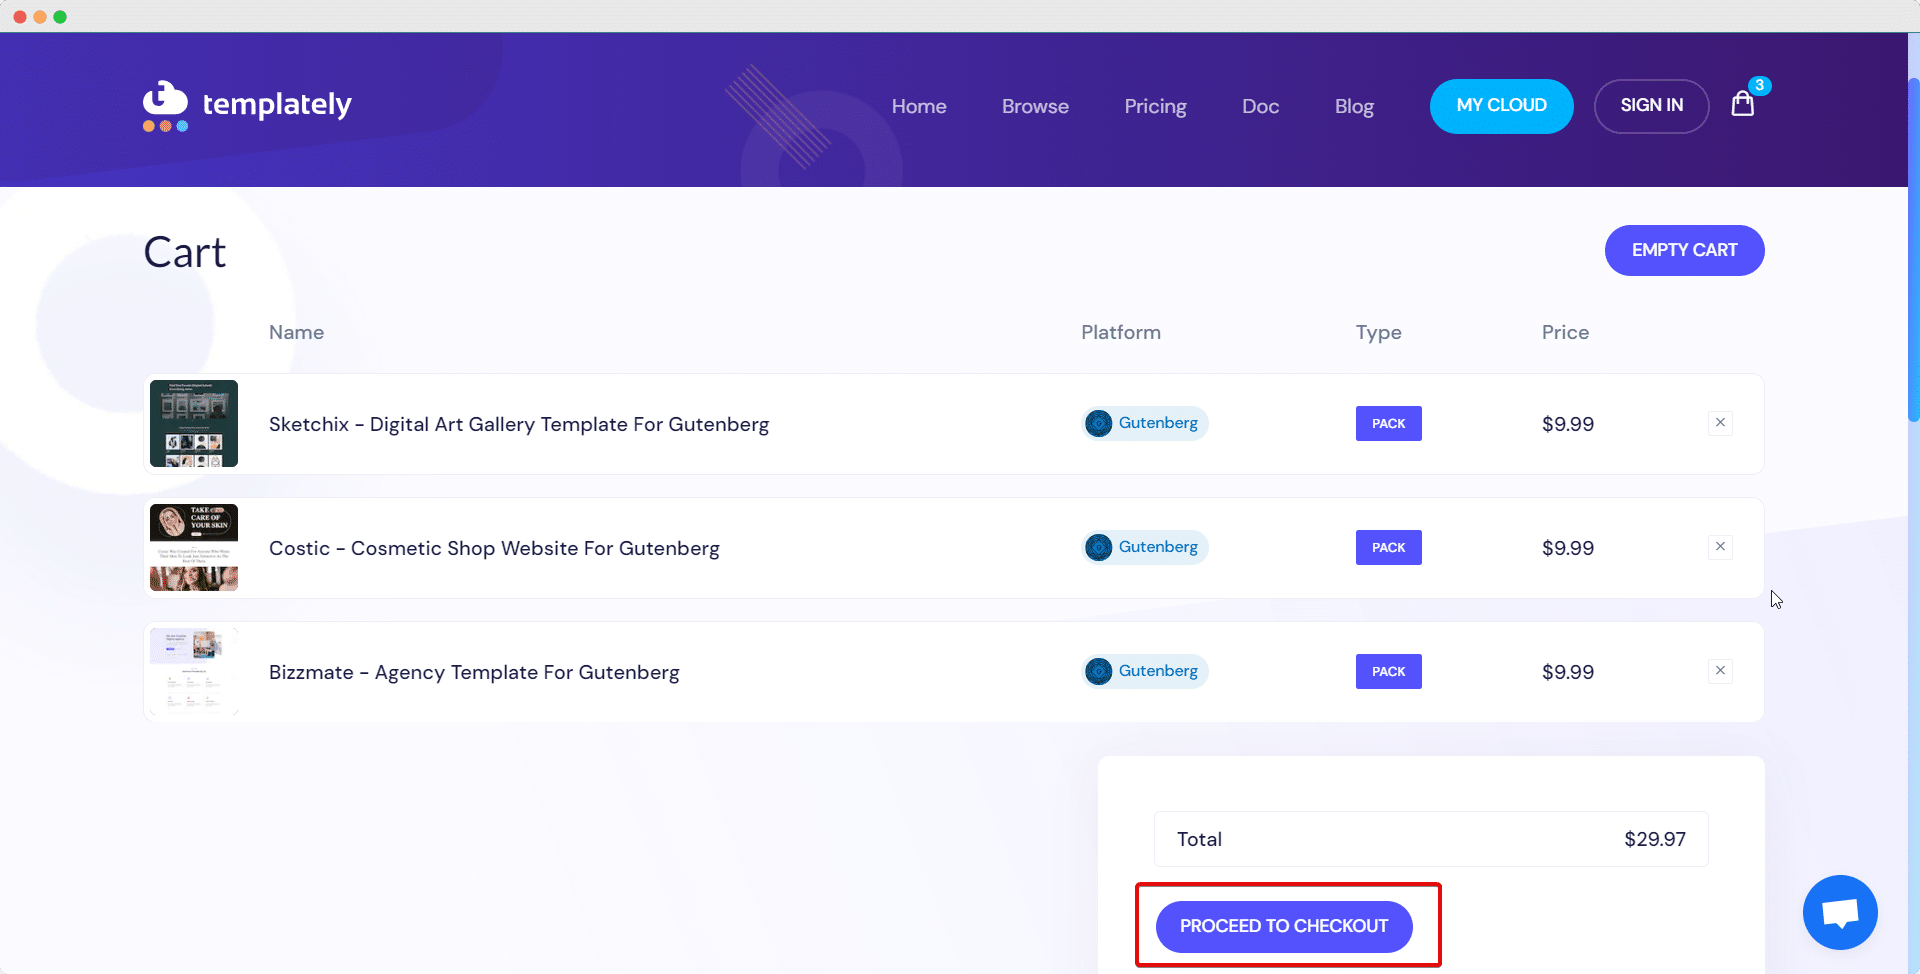
On your cart page, you will find the list of templates you added to your cart. Now, click on the ‘Proceed To Checkout’ button to purchase your selected templates.

purchase-template-packs

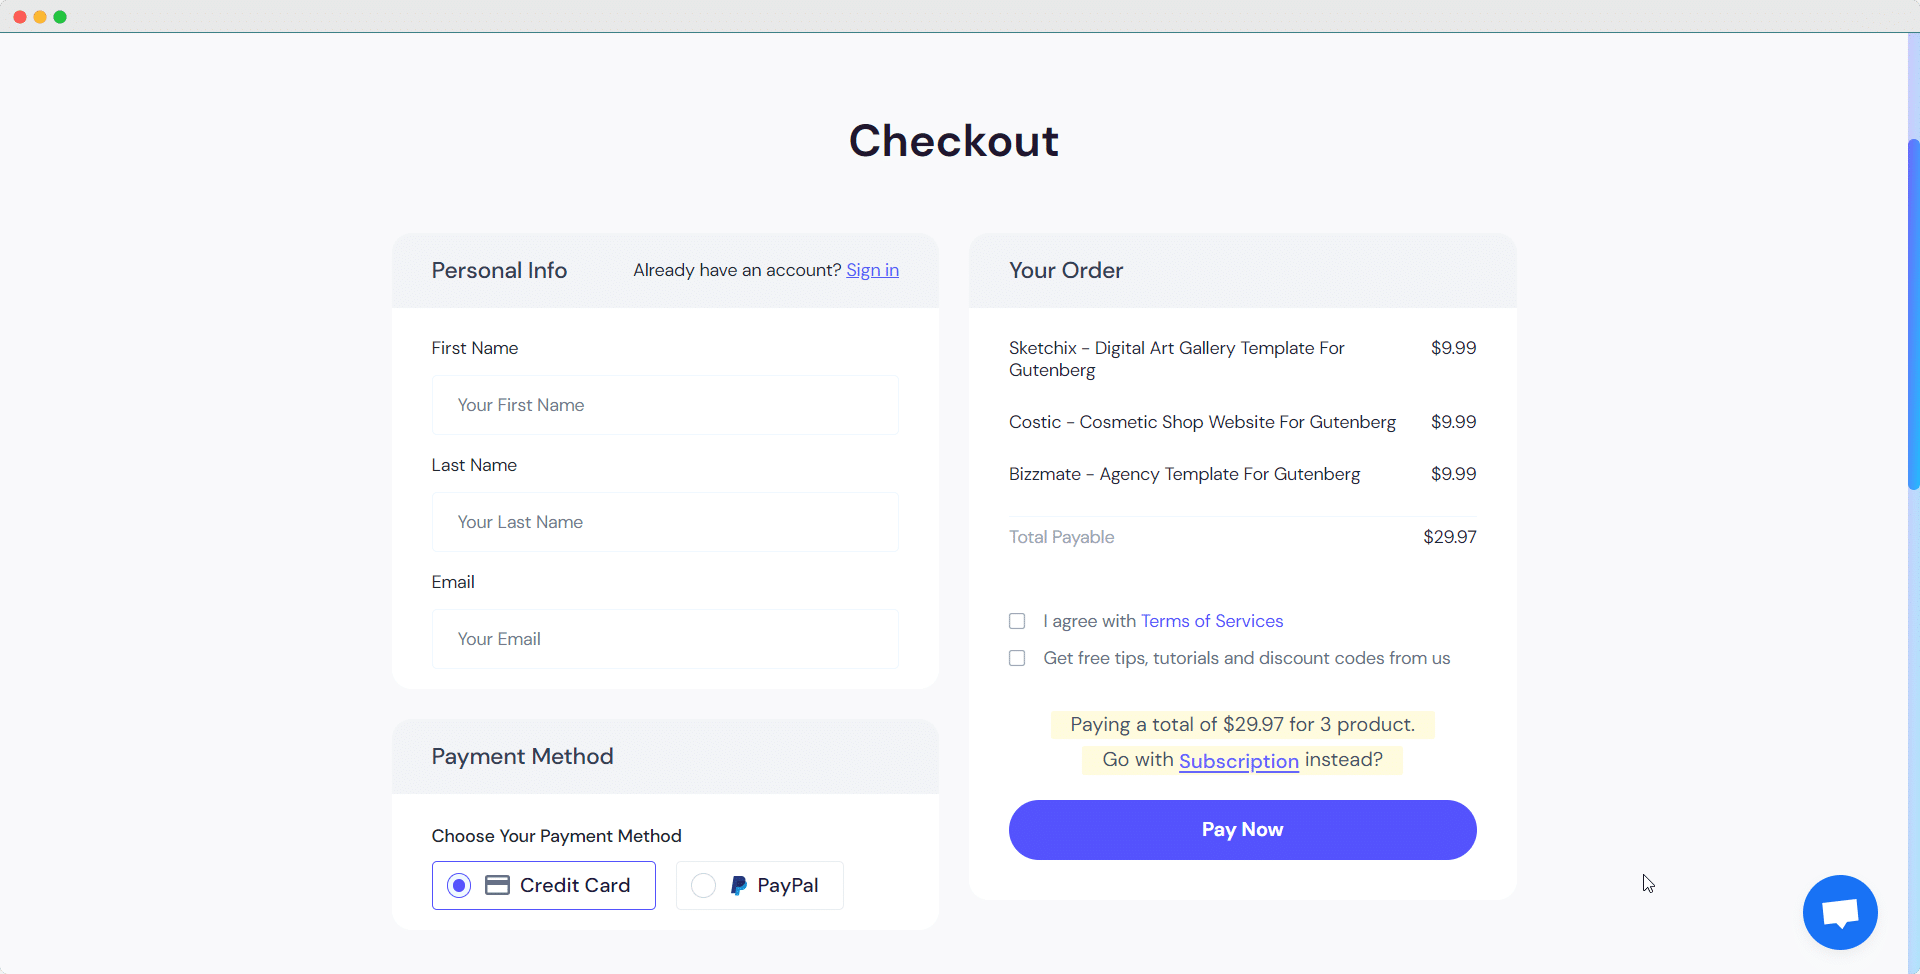
You will see a checkout page now. Here you will have to fill up the form with your name and email address. Select the payment method, consent to the Terms Of Services, and hit the ‘Pay Now’ button.

purchase-template-packs

Now, you will be directed to another page where you will need to provide your card information and other required details for payment. After providing that information, hit the ‘Pay’ button. And congrats! You are done purchasing your desired templates.

purchase-template-packs

ii. Via Pop-up Window After Adding Items To Cart

Remember step 2 above, “Choose The Templates” where you got a pop-up window that says, whether you want to browse more or go to checkout. From that popup page, you can purchase your template too.

Simply click on the ‘Go to Checkout’ option, and follow the instructions for payment same as mentioned above.

purchase-template-packs

View Your Purchased Item(s)

Once you buy the templates from your account, they will be automatically added to your “My Items” as displayed below.

purchase-template-packs

Thus, you can easily purchase template packs or single templates from Templately. Getting stuck? Feel free to contact our support team for any help.

Dependency In Templately

What Is Dependency In Templately?

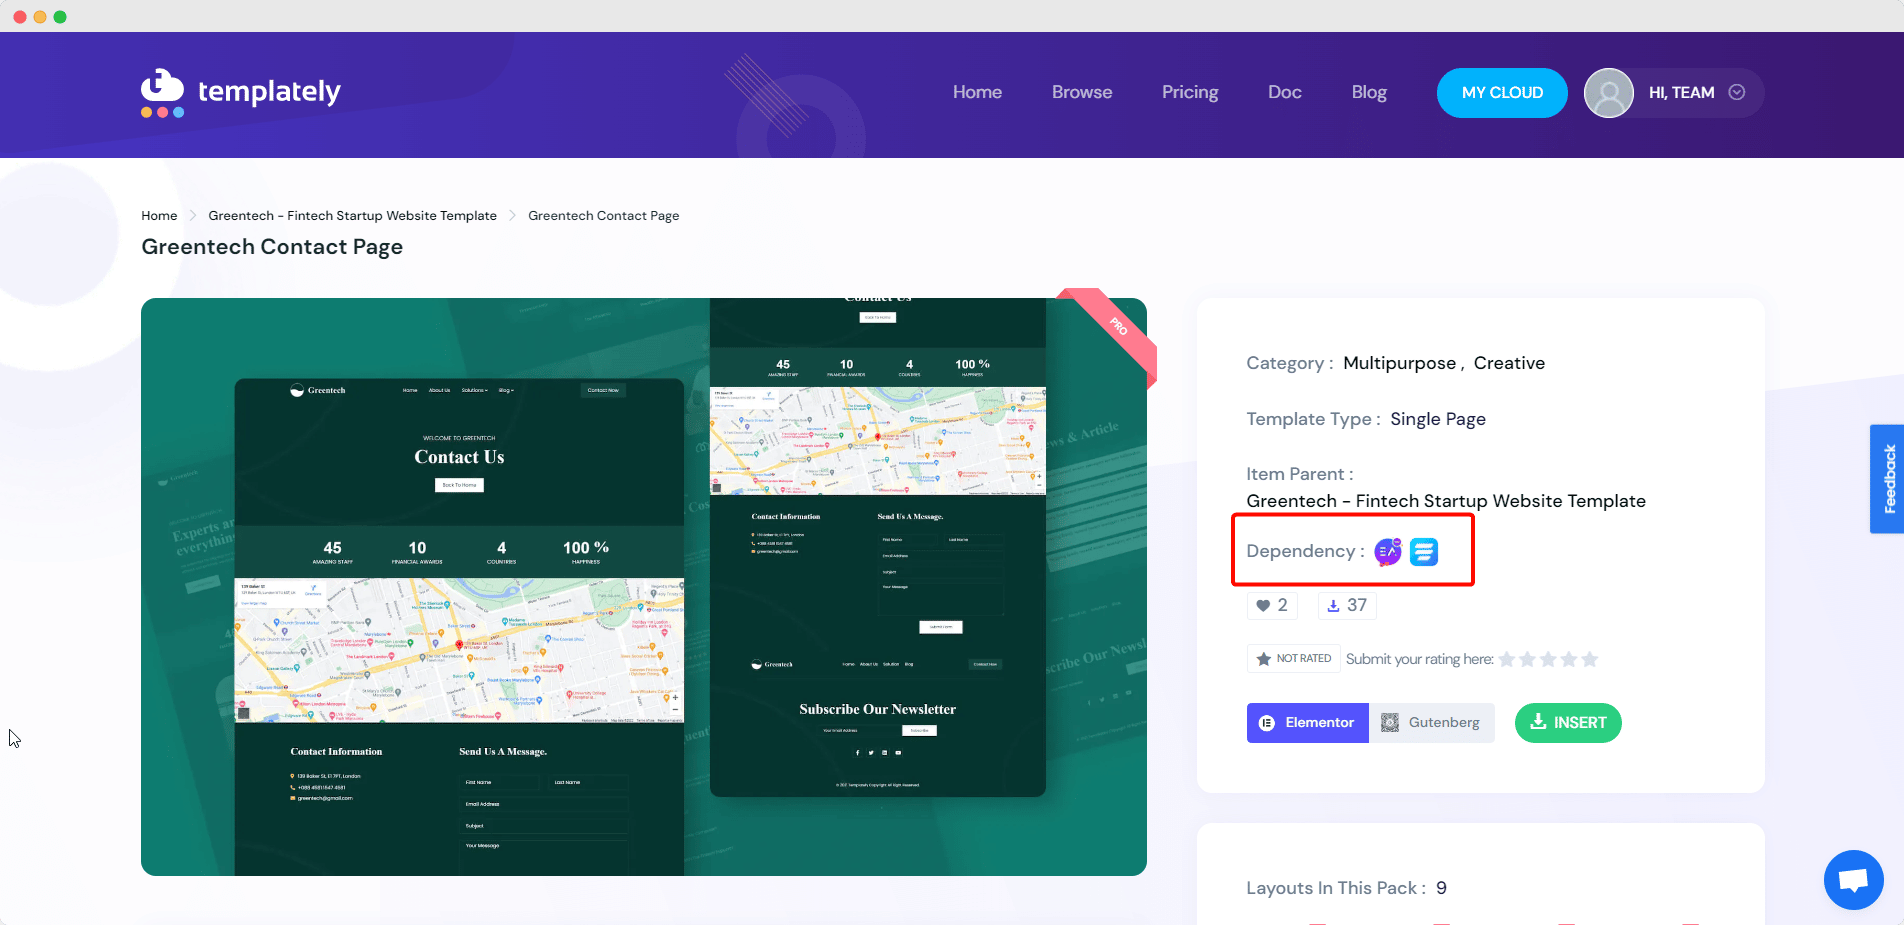
The ready templates you import from Templately can have ‘dependencies’ with other free or PRO plugins as well. This means there is plugin dependency in Templately. You need to have those ‘dependency’ plugins installed & activated on your WordPress website to properly import/use templates of Templately

Dependency In Templately

For example, here in the image above, the ‘Greentech Contact Page’ template has a dependency on Essential Addons Pro, and Fluent Forms plugins. So, to completely import this template, you need to have Essential Addons Pro, and Fluent Forms installed and activated on your WordPress site.

If you have all the dependency plugins required for your selected template installed and activated on your WordPress site, you can fully import that template. However, that particular template can still be inserted if you do not have the required plugins installed. In that case, the sections of the template that are designed with the help of those dependency plugins will not appear in the template you are using from Templately.

Any questions? Feel free to contact our support team whenever you want. 

Insert JSON or .zip Files to use Profily Template

How To Insert JSON or Zip Files To Use Profily Template Pack In Elementor?

This documentation’s purpose is to help you insert JSON or Zip files to use Profily template pack by Templately in Elementor. You should have inserted these specific JSON or Zip files by following some simple steps. 

How To Insert JSON or Zip Files To Use Profily?

Learn how you can insert JSON or Zip files to use Profily template pack in Elementor below. 

Step 1: Navigate To Elementor Templates 

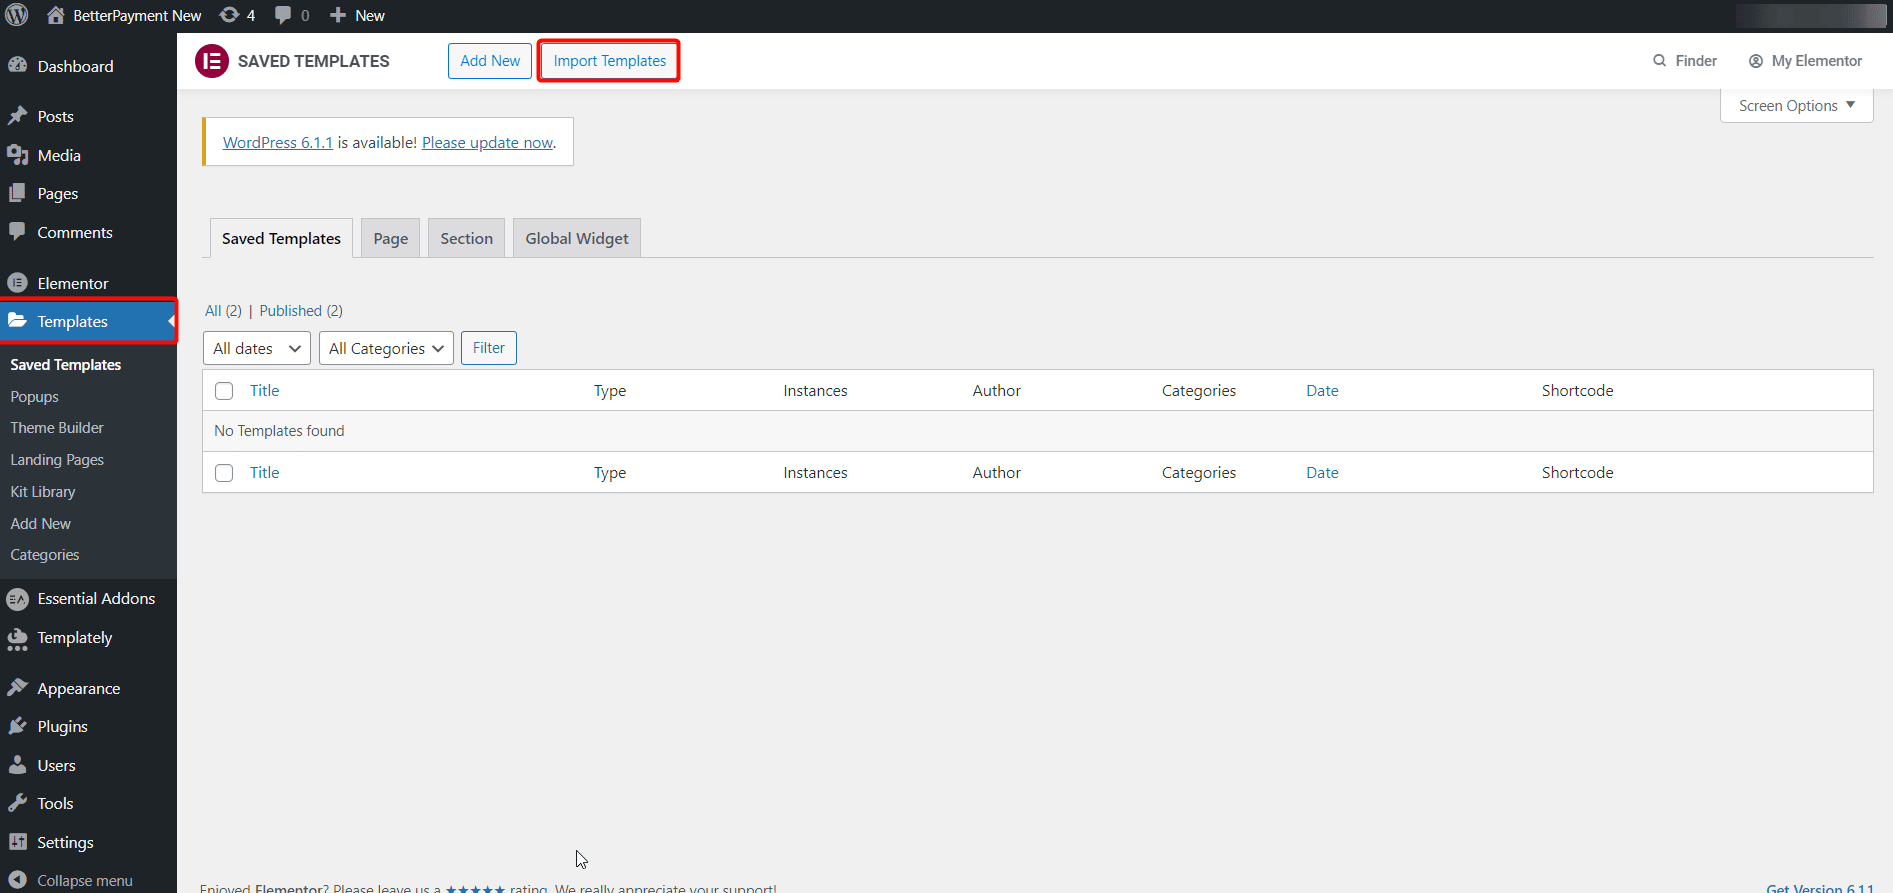
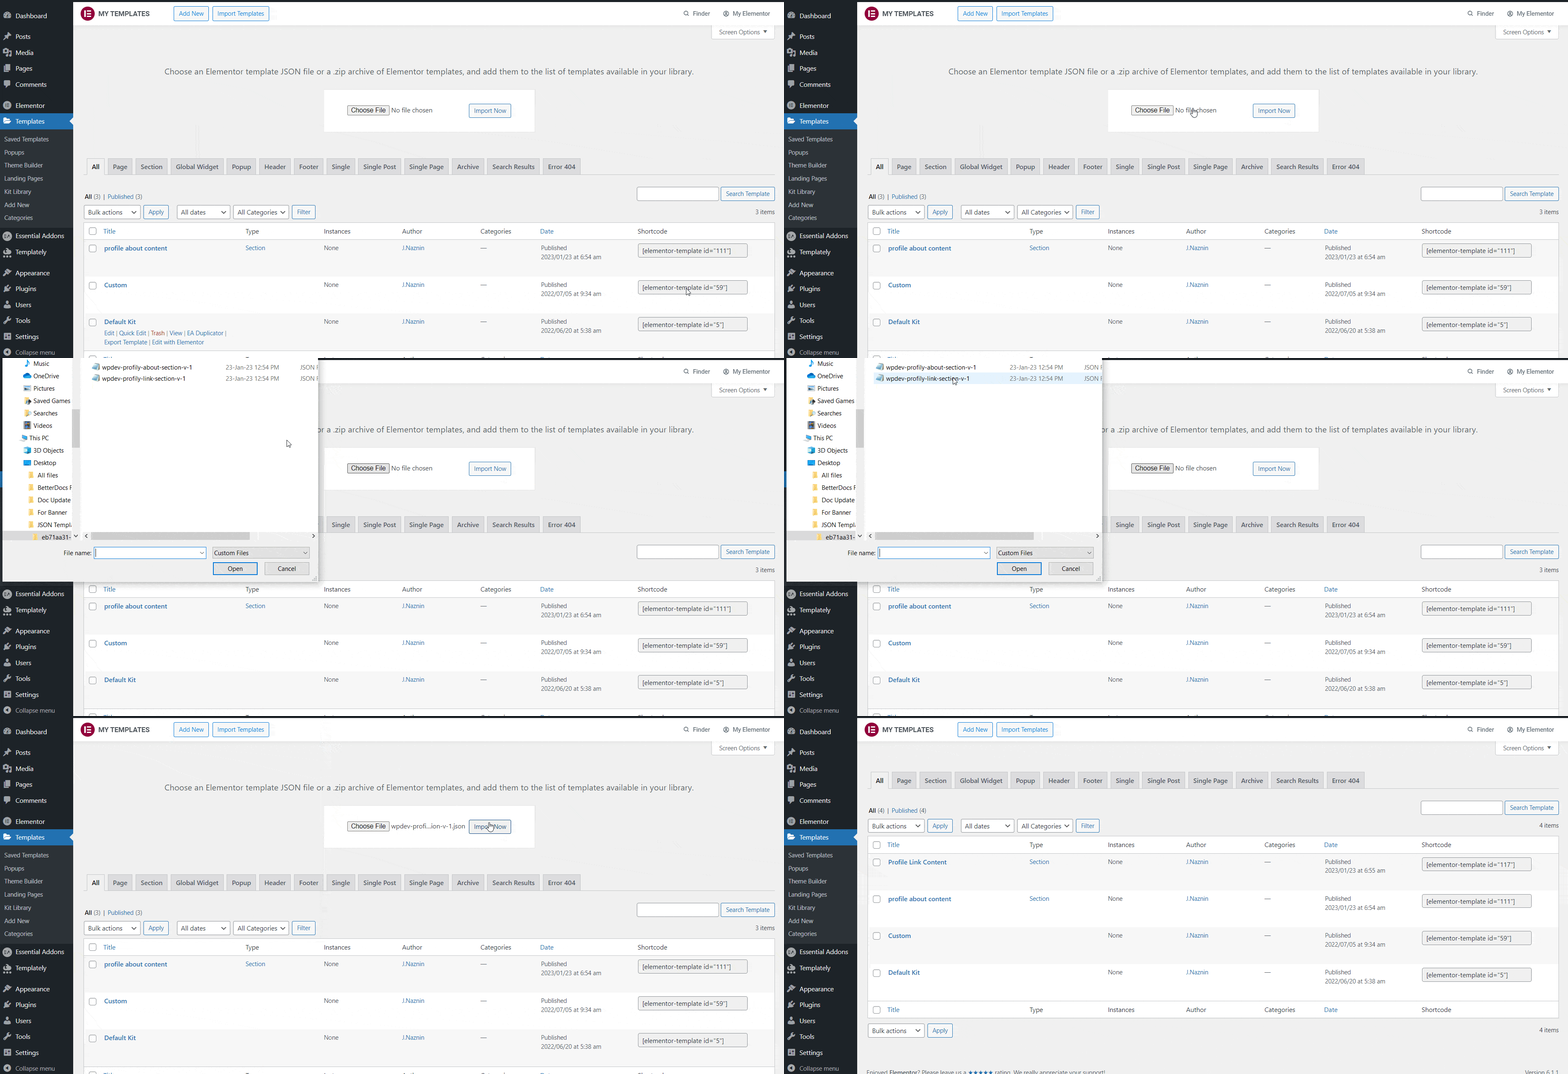
First, log in to your WordPress dashboard. Afterward, navigate to your Elementor ‘Templates’ → ‘Import Templates’ button on the top.

Insert JSON or Zip Files

Step 2: Upload Profily Template JSON File or Zip File

Next, you need to upload the JSON or Zip files of the Profily template pack you want to insert on your Elementor website. Click on the ‘Choose File’ button and select the file you want to upload. Afterward, hit the ‘Import Now’ button once you are done. Your required template will be inserted instantly on your website.

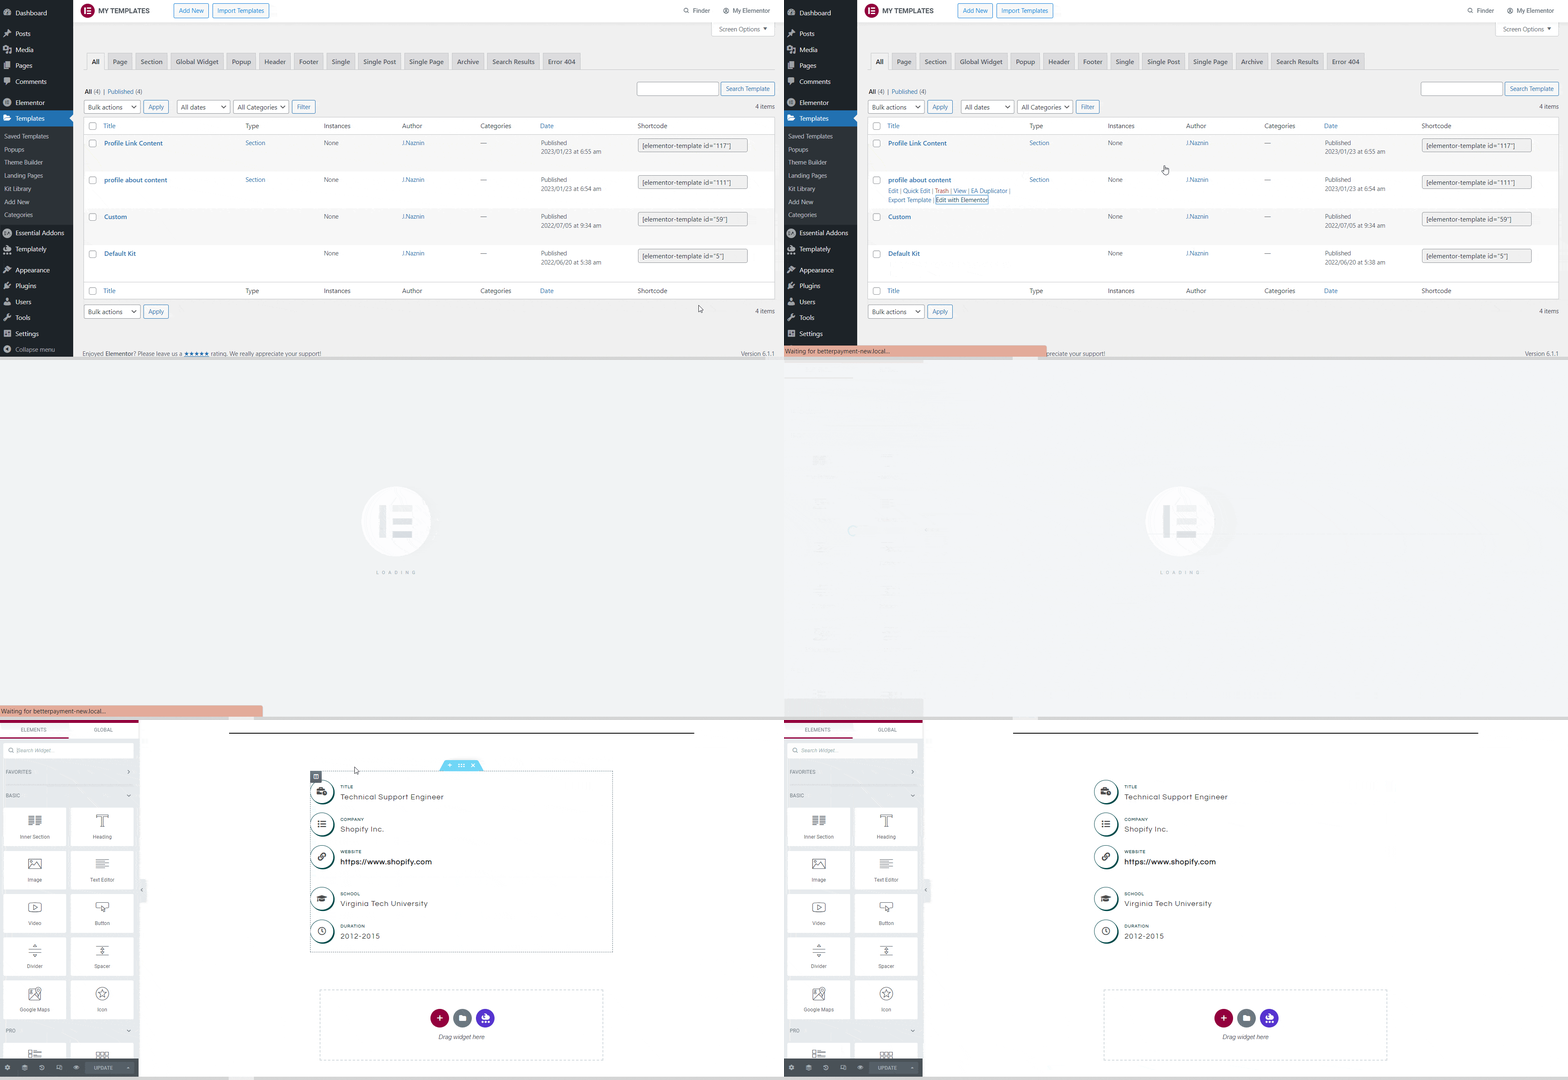
Note: You need to insert two separate JSON files separately to use the Profily template pack by following the same process. One for the Profily About page and another for the Profily Links page. Here we have inserted the Links Page JSON File below.

Insert JSON or Zip Files

Similarly, you can use a Zip file to insert Profily template packs as well. This is how easily you can insert templates using JSON or Zip files to insert templates. 

Insert JSON or Zip Files

Step 3: Customize Profily Template In Elementor As Needed

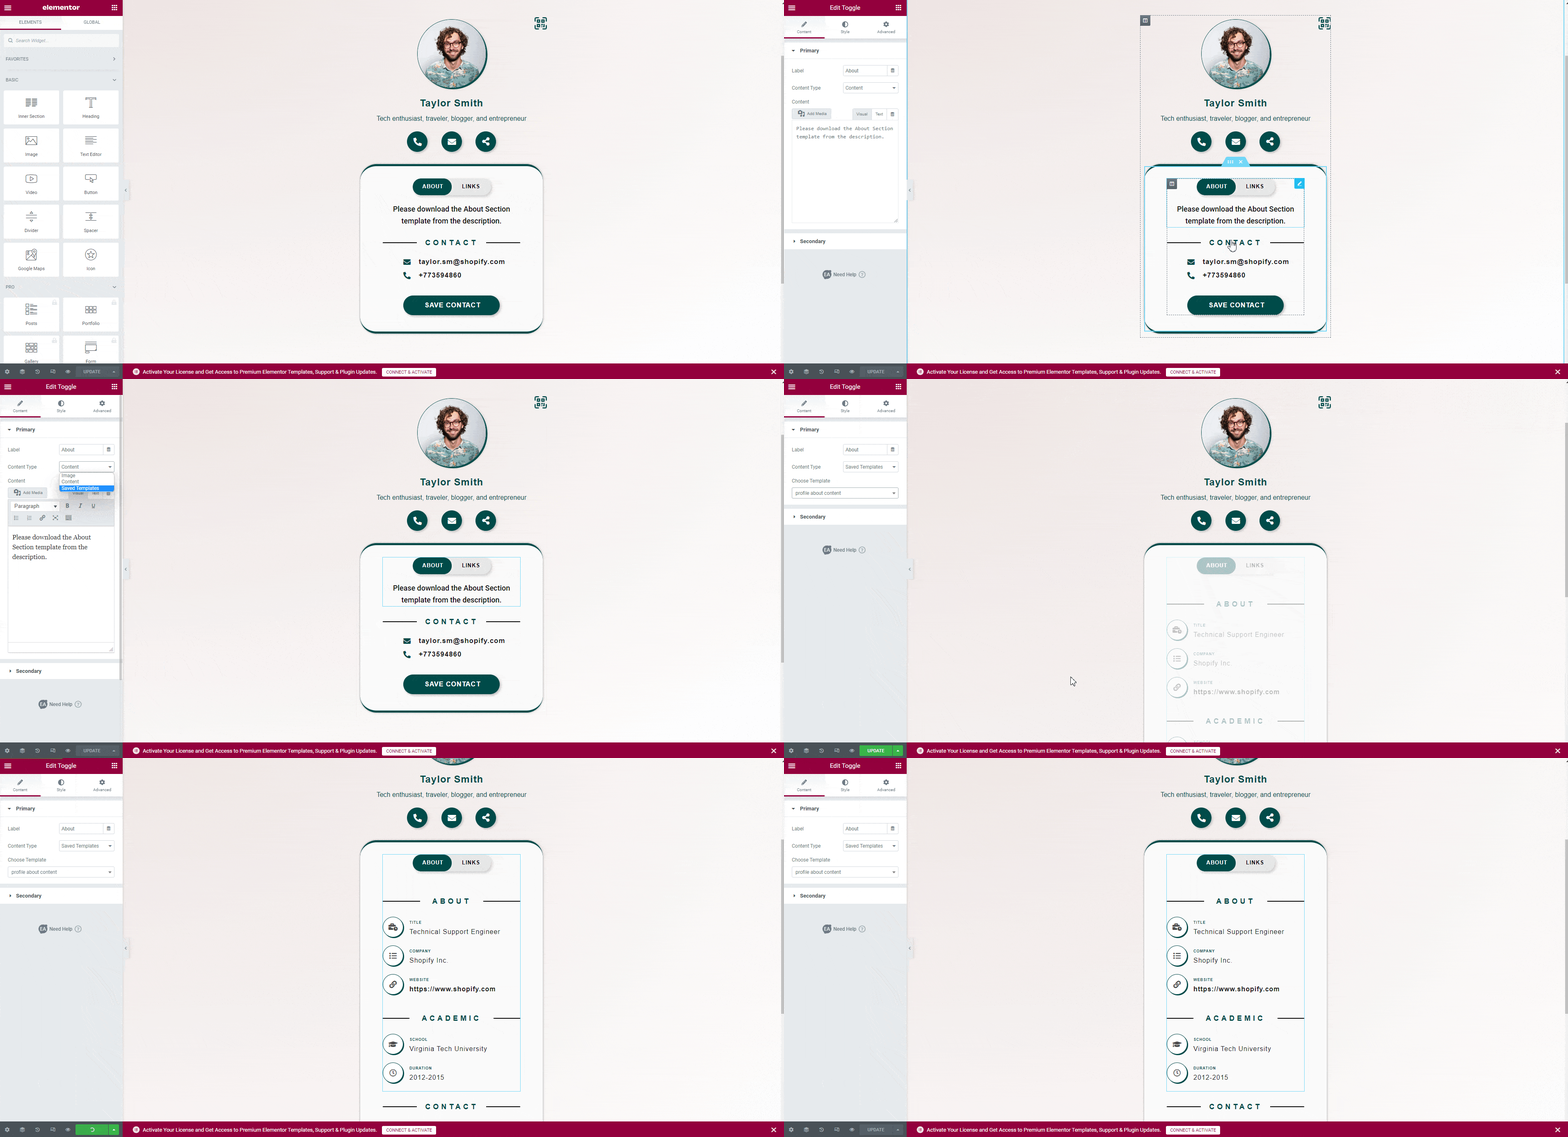
Open the template in Elementor. From the ‘Primary’ dropdown select the ‘Content Type’ as ‘Saved Templates’. Search for the template you want to insert from the ‘Choose Templates’ field. Here we have inserted ‘Profily About Page’ template design. 

Insert JSON or Zip Files

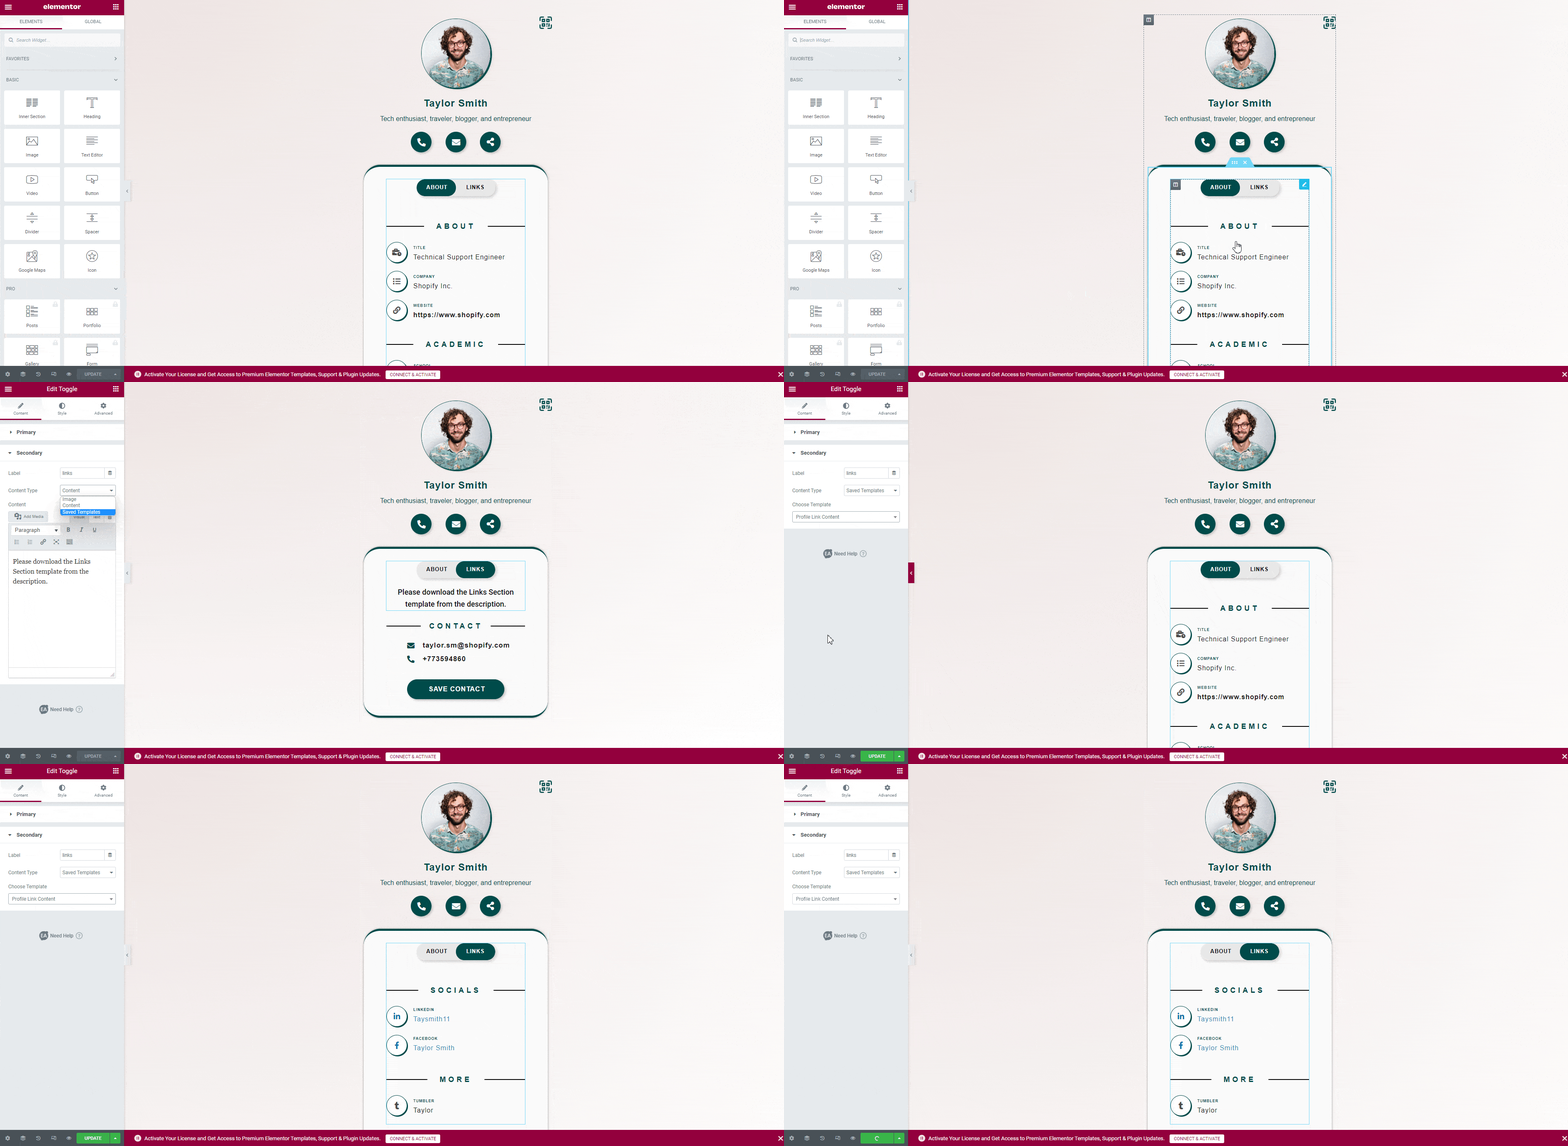
Now click on the ‘Links’ toggle button on the template. From the ‘Secondary’ dropdown select the ‘Content Type’ as ‘Saved Templates’. Search for the links page template in the ‘Choose Template’ field

Insert JSON or Zip Files


Thus, you can insert the Profily template using JSON or Zip files easily. Getting stuck? Feel free to contact our support team whenever you need.

Download Purchase Invoice

How To Download Purchase Invoice From Templately?

If you have purchased Templately PRO, you can easily download purchase invoice by signing into your Templately account. Follow the instructions given below to generate and download your purchase invoice from Templately.

How To Download Purchase Invoice From Templately?

Step 1: Visit Templately website and sign in to your Templately account as shown below.

Download Purchase Invoice

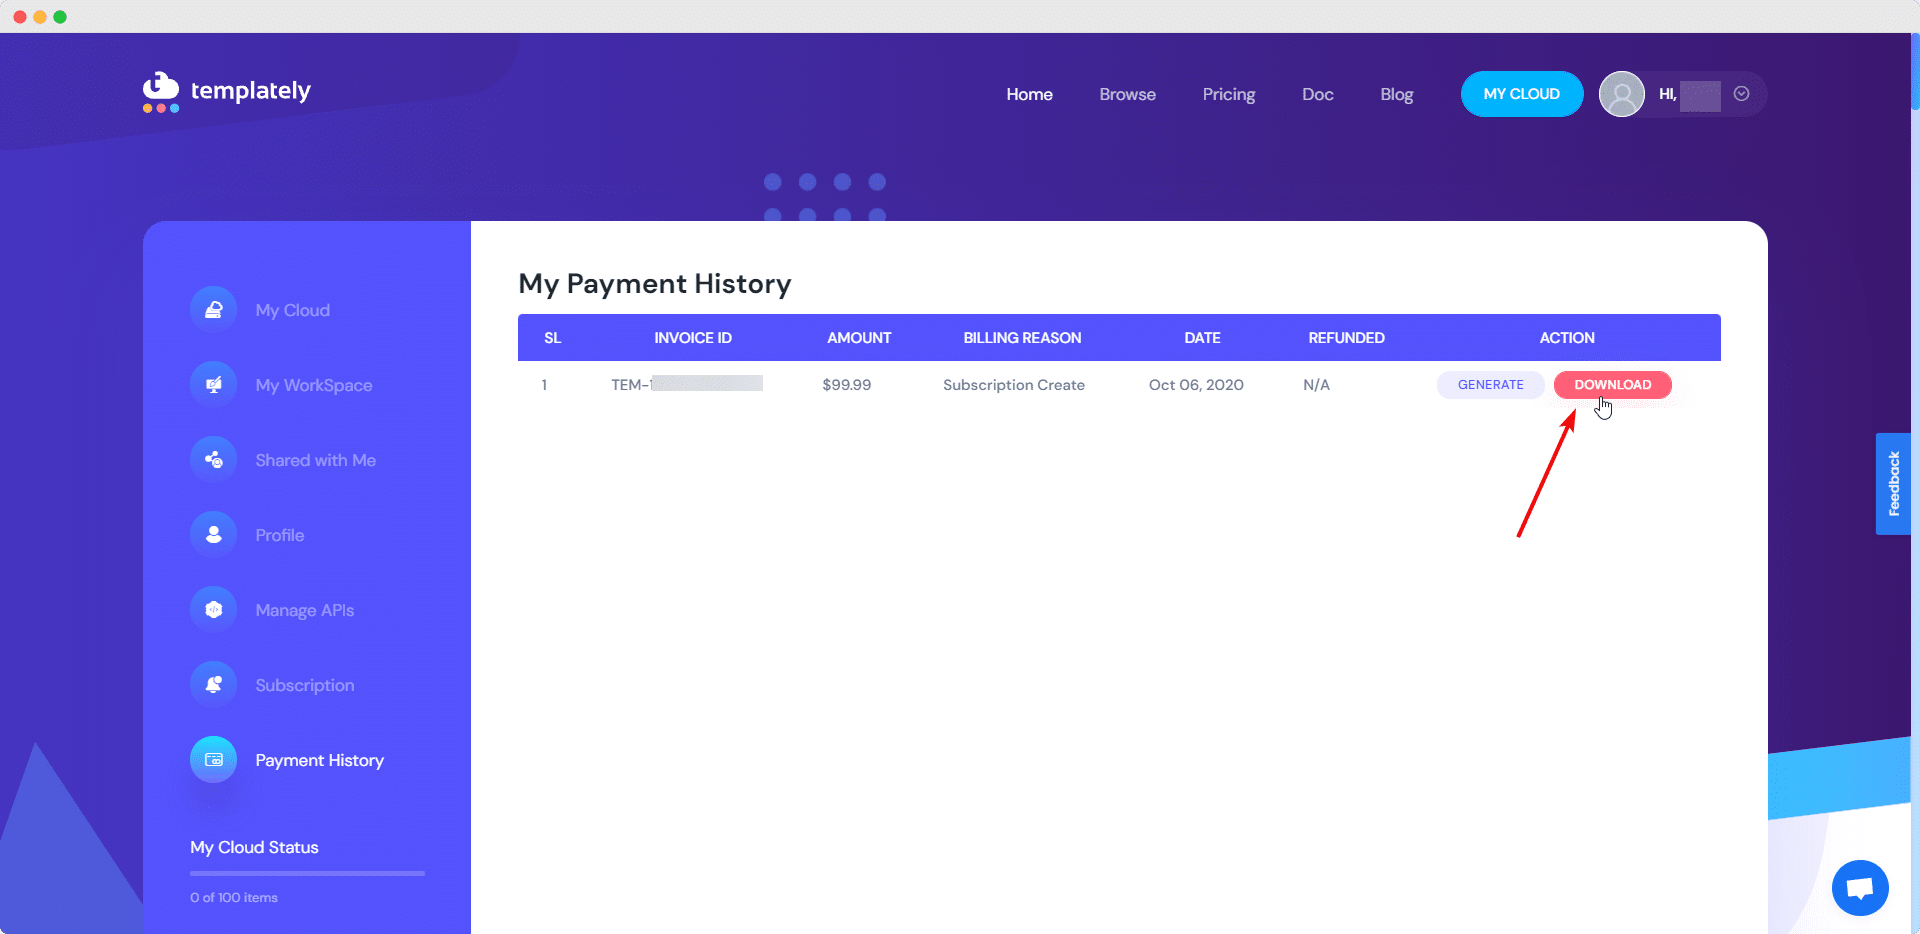
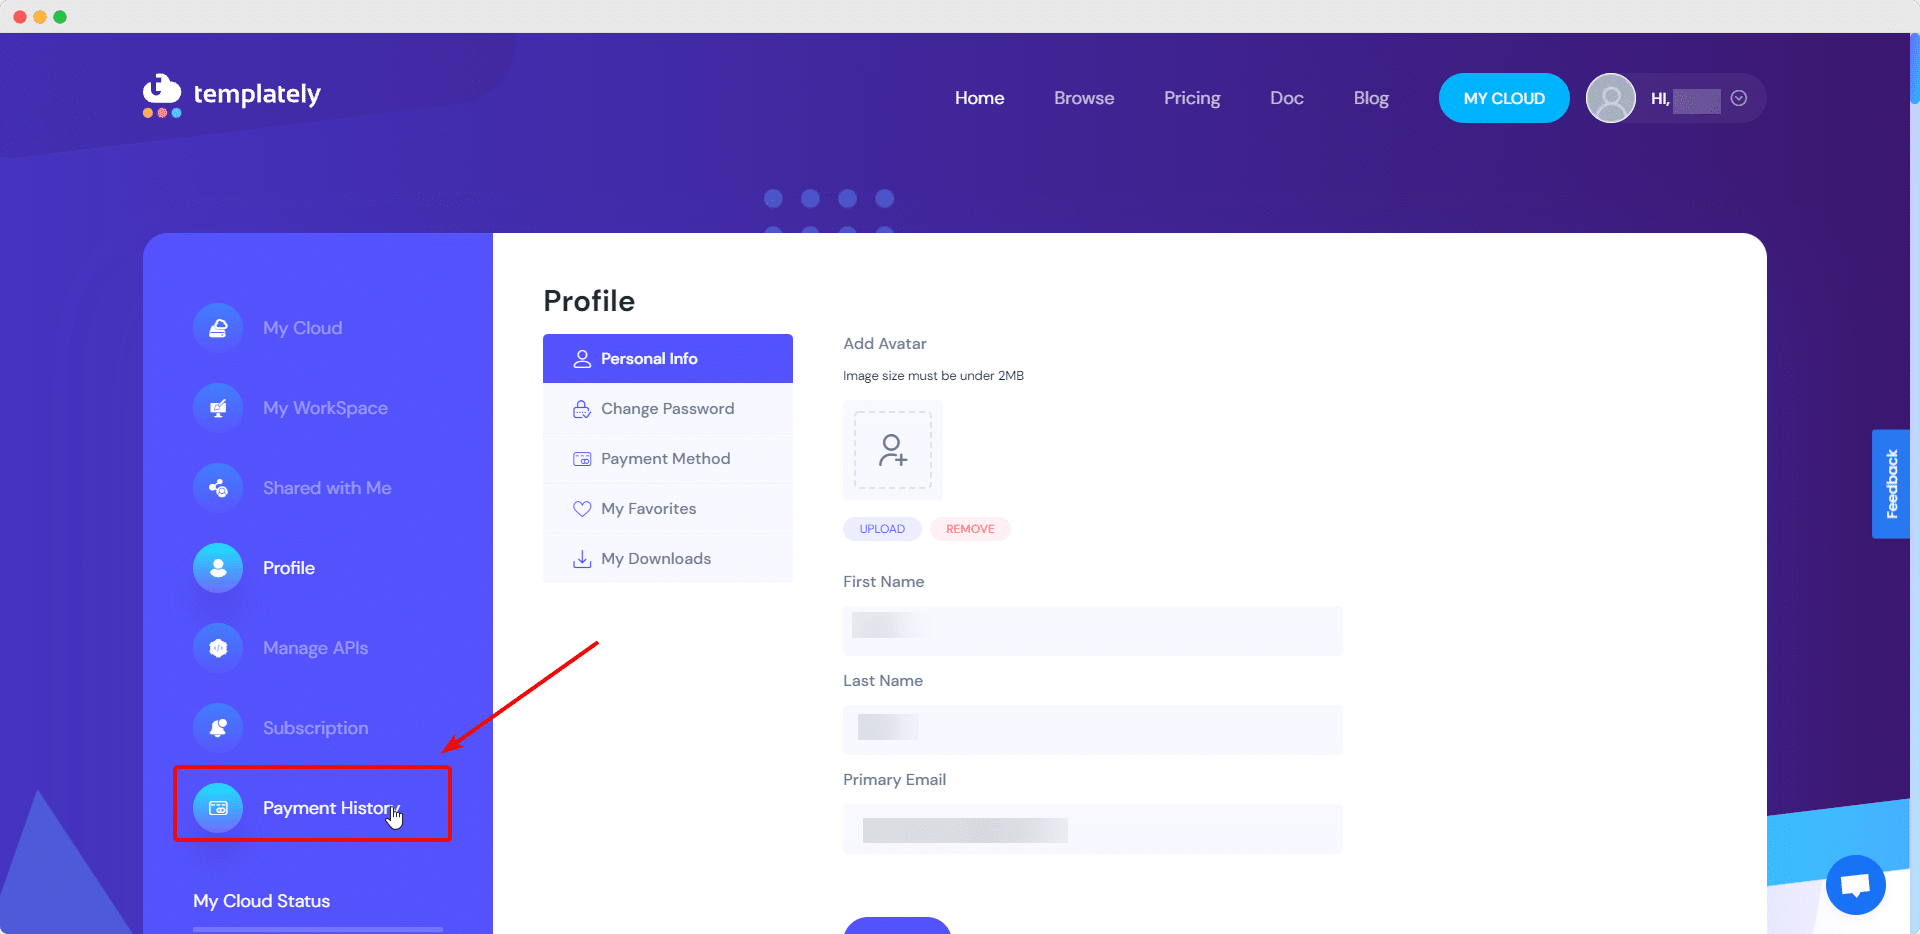
Step 2: From your profile, click on the ‘Payment History’ tab at the bottom.

Download Purchase Invoice

Step 3: Here, you can view all of your payment history for Templately PRO. You can now generate your purchase invoice from Templately, and also download your purchase invoice as well. 

To download purchase invoice from Templately, simply click on the ‘Download’ button next to your invoice. It will be downloaded to your device in a PDF format.

Download Purchase Invoice

If you want to generate purchase invoice, simply click on the ‘Generate’ button next to your invoice.

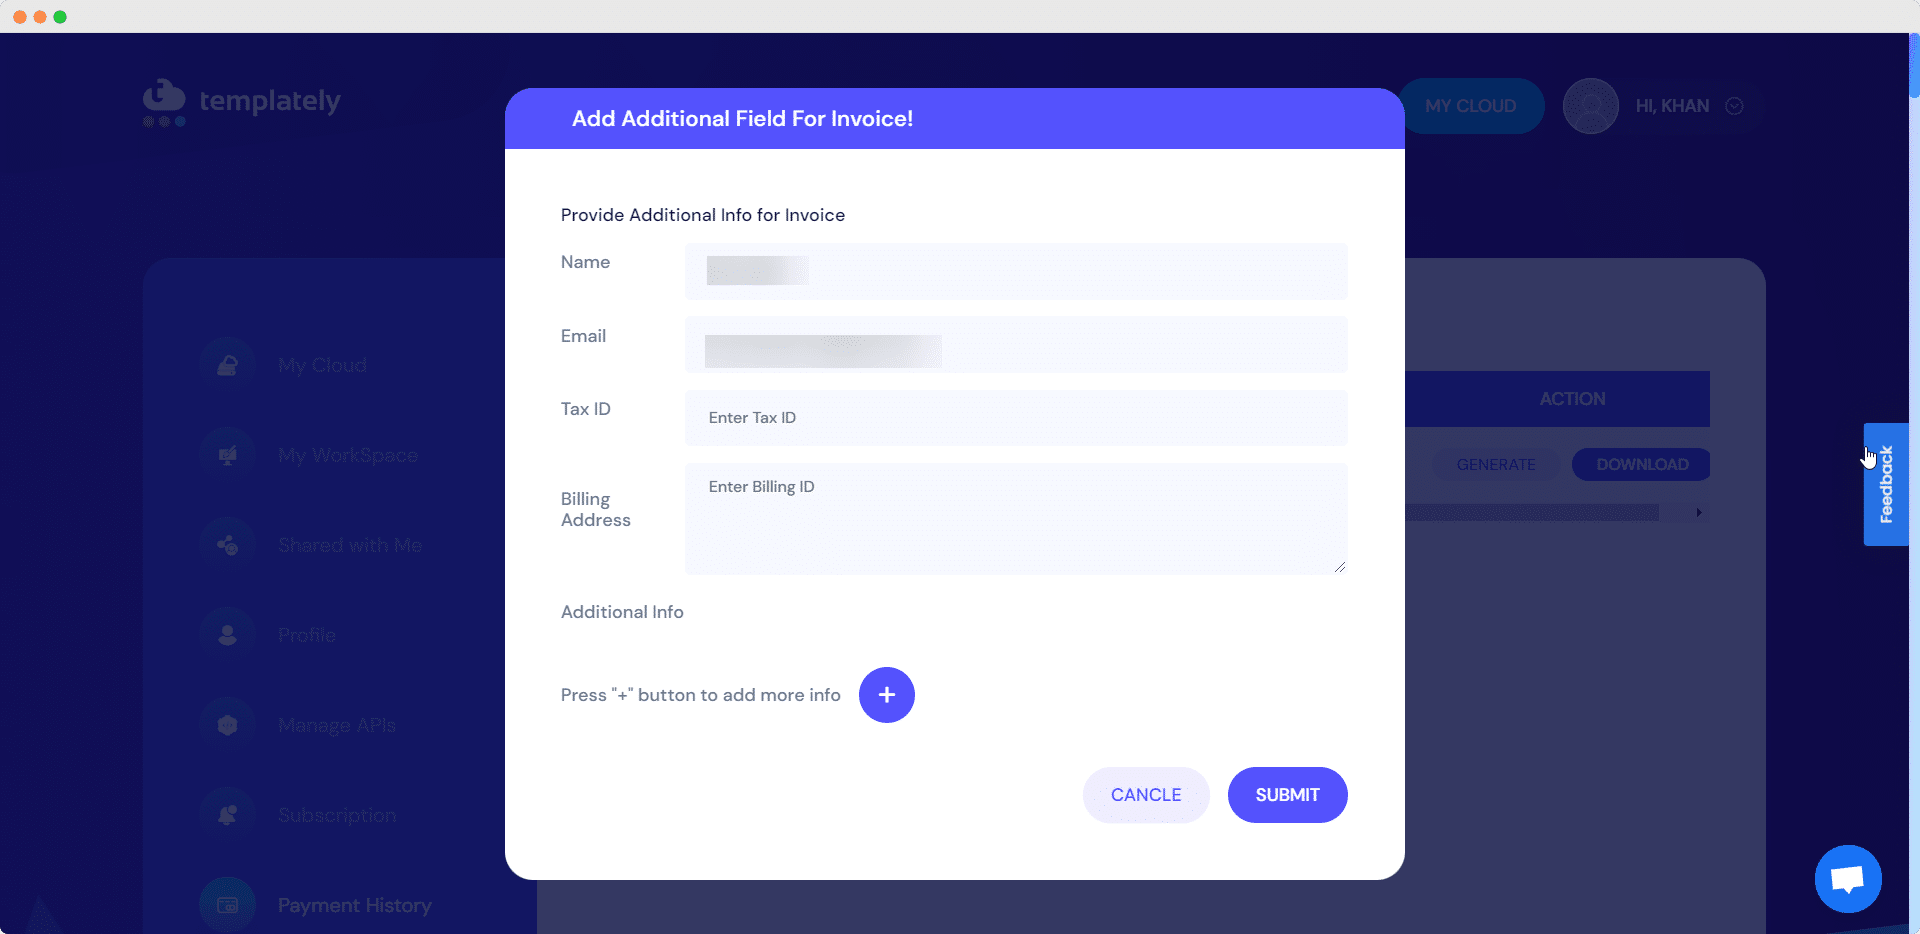
A popup will appear where you can add some more details such as billing address and tax ID. You can also add additional information that you require on your invoice by clicking on the ‘+’ button.

Download Purchase Invoice

When you are done, hit the ‘Submit’ button to download a PDF file of your purchase invoice.

This is how you can get your purchase invoice for Templately PRO. Feel free to reach out to our dedicated support team if you face any difficulties, and also if you wish to get constant updates about Templately, you can join our Facebook community.

upgrade Templately subscription plan

How To Upgrade Templately Subscription Plan?

You can easily upgrade Templately subscription plans to premium or lifetime with a few clicks. Follow the instructions given below to upgrade your Templately subscription plan. 

How To Upgrade Templately Subscription Plans?

Here is a step-by-step guideline to upgrade Templately subscription plan from Starter to Premium or Lifetime.

Step 1: Sign in to your Templately account. Click on your profile and select ‘Subscription’ from the list of options in the drop-down menu.

upgrade Templately subscription plan

Step 2: You will be taken to the ‘Subscription’ page where you can see all the subscription plans available for Templately. You can also check which plan is currently active as shown below. To upgrade Templately subscription plan, simply select the plan of your preference and click on the ‘Upgrade’ button.

upgrade Templately subscription plan

Step 3: On the next page, apply a discount coupon if you have any. Also select your preferred payment option to upgrade Templately subscription plan: ‘Credit Card’ or ‘PayPal’. 

If you’ve already added your credit card information, then it will be displayed here, allowing you to directly select your preferred credit card to proceed with the purchase plan.

upgrade Templately subscription plan

Make sure to check the ‘I agree with Terms of Services’ option and ‘Get free tips, tutorials and discount codes from us’ checkboxes, and then click on the ‘Pay Now’ button.

upgrade Templately subscription plan
Step 4: Clicking on the ‘Pay Now’ button will take you to the card details page. Now, provide the necessary details. You can also opt to select the ‘Securely save my information for 1-click checkout’ and provide your phone number, to make the future purchase procedure easier for you. 

And then click on the ‘Subscribe’ button to complete the payment process. Your subscription plan will then be upgraded.

upgrade Templately subscription plan

Feel free to reach out to our dedicated support team in the event of any difficulties, and also if you wish to get constant updates about Templately, you can join our Facebook community.

HOW TO MAKE A WOOCOMMERCE SHOP PAGE USING WOOCOMMERCE TEMPLATES FROM TEMPLATELY 3

How To Make A WooCommerce Shop Page Using WooCommerce Templates From Templately?

With WooCommerce templates from Templately, you can create stunning WooCommerce shop pages, product pages, and much more for your WordPress eCommerce website with ease. 

Note: To do this, you first need to set up your WooCommerce store. Afterward, you can create your shop page in Elementor using the ready WooCommerce template packs from Templately.

Check out the complete, step-by-step guideline below on how to create a WooCommerce shop page using WooCommerce templates from Templately.

How To Create A Shop Page With WooCommerce Templates?

After setting up your WooCommerce store, you need to install & activate the Essential Addons For Elementor plugin on your WordPress website. This is because some of the WooCommerce shop page templates in Templately are made with the Woo Product Grid, Woo Product Collection, and other WooCommerce elements from Essential Addons – the most popular addon for Elementor with over 1 million happy users

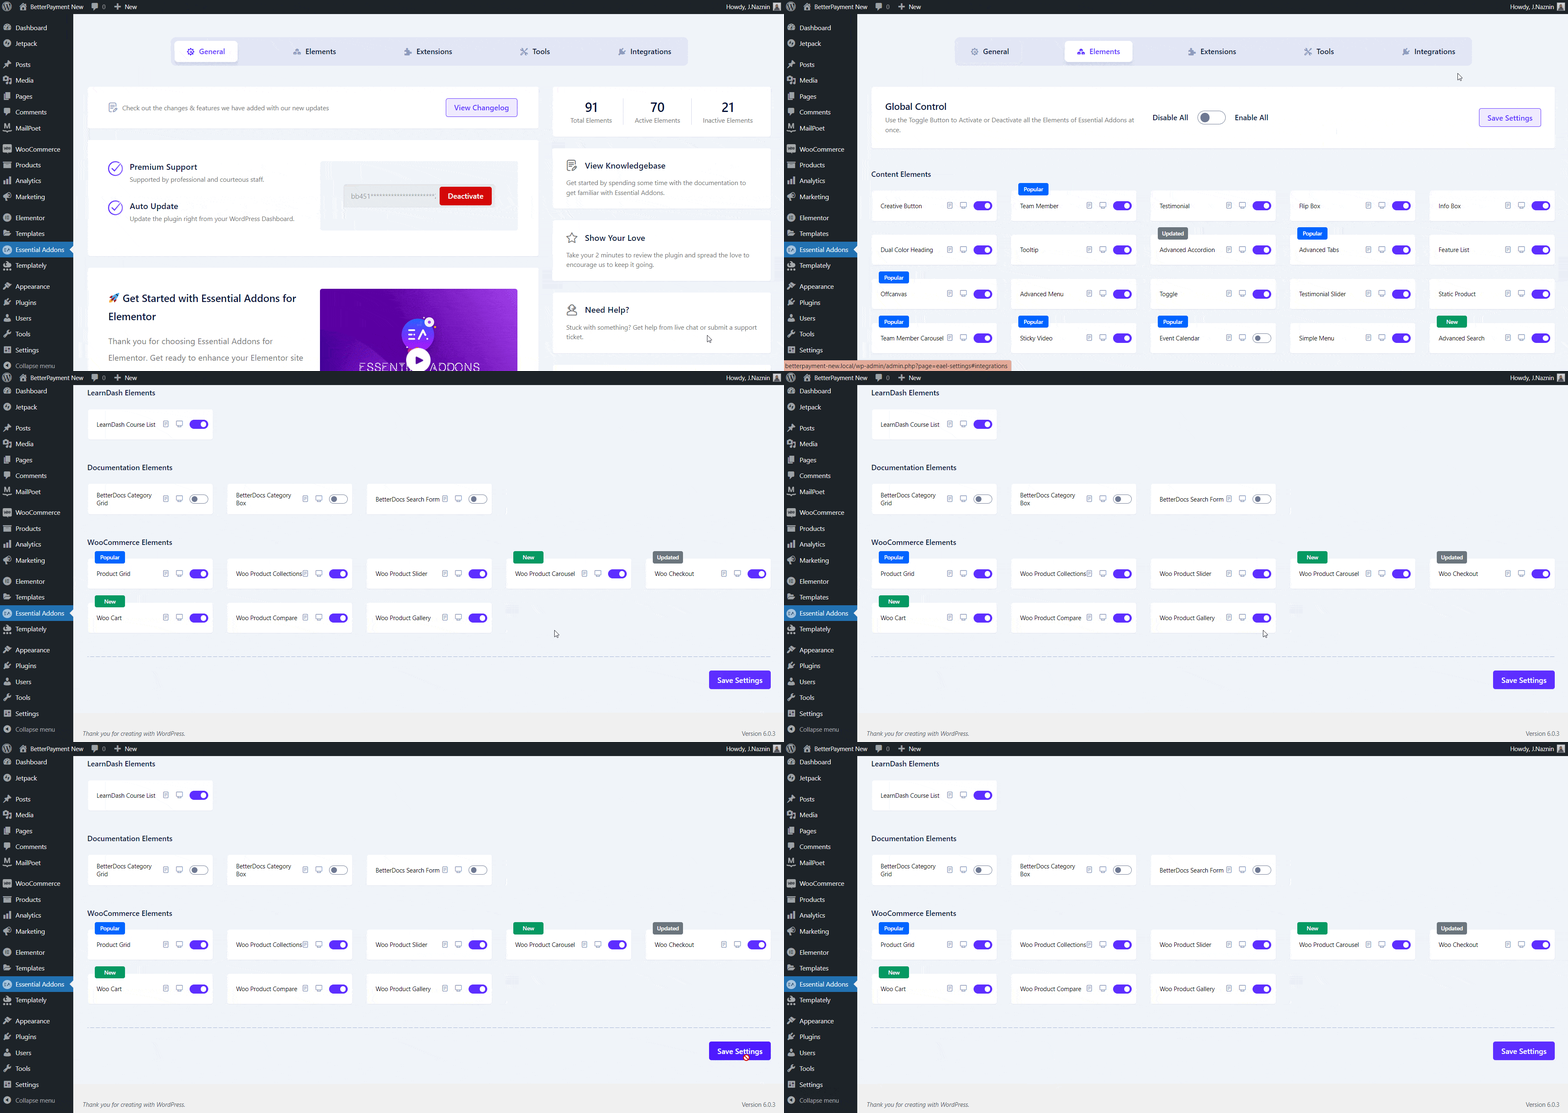
To activate these WooCommerce elements from Essential Addons, first, install the Essential Addons WordPress plugin on your website and then, navigate to the Essential Addons → Elements page. Then, scroll down to the WooCommerce Elements section and toggle to enable the required widgets. Finally, click on ‘Save Changes’.

WooCommerce Shop Page

How To Create WooCommerce Shop Pages With Templately?

You can insert any ready WooCommerce templates from Templately and customize them using following the simple and easy steps below:

Step 1: Insert A WooCommerce Template From Templately

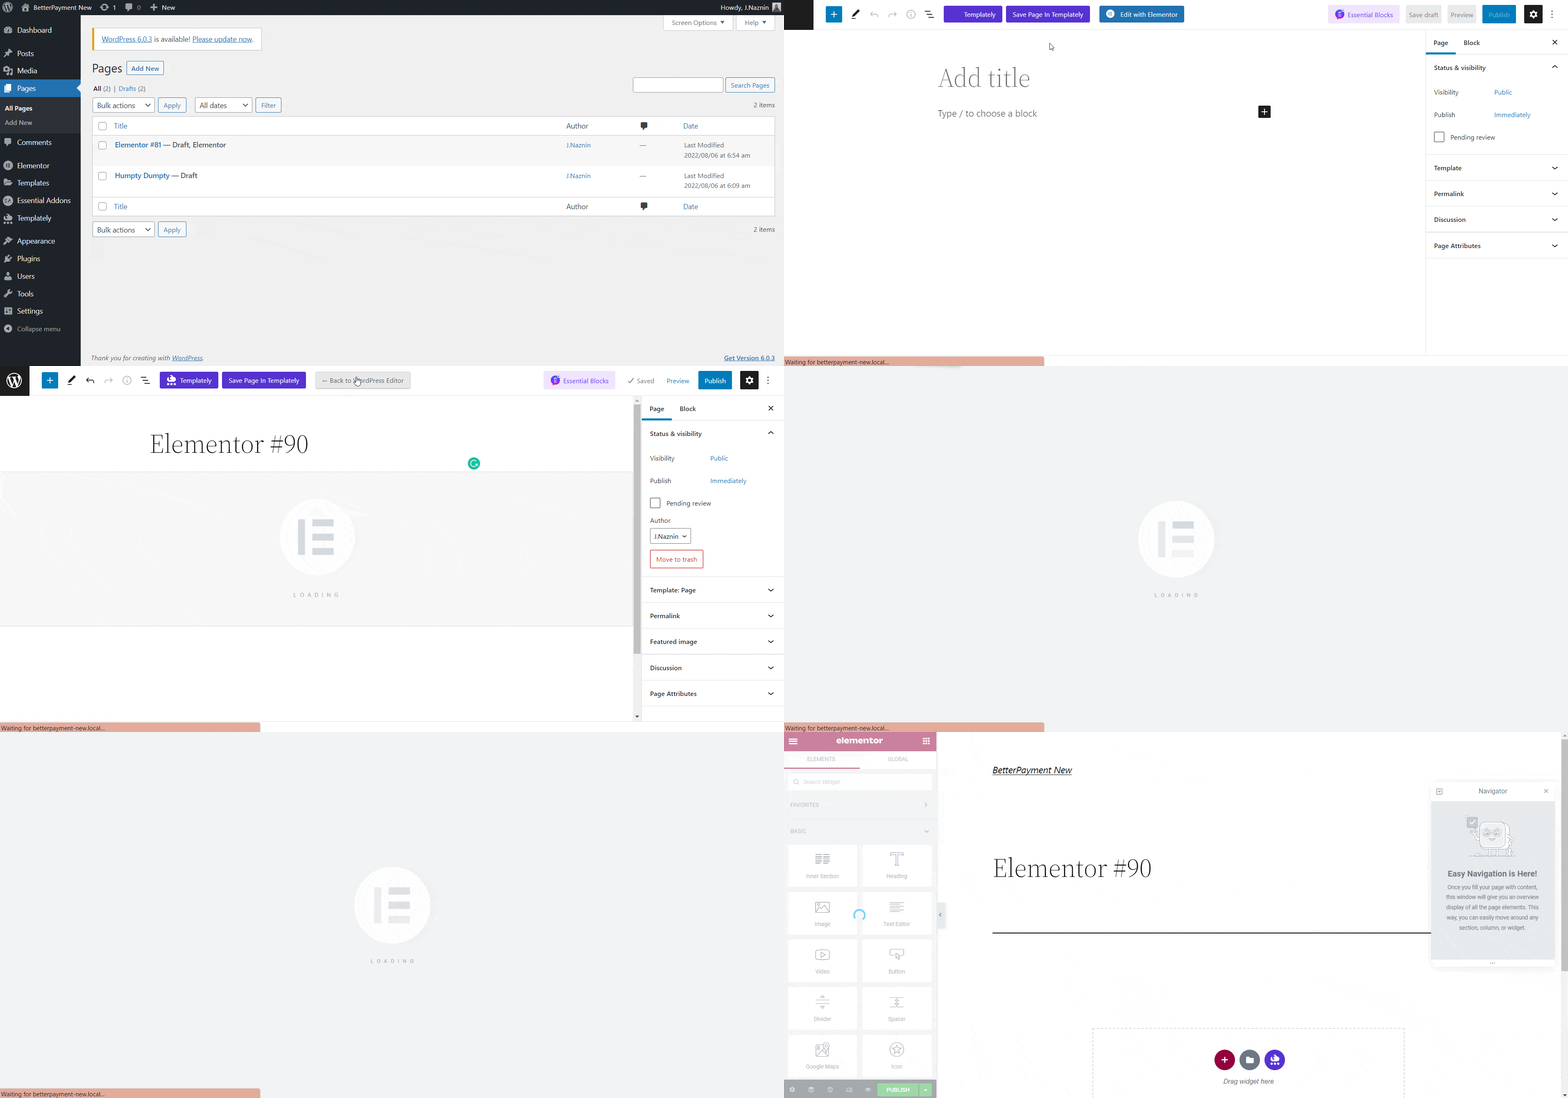
First, from your WordPress dashboard, navigate to ‘Page’ → ‘Add New’ → ‘Edit With Elementor’. After opening the page in Elementor you can insert any of the WooCommerce templates of your choice.

WooCommerce Shop Page

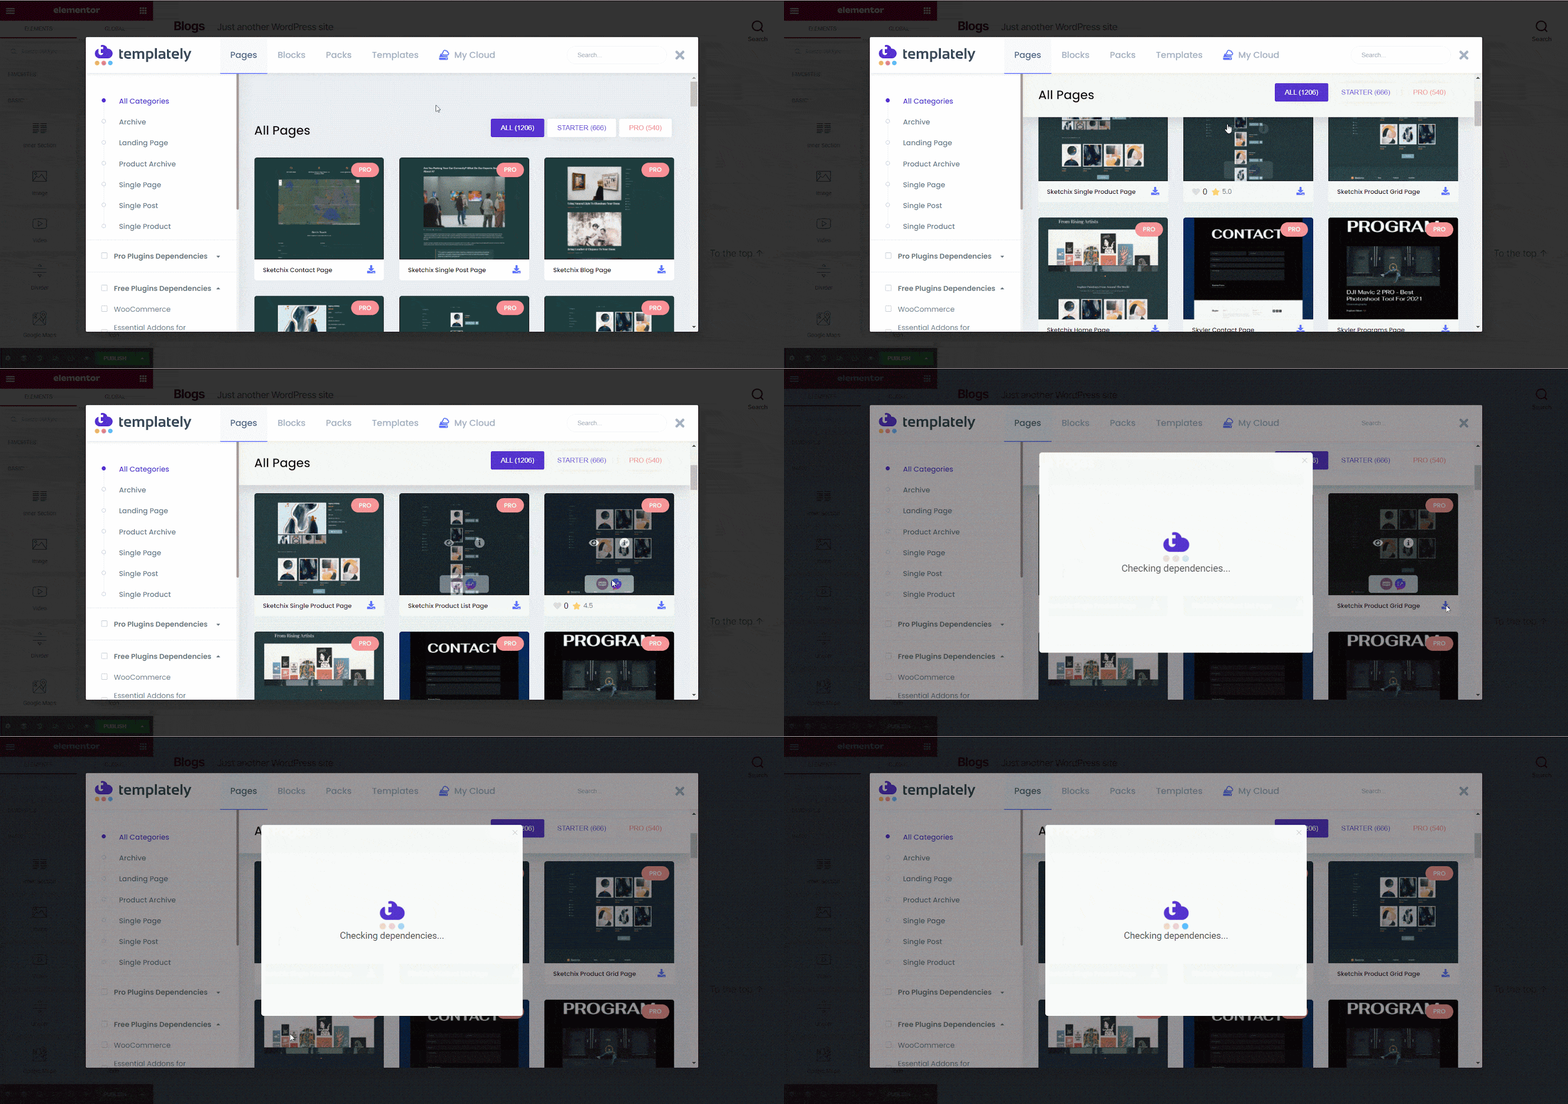
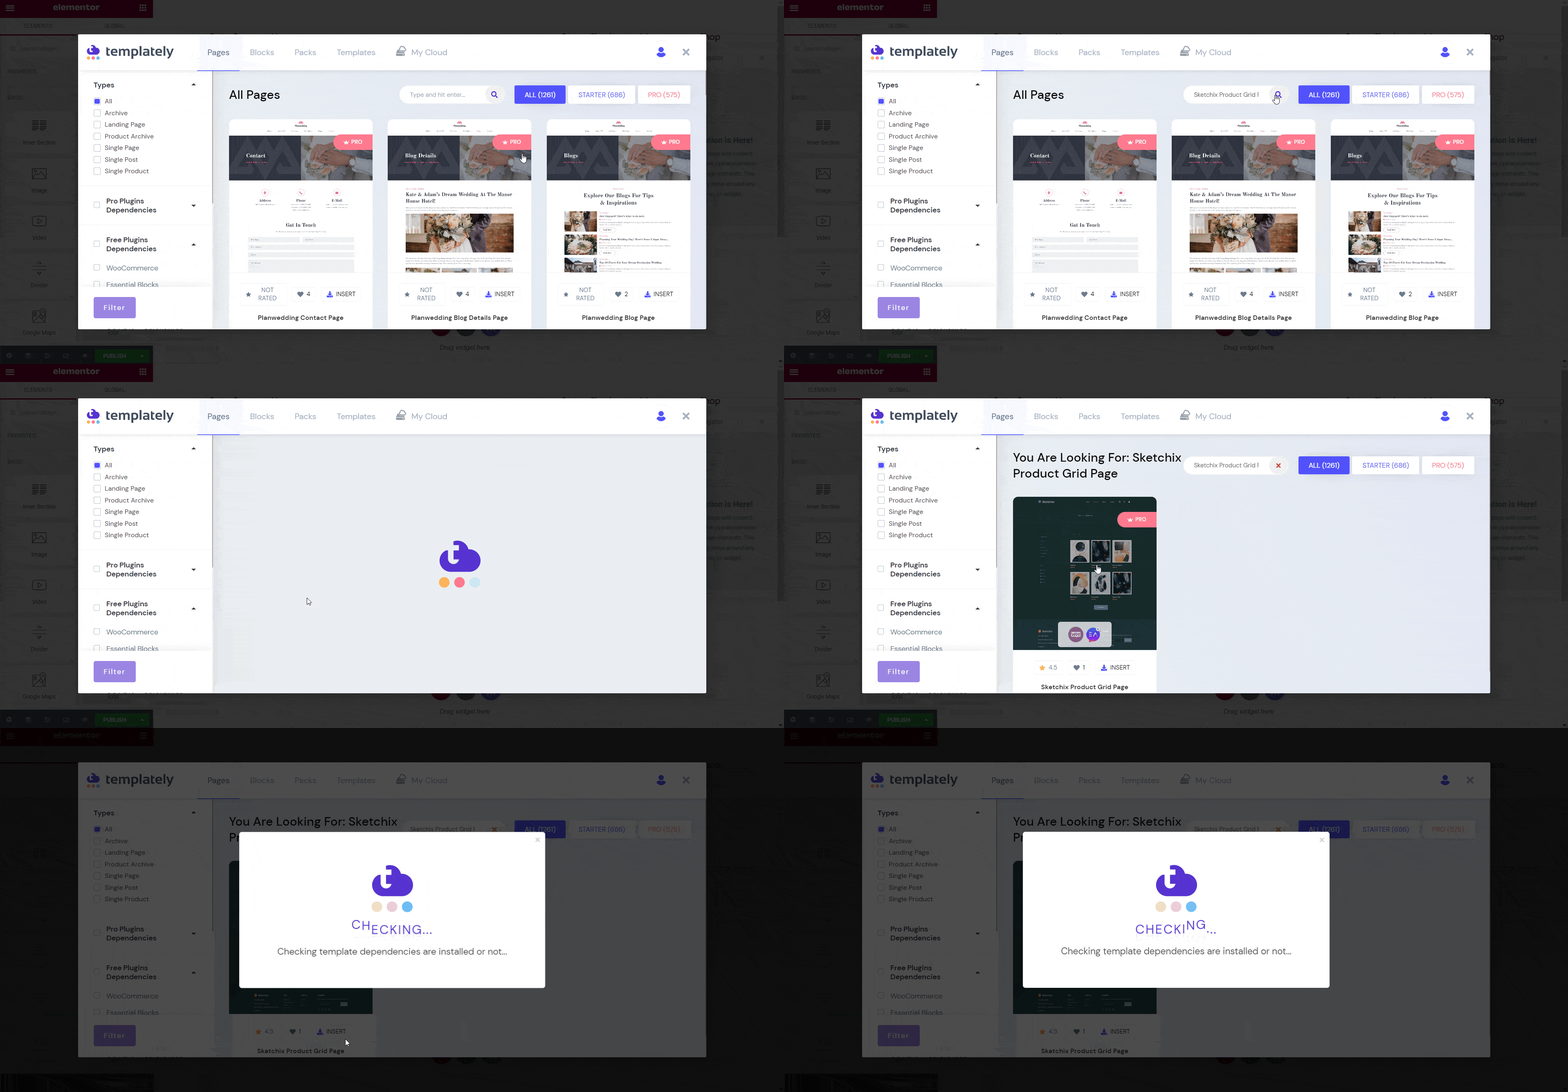
Click on the ‘Templately Blue’ icon and search for any WooCommerce templates from the Templately template library. Check the dependencies to see which plugins are required for using the template. 

For this tutorial, we will be using the Sketchix Product Grid Page‘. Simply click on the ‘Insert’ button to add the template to your website. 

WooCommerce Shop page

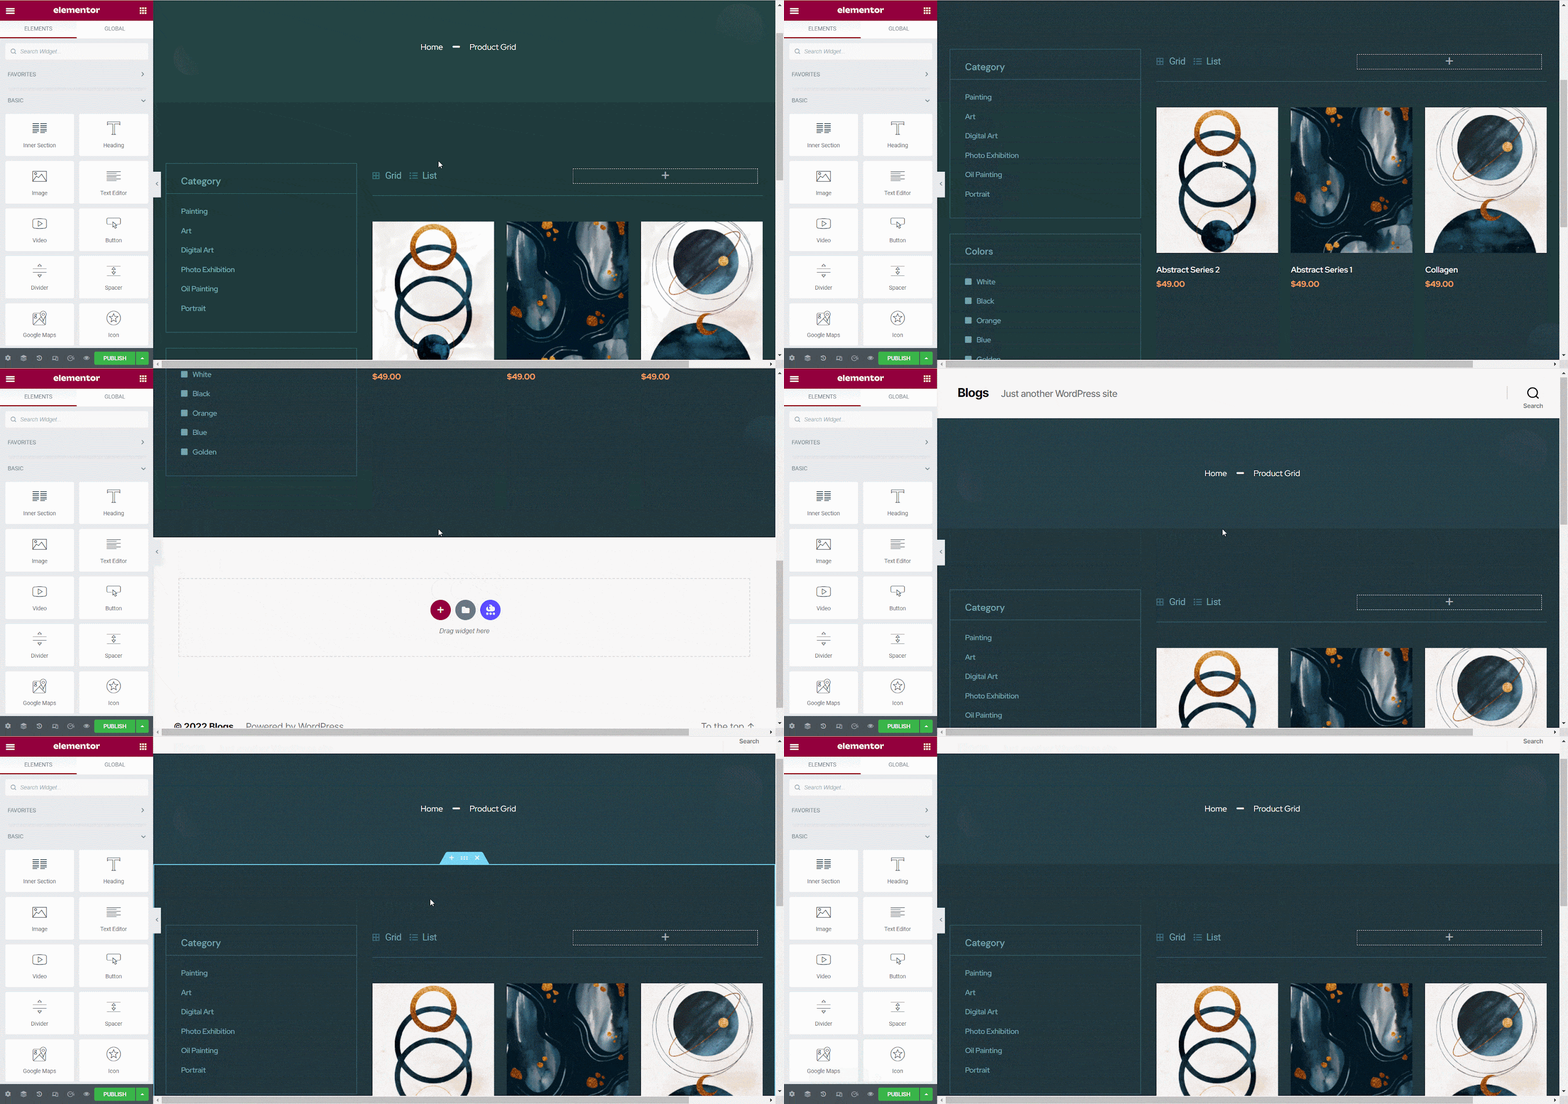
When the template is done loading, this is how your WooCommerce shop page will appear on your WordPress website by default.

HOW TO MAKE A WOOCOMMERCE SHOP PAGE USING WOOCOMMERCE TEMPLATES FROM TEMPLATELY 4

Step 2: Customize & Publish WooCommerce Shop Page In Elementor

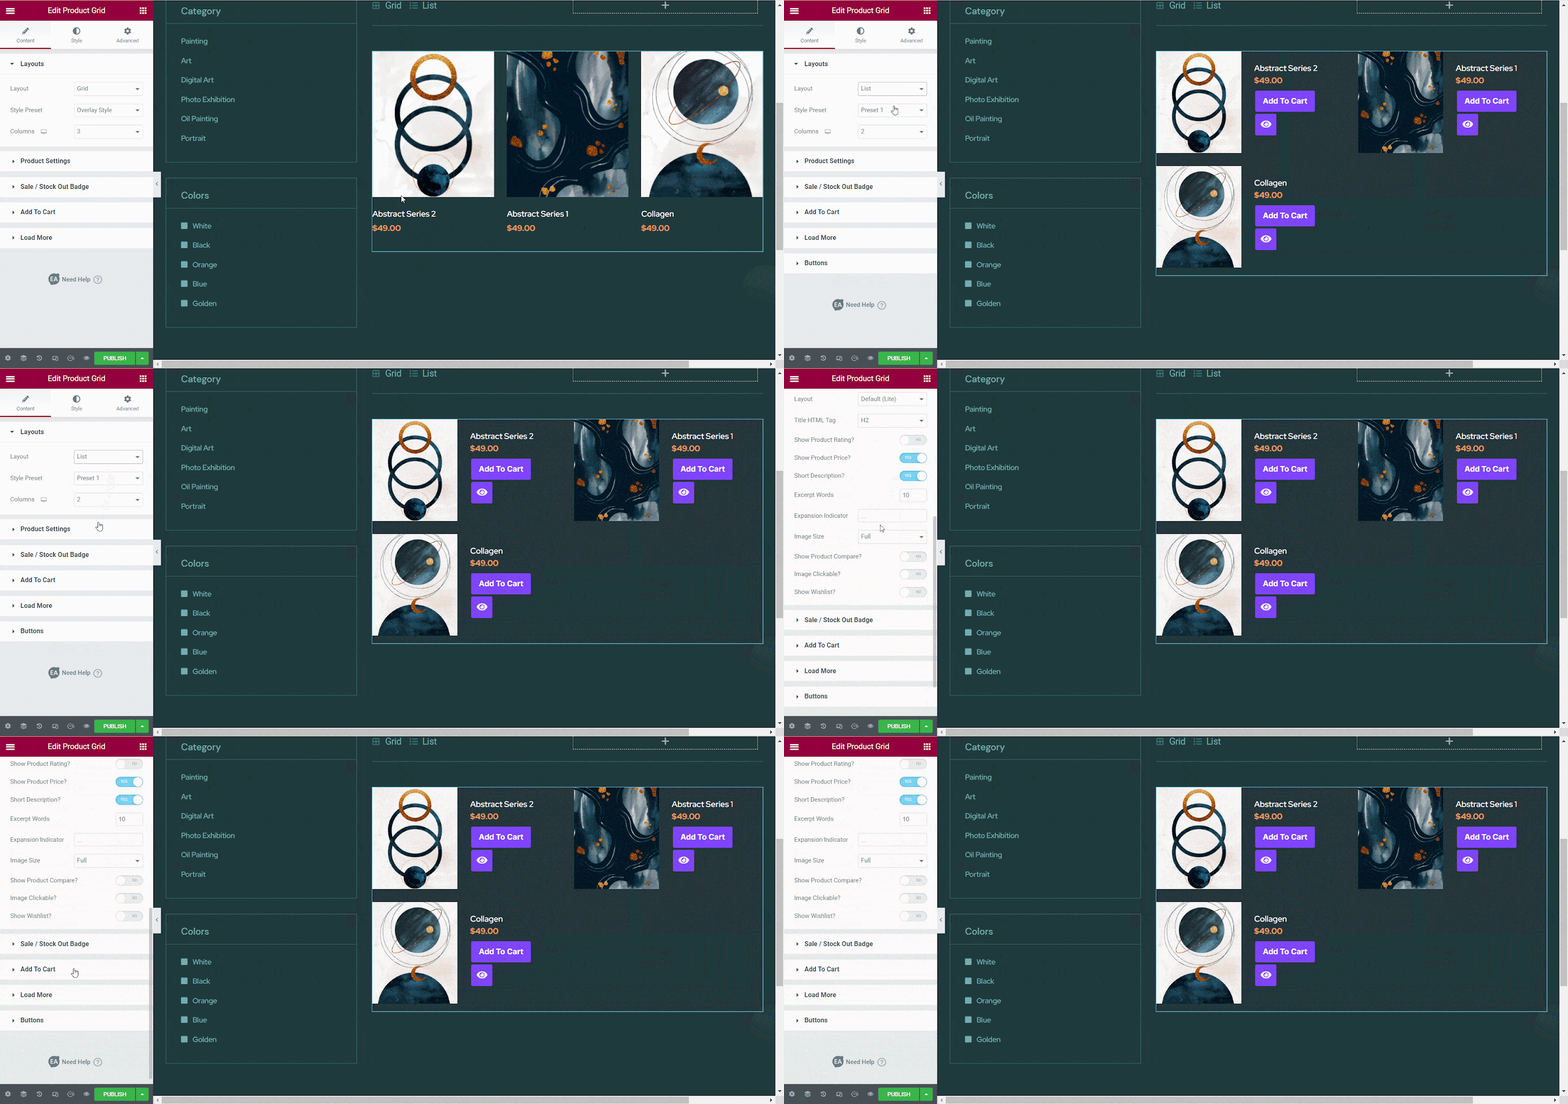
You can now customize your WooCommerce shop page any way you want in Elementor editor. From the ‘Content’ tab you can choose different layouts for your WooCommerce shop page, while from the ‘Style’ tab, you can change the colors, typography, font styles, and much more. 

If the WooCommerce template you have chosen is built using Essential Addons for Elementor, then you may see that the Woo Product Grid or Woo Product Collections elements have been used for your WooCommerce shop page. Furthermore, you can customize the elements any way you want in the Elementor editor.

HOW TO MAKE A WOOCOMMERCE SHOP PAGE USING WOOCOMMERCE TEMPLATES FROM TEMPLATELY 5

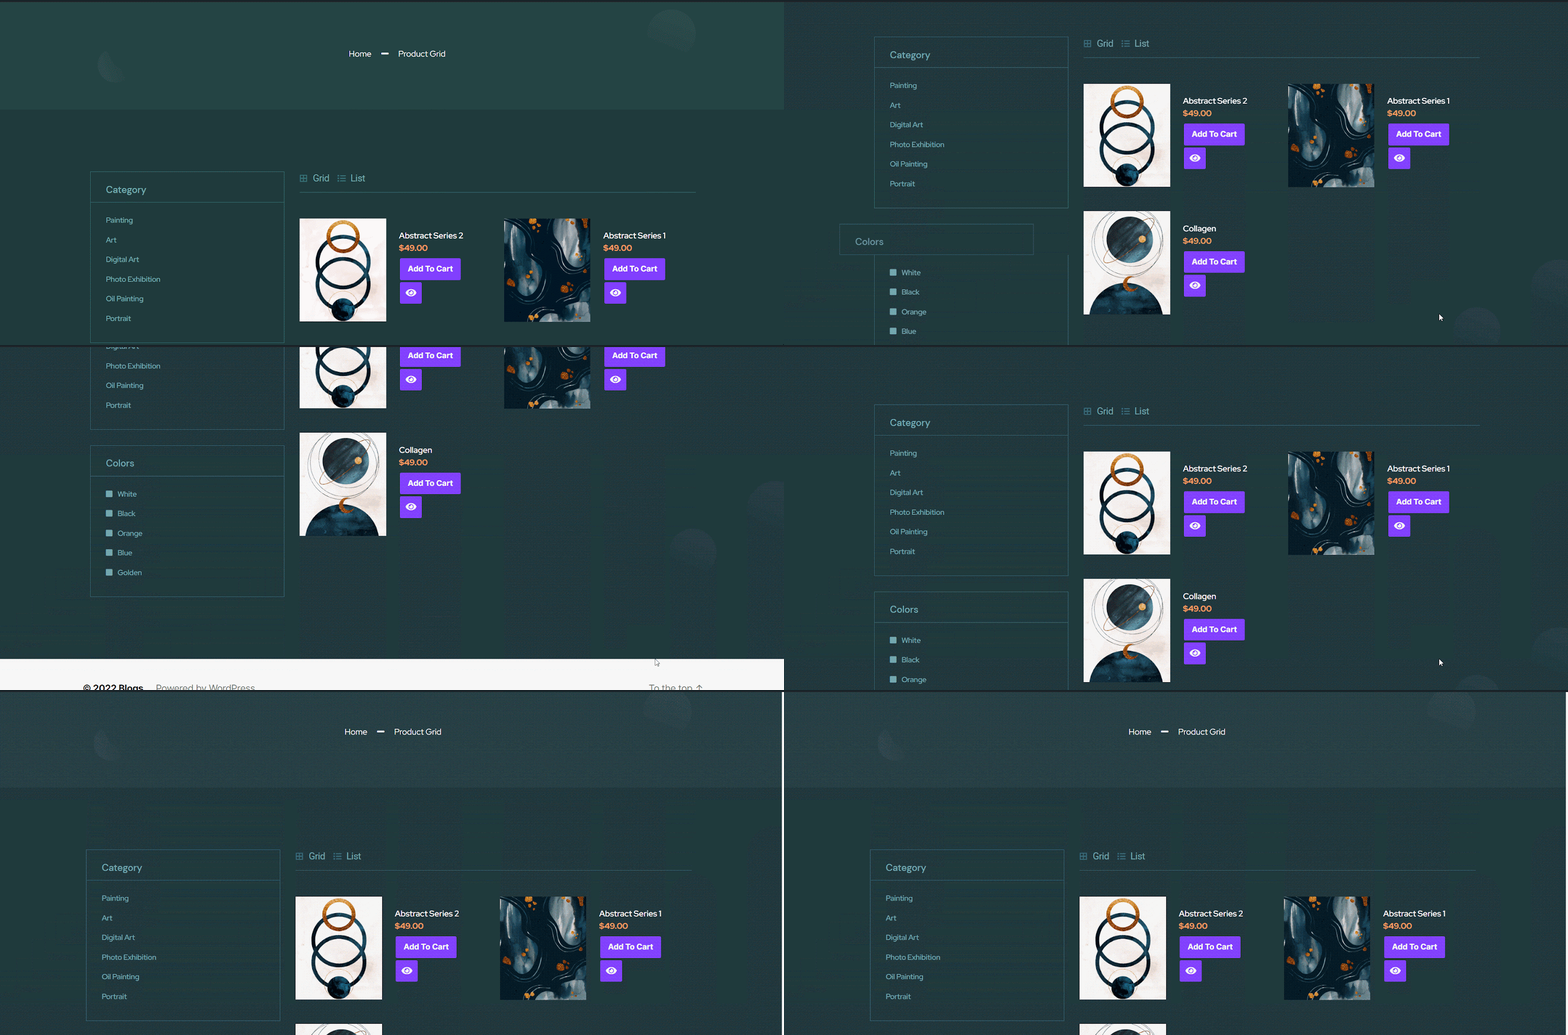
After you have customized your WooCommerce shop page and published the page. You can also save your WooCommerce template to MyCloud by right-clicking anywhere on your page and selecting the ‘Save Page To Templately’ option. 

HOW TO MAKE A WOOCOMMERCE SHOP PAGE USING WOOCOMMERCE TEMPLATES FROM TEMPLATELY 6

Step 3: Add Your Template To WooCommerce Shop Page

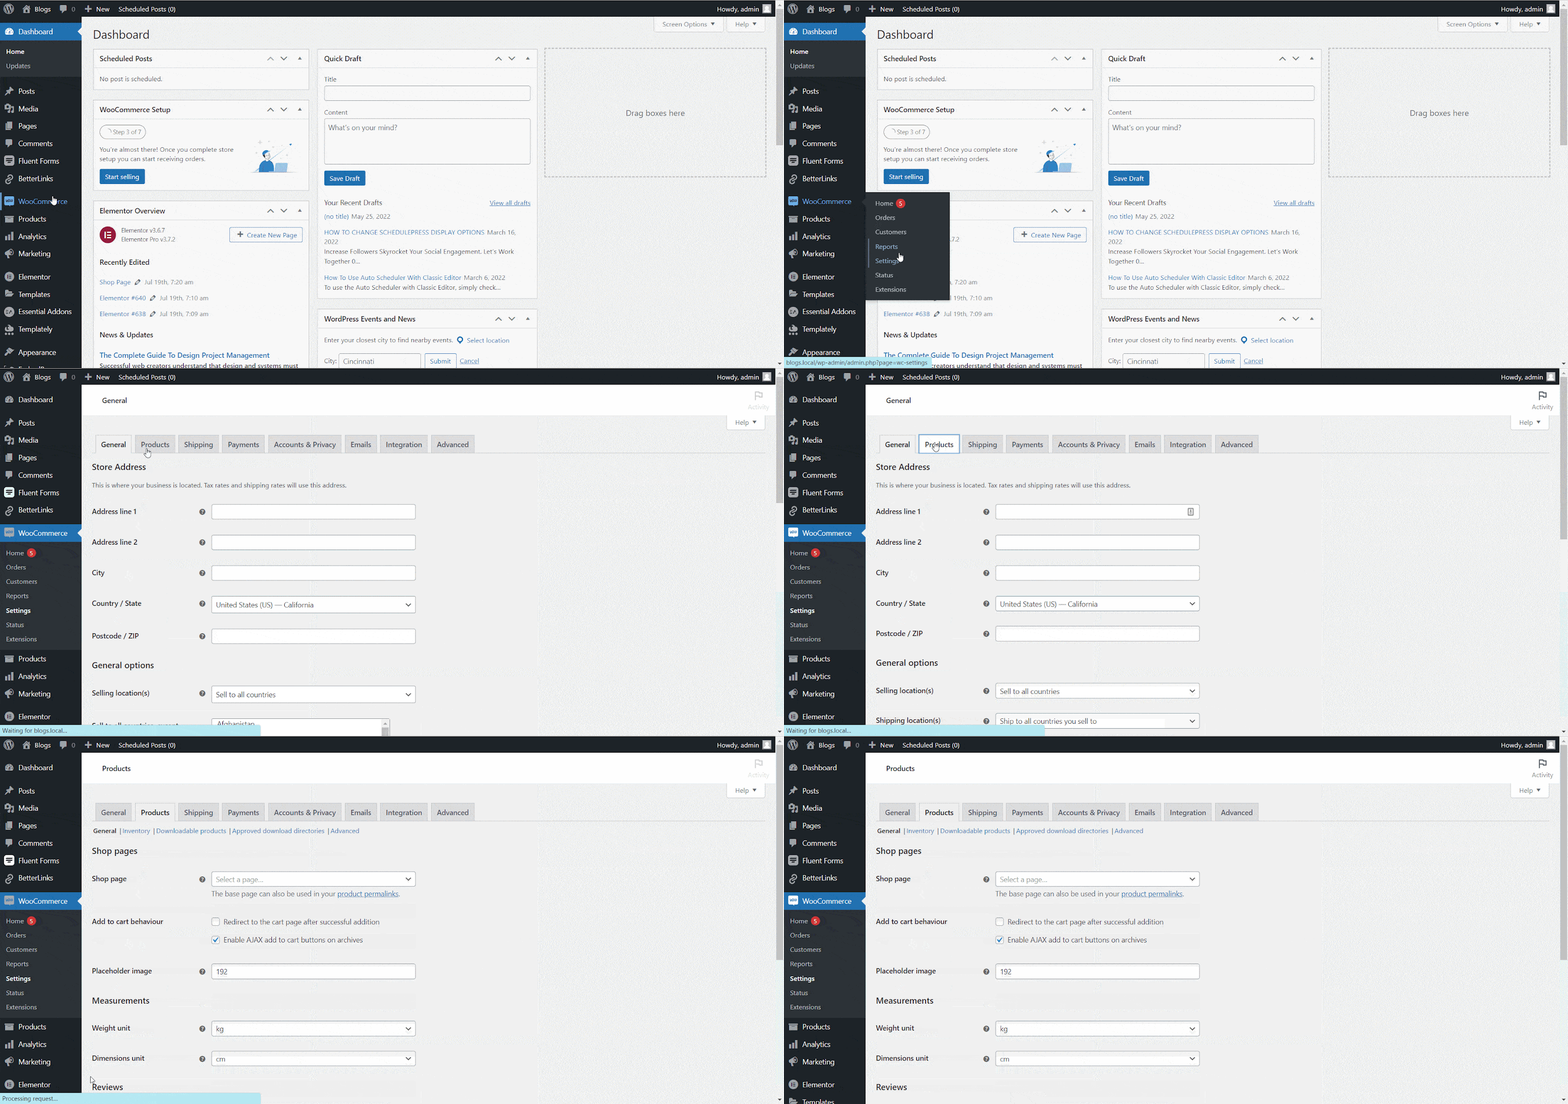
Now, you need to add your published template to the WooCommerce shop page. So, navigate to ‘WooCommerce’→ ‘Settings’→ ‘Products’ from your WordPress Dashboard. 

HOW TO MAKE A WOOCOMMERCE SHOP PAGE USING WOOCOMMERCE TEMPLATES FROM TEMPLATELY 7

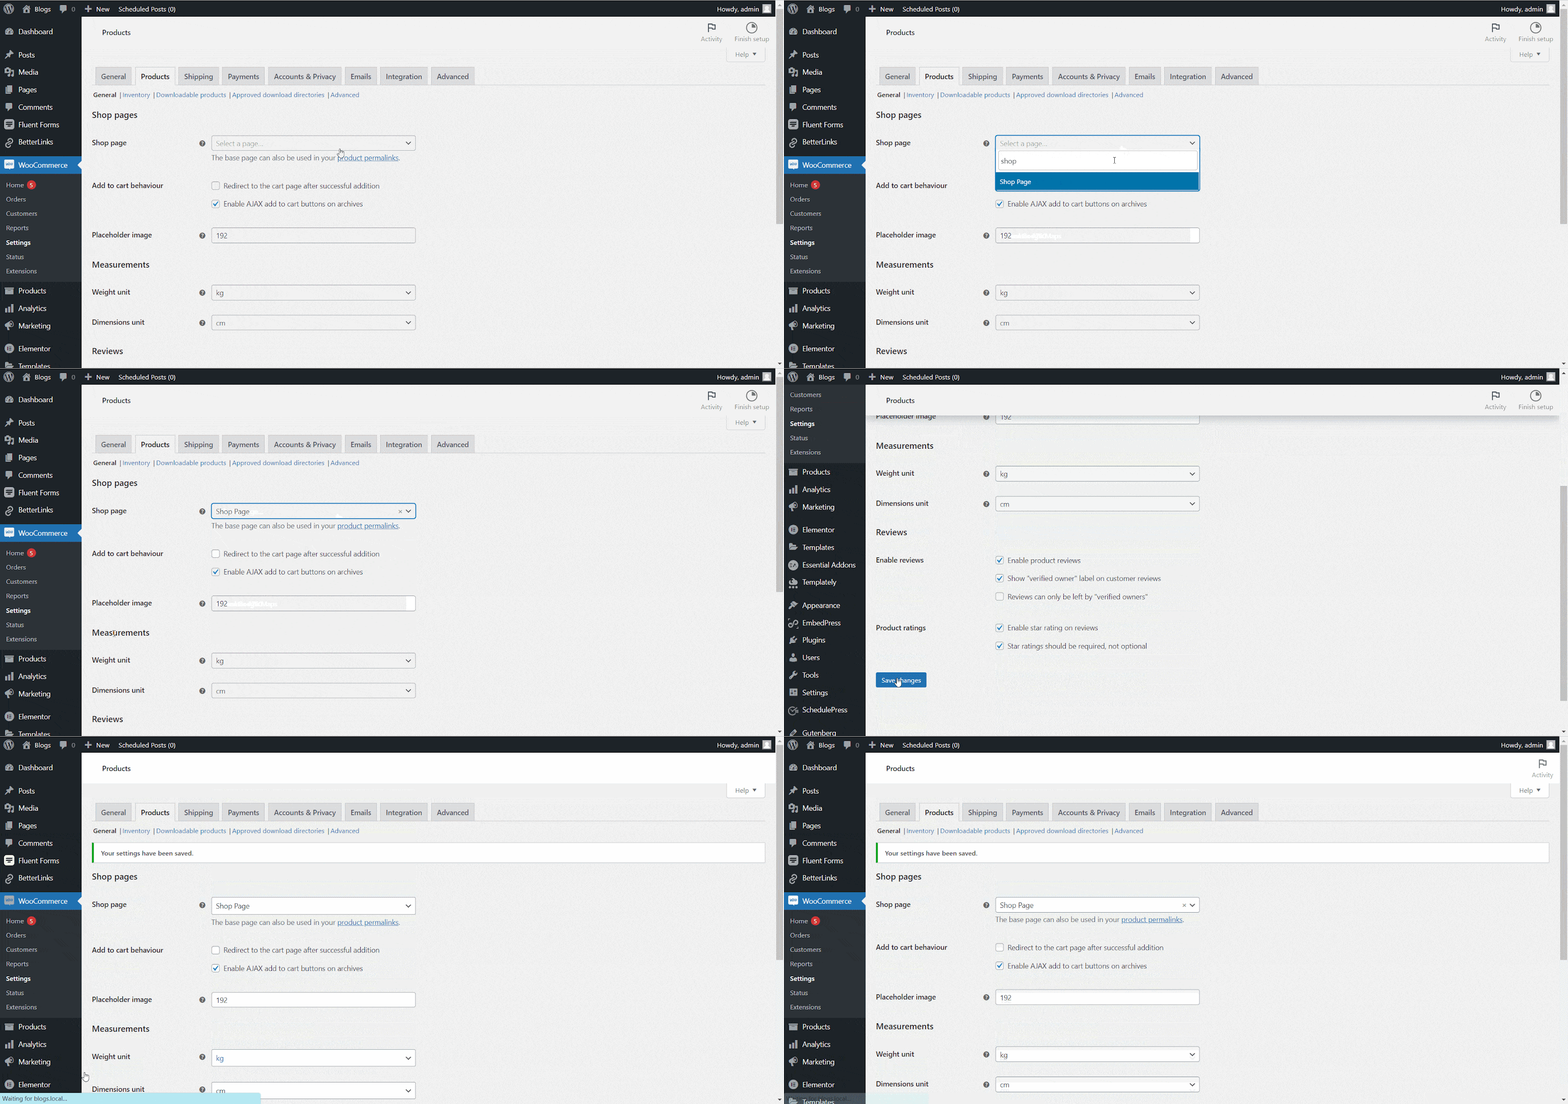
Now, select the page that you have published on the ‘Shop Page’ and then hit the ‘Save Change’ button. And that’s it, your WooCommerce shop page using Templately will be ready. 

HOW TO MAKE A WOOCOMMERCE SHOP PAGE USING WOOCOMMERCE TEMPLATES FROM TEMPLATELY 8

By following these simple steps, you can make a shop page with WooCommerce templates in Templately. 

Feel free to reach out to our dedicated support team in the event of any difficulties, and also if you wish to get updates about Templately, you can join our Facebook community.